Panasonic CF-19CDBAXVM Service Manual - Page 35
Setting up the LCD Hinge
 |
UPC - 092281864785
View all Panasonic CF-19CDBAXVM manuals
Add to My Manuals
Save this manual to your list of manuals |
Page 35 highlights
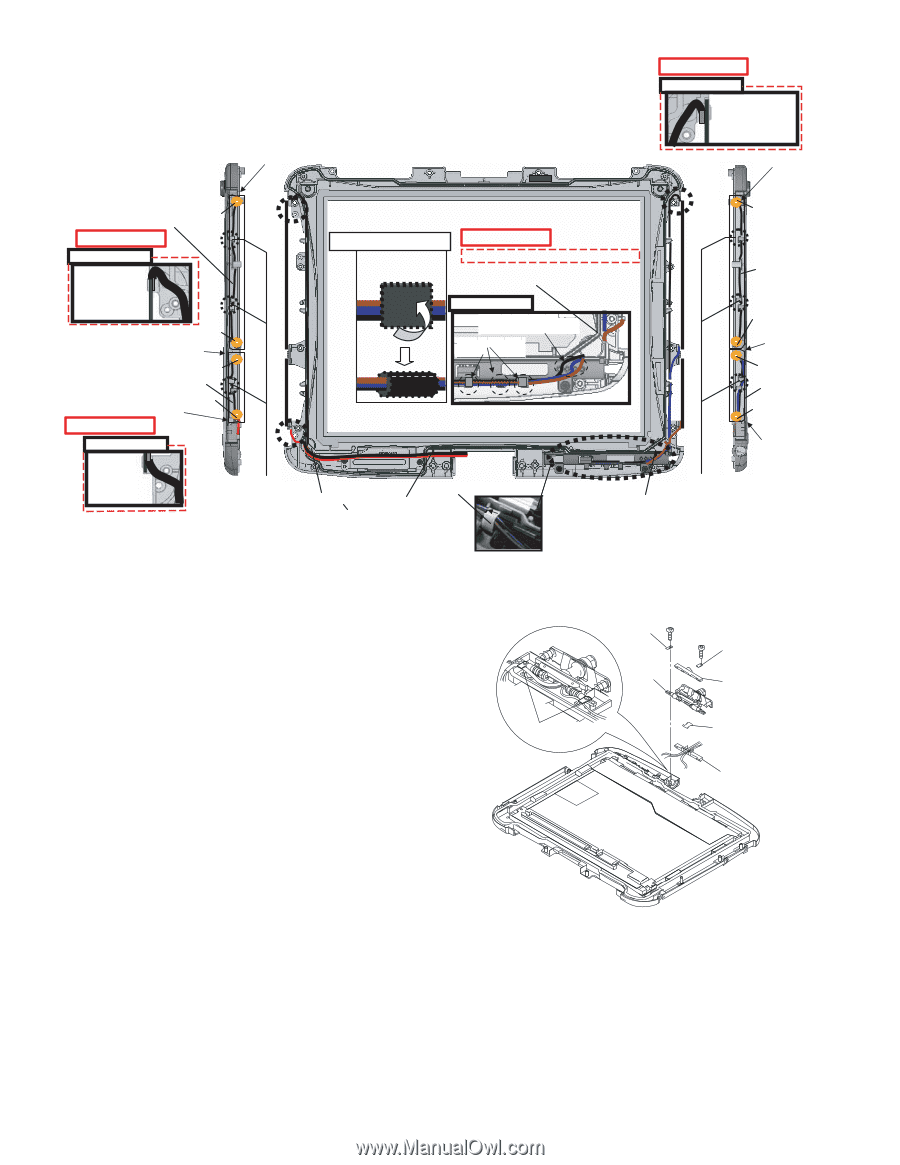
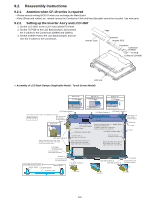
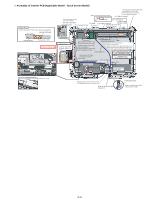
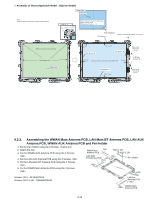
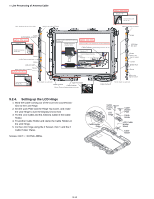
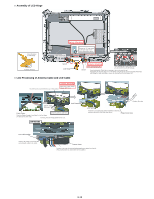
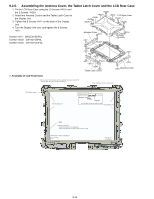
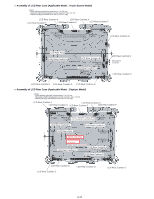
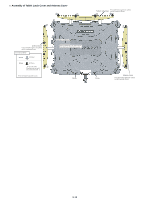
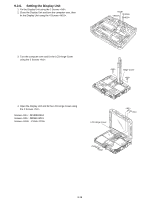
n Line Processing of Antenna Cable Safety Working Details of "B" Avoid running over the rib, etc.. Note: Avoid any stress on the solder. Screw EVDO/EDGE Antenna Safety Working Details of "A" Avoid running over the rib, etc.. Screw Put the Cable on each hook Screw LAN-AUX ANT Screw Match to the edge of Cabinet Safety Working Details of "D" Match to the edge of Cabinet A Cable Cushion Attachment Method (3 Places) Bundle and wind 3 antenna cables. Safety Working Insert it between the wall and the rib after attaching. Cable Cushion Avoid running over the rib, etc.. Details of "D" Insert it between the pins. Hook it. C D Match to the edge of Cabinet B Screw LAN Main /BT ANT Screw Match to the edge of Cabinet Screw EVDO-AUX Screw Match to the edge of Cabinet Avoid running over the rib, etc.. Put the Cable on each hook Cable Cushion Tape Pen Holder Cable Cushion Put the center of Cushion between the ribs. Cable Cushion Put the Cable on each hook 9.2.4. Setting up the LCD Hinge 1. Wind the Cable coming out of the LCD Unit counterclockwise to the LCD Hinge. 2. Set the Lock Plate and the Hinge Top Cover, and rotate the LCD Hinge to turn the Display Unit to front 3. Put the LCD Cable and the Antenna Cable in the Cable Holder. 4. Fit another Cable Holder and clamp the Cable Holders in the LCD Hinge. 5. Fix the LCD Hinge using the 2 Screws and the 2 Cable Holder Plates. Screws : DXYN3+J8FNL Cable Holder Plate Cable Holder Plate Cable Holder LCD Plate Hinge Cable Holder LCD Cable Holder Sheet Cable Holder 9-14
-
 1
1 -
2
-
3
-
4
-
5
-
6
-
7
-
8
-
9
-
10
-
11
-
12
-
13
-
14
-
15
-
16
-
17
-
18
-
19
-
20
-
21
-
22
-
23
-
24
-
25
-
26
-
27
-
28
-
29
-
 30
30 -
 31
31 -
 32
32 -
 33
33 -
 34
34 -
 35
35 -
 36
36 -
 37
37 -
 38
38 -
 39
39 -
 40
40 -
41
-
42
-
43
-
44
-
45
-
46
-
47
-
48
-
49
-
50
-
51
-
52
-
53
-
54
-
55
-
56
-
57
-
58
-
59
-
60
-
61
-
62
-
63
-
64
-
65
-
66
-
67
-
68
-
69
-
70
-
71
-
72
-
73
-
74
-
75
-
76
-
77
-
78
-
79
-
80
-
81
-
82
-
83
-
84
 |
 |