Panasonic PVDM2093 PVDM2093 User Guide - Page 18
Basic Operation, Playback A Tape, Record On A Tape
 |
View all Panasonic PVDM2093 manuals
Add to My Manuals
Save this manual to your list of manuals |
Page 18 highlights
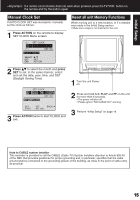
Playback a Tape Record On a Tape Check List Cable or antenna is connected. Power cord is plugged in. 1 Insert a cassette. • The unit power comes on automatically. Record tab To prevent tape jam, remove loose or peeling labels from tapes. 2 Press PLAY* to play a tape. • If tape has no record tab (see page 4), auto play begins. ■ Forward/Reverse scene search ➞Press FF/SLOW+ or REW/SLOW-. ➞Press again or PLAY to release. ■ Still (Freeze) picture ➞Press STILL/PAUSE. ➞Press PLAY to release. ■ Slow Motion picture ➞Press FF/SLOW+ (increases speed) or REW/SLOW- (decreases speed) in Still mode. ➞Press PLAY to release. ■ Frame by Frame picture ➞Press STILL/PAUSE in Still mode. ➞Press PLAY to release. Notes • These features work best in SP or SLP mode. • After the unit is in Still or Slow mode for 3 minutes, it will switch to Stop mode automatically to protect the tape and the video head. ■ Stop ➞ Press STOP ■ Rewind tape ➞ Press REW/SLOW- in Stop mode ■ Fast forward tape ➞ Press FF/SLOW+ in Stop mode ■ Eject tape ➞ Press EJECT on the remote or STOP/EJECT on the unit Operation using unit buttons Insert a tape. PLAY/REPEAT CH REC Press to stop and/or eject tape. REC Indicator 1 Insert a tape with record tab. • The unit power comes on automatically. 2 Press CH or NUMBER keys to select a channel. • For "LINE" input, see bottom of next page. 3 Press SPEED to select recording speed (see page 4). SP = Standard Play LP = Long Play SLP = Super Long Play • Selected speed is displayed. 4 Press REC to start recording. • To edit out unwanted portions, press STILL/PAUSE to pause and resume recording. • You cannot view another channel during recording. ■ Stop ➞ Press STOP ■ One Touch Recording (OTR) [recording in progress] Press REC repeatedly to set Normal Rec 0:30 1:00 the recording 4:00 3:00 2:00 1:30 length (30 min - 4 hours.) • The unit stops recording at a preset time. • PROG TIMER Indicator lights on the unit. Notes • It is not possible to record from DVD/Video CD/CD to VHS tape using this unit. • After the unit has been in Rec Pause mode for 5 minutes, it will stop automatically to protect the tape and the video head. • The remaining recording time of an OTR can be displayed by pressing DISPLAY. EJECT DISPLAY ACTION CH STOP STILL/ PAUSE REW/SLOW- REC NUMBER keys SELECT SET PLAY FF/SLOW+ SPEED 18 For assistance, please call : 1-800-211-PANA(7262) or send e-mail to : [email protected]
-
 1
1 -
2
-
3
-
4
-
5
-
6
-
7
-
8
-
9
-
10
-
11
-
12
-
 13
13 -
 14
14 -
 15
15 -
 16
16 -
 17
17 -
 18
18 -
 19
19 -
 20
20 -
 21
21 -
 22
22 -
 23
23 -
24
-
25
-
26
-
27
-
28
-
29
-
30
-
31
-
32
-
33
-
34
-
35
-
36
-
37
-
38
-
39
-
40
-
41
-
42
-
43
-
44
-
45
-
46
-
47
-
48
-
49
-
50
-
51
-
52
-
53
-
54
-
55
-
56
-
57
-
58
-
59
-
60
-
61
-
62
-
63
-
64
-
65
-
66
-
67
-
68
-
69
-
70
-
71
-
72
-
73
-
74
-
75
-
76
 |
 |
