Panasonic SABT100 Blu-ray Dvd Home Theater Sound System - Page 5
Quick Start Guide, Speaker installation options, Prevent the speakers from falling - volume
 |
View all Panasonic SABT100 manuals
Add to My Manuals
Save this manual to your list of manuals |
Page 5 highlights
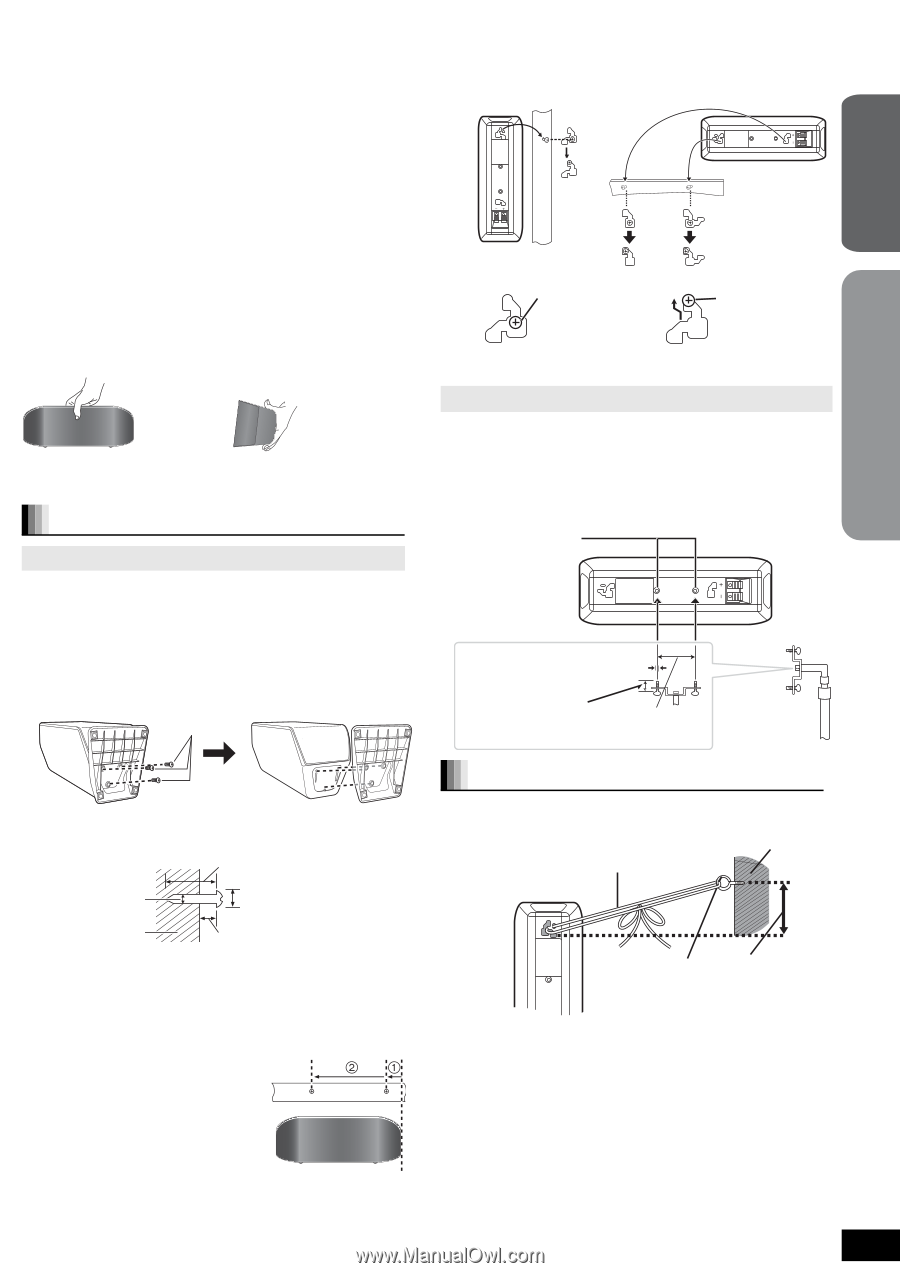
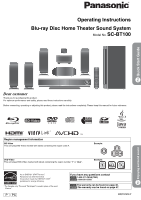
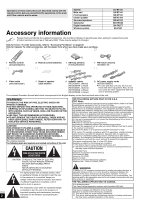
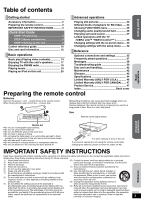
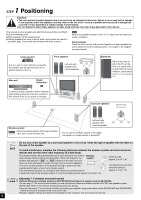
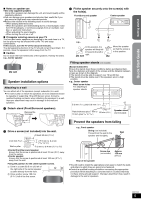
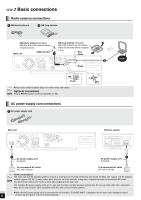
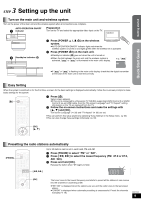
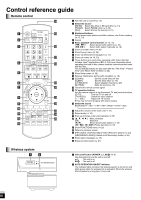
Getting started Quick Start Guide ∫ Notes on speaker use ≥Use only supplied speakers Using other speakers can damage the unit, and sound quality will be negatively affected. ≥You can damage your speakers and shorten their useful life if you play sound at high levels over extended periods. ≥Reduce the volume in the following cases to avoid damage: - When playing distorted sound. - When the speakers are reverberating due to a record player, noise from FM broadcasts, or continuous signals from an oscillator, test disc, or electronic instrument. - When adjusting the sound quality. - When turning the unit on or off. ∫ If irregular coloring occurs on your TV The front and center speakers are designed to be used close to a TV, but the picture may be affected with some TVs and setup combinations. If this occurs, turn the TV off for about 30 minutes. The demagnetizing function of the TV should correct the problem. If it persists, move the speakers further away from the TV. ∫ Caution Do not touch the front netted area of the speakers. Hold by the sides. e.g., Center speaker Do not Do Speaker installation options Attaching to a wall You can attach all of the speakers (except subwoofer) to a wall. ≥The wall or pillar on which the speakers are to be attached should be capable of supporting 10 kg (22 lbs) per screw. Consult a qualified building contractor when attaching the speakers to a wall. Improper attachment may result in damage to the wall and speakers. 1 Detach stand (Front/Surround speakers). Remove the 3 screws 3 Fit the speaker securely onto the screw(s) with the hole(s). Front/Surround speaker Center speaker e.g., In this position, the speaker will likely fall if moved to the left or Do not right. Do Move the speaker so that the screw is in this position. Fitting speaker stands (not included) (Except subwoofer) Ensure the stands meet these conditions before purchasing them. Note the diameter and length of the screws and the distance between screws as shown in the diagram. ≥The stands must be able to support over 10 kg (22 lbs). ≥The stands must be stable even if the speakers are in a high position. e.g., Center speaker Metal screw holes For attaching to speaker stands 5.0 mm (3/16q), pitch 0.8 mm (1/32q) Plate thickness plus 7 mm to 60 mm (23/8q) 10 mm (plus 9/32q to 13/32q) Speaker stand (not included) 2 Drive a screw (not included) into the wall. At least 30 mm (13/16q) ‰4.0 mm (5/32q) ‰7.5 mm to 9.4 mm (19/64q to 3/8q) Wall or pillar 7.0 mm to 9.4 mm (9/32q to 3/8q) ≥Center/Front/Surround speaker Ensure that the screw is positioned at least 70 mm (23/4q) away from the ceiling. ≥Center speaker Ensure that the screw is positioned at least 100 mm (315/16q) away from the wall. Fixing the position for the center speaker screws. 1 Drive in a screw 50.5 mm (2q) left of the right side of the center speaker as seen directly from the front. 2 Drive another screw 160 mm (6 5/16q) left of the first screw. Prevent the speakers from falling e.g., Front speaker String (not included) Thread from the wall to the speaker and tie tightly. Wall Screw eye (not included) Approx. 150 mm (529/32z) Rear of the speaker ≥You will need to obtain the appropriate screw eyes to match the walls and pillars to which they are going to be fastened. ≥Consult a qualified housing contractor concerning the appropriate procedure when attaching to a concrete wall or a surface that may not have strong enough support. Improper attachment may result in damage to the wall or speakers. RQT9129 5
-
 1
1 -
 2
2 -
 3
3 -
 4
4 -
 5
5 -
 6
6 -
 7
7 -
 8
8 -
 9
9 -
 10
10 -
 11
11 -
12
-
13
-
14
-
15
-
16
-
17
-
18
-
19
-
20
-
21
-
22
-
23
-
24
-
25
-
26
-
27
-
28
-
29
-
30
-
31
-
32
-
33
-
34
-
35
-
36
-
37
-
38
-
39
-
40
-
41
-
42
-
43
-
44
-
45
-
46
-
47
-
48
 |
 |