Panasonic SDC615 AJSDC615 User Guide - Page 69
Attaching the rain cover, Connecting the extension control, unit AJ-EC3P, Attaching the FRONT
 |
UPC - 791871302699
View all Panasonic SDC615 manuals
Add to My Manuals
Save this manual to your list of manuals |
Page 69 highlights
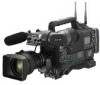
Chapter 5 Preparation 5-8 Attaching the rain cover Example showing use of the SHAN-RC700 rain cover Tighten the cord. Close using the fastener. Close using the fastener. 5-9 Connecting the extension control unit (AJ-EC3P) By connecting the AJ-EC3P extension control unit (optional accessory), some of the functions can be operated by remote control. When the AJ-EC3P is connected and the POWER switches on the unit and AJ-EC3P are set to ON, the unit is automatically set to the remote control mode. Dedicated cable ≥ Before connecting or disconnecting the dedicated cable, be absolutely sure to set the POWER switches on the unit and the AJ-EC3P to OFF. ≥ If the ECU DATA SAVE item on the screen is set to OFF, the camera related settings among the adjustments and settings performed using the AJ-EC3P will be erased when the unit's POWER switch is set to OFF. In addition, it will not be possible to write this data to the setup card. It is however possible for the menu content settings to be written on the setup card. 5 When the unit is connected once again to the AJ-EC3P, the settings of the AJ-EC3P are restored. ≥ When ON has been selected as the ECU DATA SAVE item setting on the screen, the adjustments and settings performed using the AJ-EC3P will not be erased even when the unit's POWER switch is set to the OFF position. ≥The unit's USER switch does not function when the AJEC3P is connected. ≥ When the AJ-EC3P is used to control the unit's shutter, the shutter speed settings on the unit's menu are used rather than the shutter speeds engraved on the AJ-EC3P. The correspondence between the shutter speed indications on the AJ-EC3P and the unit's shutter speed settings are shown in the table below. AJ-EC3P shutter speed indication 100 (60) 120 250 500 1000 2000 Unit shutter speed setting POSITION1 POSITION2 POSITION3 POSITION4 POSITION5 POSITION6 5-10 Attaching the FRONT AUDIO LEVEL control knob When the FRONT AUDIO LEVEL control is to be operated frequently, the accessory knob can be attached to make it easier to operate the control. FRONT AUDIO LEVEL control Knob (accessory) AJ- 6 5 ∫ 1 Index 5 Screw marks Screw (accessory) ECU connector AJ-EC3P Remove the screw at the center of the FRONT AUDIO LEVEL control, and secure the accessory knob to the control and unit behind using the same screw (accessory). Make sure that the index mark on the knob side is aligned with the index mark on the control side. 69
-
 1
1 -
2
-
3
-
4
-
5
-
6
-
7
-
8
-
9
-
10
-
11
-
12
-
13
-
14
-
15
-
16
-
17
-
18
-
19
-
20
-
21
-
22
-
23
-
24
-
25
-
26
-
27
-
28
-
29
-
30
-
31
-
32
-
33
-
34
-
35
-
36
-
37
-
38
-
39
-
40
-
41
-
42
-
43
-
44
-
45
-
46
-
47
-
48
-
49
-
50
-
51
-
52
-
53
-
54
-
55
-
56
-
57
-
58
-
59
-
60
-
61
-
62
-
63
-
 64
64 -
 65
65 -
 66
66 -
 67
67 -
 68
68 -
 69
69 -
 70
70 -
 71
71 -
 72
72 -
 73
73 -
 74
74 -
75
-
76
-
77
-
78
-
79
-
80
-
81
-
82
-
83
-
84
-
85
-
86
-
87
-
88
-
89
-
90
-
91
-
92
-
93
-
94
-
95
-
96
-
97
-
98
-
99
-
100
-
101
-
102
-
103
-
104
-
105
-
106
-
107
-
108
 |
 |
