Panasonic SDC615 AJSDC615 User Guide - Page 9
Audio function input system - aj manual
 |
UPC - 791871302699
View all Panasonic SDC615 manuals
Add to My Manuals
Save this manual to your list of manuals |
Page 9 highlights
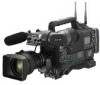
Chapter 2 Parts and their functions 2-2 Audio function section (input system) = ; : 3 7 2 2 6 1 8? 4 ? @ 59 1 MIC IN (microphone input) jack (XLR, 3-pin) Connect the microphone (optional accessory) here. The power for the microphone is supplied from this jack. 2 AUDIO LEVEL CH1/CH2 (audio channel 1 & 2 recording level adjustment) controls When the AUDIO SELECT CH1/CH2 switch 3 is set to MAN, the recording level of audio channels 1 and 2 can be adjusted using these controls. The controls come with a locking mechanism. Therefore, to adjust the recording level, simultaneously push in and turn the controls. 3 AUDIO SELECT CH1/CH2 (audio channel 1 & 2 automatic/manual level adjustment selector) switch This is used to select the method for adjusting the recording levels of audio channels 1 and 2. AUTO : Set here for automatic adjustment. MAN : Set here for manual adjustment. 4 AUDIO IN (audio input selector) switch These are used to select the input signals to be recorded on audio channels 1 and 2. FRONT : The input signals supplied from the microphone which has been connected to the MIC IN jack 1 are recorded. W.L. (wireless) : The input signals from the slot-in wireless microphone receiver are recorded. REAR : The audio input signals supplied from the audio component which has been connected to the AUDIO IN CH1/CH2 connectors 5 are recorded. The mixed signals of audio channels 1 and 2 are output to the remote control unit (AJ-RC905). The signals are output now as is without the adjustment of their level, etc. 5 AUDIO IN CH1/CH2 (audio input channel 1 & 2) connectors (XLR, 3-pin) An audio component or microphones are connected here. 6 LINE/MIC/+48V (line input/mic input/mic input + 48V) selector switch This is used to switch the audio input signals from the audio component which has been connected to the AUDIO IN CH1/CH2 connectors 5. LINE : The audio input signals from the audio component serving as the line input are selected. MIC : The audio input signals from the internal power supply type of microphone are selected. (The phantom mic power is not supplied from the unit.) +48V : The audio input signals from the external power supply type of microphone are selected. (The phantom mic power is supplied from the unit.) 7 Wireless receiver slot The UniSlot ® wireless receiver (optional accessory) can be attached here. 8 FRONT AUDIO LEVEL (audio recording level adjustment) control This enables the recording level of audio channels 1 and 2 to be adjusted. This level can be adjusted regardless of the setting position of the AUDIO SELECT switch. When the screen is opened from the VTR MENU page by performing a menu operation, whether to enable or disable the operation of this level control can be set using the FRONT VR CH1 and FRONT VR CH2 setting items. SDC905 O The same signals as for CH1 are recorded on audio track CH3. Similarly, the same signals as for CH2 are recorded on audio track CH4. O The signals are recorded on two channels (CH1 and CH2) when the DVCPRO format (25 Mbps) is set. 9
-
 1
1 -
2
-
3
-
 4
4 -
 5
5 -
 6
6 -
 7
7 -
 8
8 -
 9
9 -
 10
10 -
 11
11 -
 12
12 -
 13
13 -
 14
14 -
15
-
16
-
17
-
18
-
19
-
20
-
21
-
22
-
23
-
24
-
25
-
26
-
27
-
28
-
29
-
30
-
31
-
32
-
33
-
34
-
35
-
36
-
37
-
38
-
39
-
40
-
41
-
42
-
43
-
44
-
45
-
46
-
47
-
48
-
49
-
50
-
51
-
52
-
53
-
54
-
55
-
56
-
57
-
58
-
59
-
60
-
61
-
62
-
63
-
64
-
65
-
66
-
67
-
68
-
69
-
70
-
71
-
72
-
73
-
74
-
75
-
76
-
77
-
78
-
79
-
80
-
81
-
82
-
83
-
84
-
85
-
86
-
87
-
88
-
89
-
90
-
91
-
92
-
93
-
94
-
95
-
96
-
97
-
98
-
99
-
100
-
101
-
102
-
103
-
104
-
105
-
106
-
107
-
108
 |
 |
