Pfaff creative 2124 Owner's Manual - Page 39
Embroidery box overview, Attaching the embroidery foot - smart card
 |
View all Pfaff creative 2124 manuals
Add to My Manuals
Save this manual to your list of manuals |
Page 39 highlights
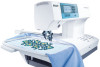
Embroidery Embroidery box overview The embroidery unit will be delivered together with four clips, the embroidery foot, the hoop (225x140), the 300 s- creative smart card and the booklet. S T 1. 2. Attaching the embroidery foot 1. Remove the standard presser foot. Carefully loosen the screw (S) until the crosshole (T) is accessible. 2. Squeeze the embroidery foot gently together and guide the pin of the foot into the cross hole of the presser foot holder as 3. far as it will go. 3. Tighten the screw (S). To remove the embroidery foot loosen the screw (S), squeeze the embroidery foot together and pull it out to the right. Tighten the screw (S). 3:3
-
 1
1 -
2
-
3
-
4
-
5
-
6
-
7
-
8
-
9
-
10
-
11
-
12
-
13
-
14
-
15
-
16
-
17
-
18
-
19
-
20
-
21
-
22
-
23
-
24
-
25
-
26
-
27
-
28
-
29
-
30
-
31
-
32
-
33
-
 34
34 -
 35
35 -
 36
36 -
 37
37 -
 38
38 -
 39
39 -
 40
40 -
 41
41 -
 42
42 -
 43
43 -
 44
44 -
45
-
46
-
47
-
48
-
49
-
50
-
51
-
52
-
53
-
54
-
55
-
56
-
57
-
58
-
59
-
60
-
61
-
62
-
63
-
64
-
65
-
66
-
67
-
68
-
69
-
70
-
71
-
72
-
73
-
74
-
75
-
76
-
77
-
78
-
79
-
80
-
81
-
82
-
83
-
84
-
85
-
86
-
87
-
88
-
89
-
90
-
91
-
92
-
93
-
94
-
95
-
96
-
97
 |
 |

2.
3.
1.
S
T
Embroidery
3:3
Embroidery box overview
The embroidery unit will be delivered together
with four clips, the embroidery foot, the hoop
(225x140), the 300 s- creative smart card and
the booklet.
Attaching the embroidery foot
1.
Remove the standard presser foot. Care-
fully loosen the screw (S) until the cross-
hole (T) is accessible.
2.
Squeeze the embroidery foot gently
together and guide the pin of the foot into
the cross hole of the presser foot holder as
far as it will go.
3.
Tighten the screw (S).
To remove the embroidery foot loosen the screw
(S), squeeze the embroidery foot together and
pull it out to the right. Tighten the screw (S).