Pfaff creative 2124 Owner's Manual - Page 40
Attach the embroidery unit, Remove the embroidery unit
 |
View all Pfaff creative 2124 manuals
Add to My Manuals
Save this manual to your list of manuals |
Page 40 highlights
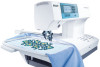
Attach the embroidery unit Switch off the main switch. The connecting socket (A) for the embroidery unit is found on the back side of the sewing machine. Push the embroidery unit parallel from the back to the front into the socket. A Make sure that the under arm guide (A) on the embroidery unit is placed between the base plate and the free arm, and pushed in as far as it will go. The embroidery unit will be flush with the machine. A Remove the embroidery unit Switch off the main switch. Press release lever (A) and remove the embroidery unit with a backward movement, holding it parallel to the machine. Note: Make sure that you have removed the hoop and placed the embroidery arm in the right position, before removing the embroidery unit. A 3:4
-
 1
1 -
2
-
3
-
4
-
5
-
6
-
7
-
8
-
9
-
10
-
11
-
12
-
13
-
14
-
15
-
16
-
17
-
18
-
19
-
20
-
21
-
22
-
23
-
24
-
25
-
26
-
27
-
28
-
29
-
30
-
31
-
32
-
33
-
34
-
 35
35 -
 36
36 -
 37
37 -
 38
38 -
 39
39 -
 40
40 -
 41
41 -
 42
42 -
 43
43 -
 44
44 -
 45
45 -
46
-
47
-
48
-
49
-
50
-
51
-
52
-
53
-
54
-
55
-
56
-
57
-
58
-
59
-
60
-
61
-
62
-
63
-
64
-
65
-
66
-
67
-
68
-
69
-
70
-
71
-
72
-
73
-
74
-
75
-
76
-
77
-
78
-
79
-
80
-
81
-
82
-
83
-
84
-
85
-
86
-
87
-
88
-
89
-
90
-
91
-
92
-
93
-
94
-
95
-
96
-
97
 |
 |
