Pfaff creative 7510 Owner's Manual - Page 140
elimination
 |
View all Pfaff creative 7510 manuals
Add to My Manuals
Save this manual to your list of manuals |
Page 140 highlights
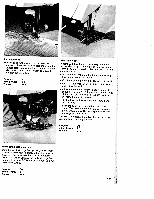
Sewing faults and their elimination Cause: 1. The machine skips stitches Needle is not properly attached. A wrong needle has been attached. Needle is bent or blunt Machine is not properly threaded. Needle is too small for thread. 2. The needle thread breaks See 1. Thread tension is too tight Thread is poor or has slubs in it or it has become dry after too long in storage. Thread is too thick Elimination: Push needle fully upwards, flat side to the back Use needle system 130/705 H. Attach a new needle. Check the threading paths. Use a larger needle. See 1. Adjust thread tension. Only use quality threads. Use a needle with a larger eye (System 1 30 N). 3. Needle breaks off Needle not pushed in fully. Needle is bent Needle is too thick or too thin. Needle is bent and hits the needle plate because you are pulling or pushing the fabric. The bobbin case is not properly inserted. 4. Seam is sewn unevenly The tension needs adjusting. Thread is too thick, slubbed or hard. The bobbin thread is unevenly wound. Thread loops above or below stitches. Attach new needle and push it fully in. Attach new needle. See needle chart (Pages 1 32/1 33). Let the machine feed the fabric. Only guide the fabric lightly. Push the bobbin case in fully when inserting it Check needle-thread and bobbin-thread tensions. Use only quality threads. Do not wind free-hand. Run the thread through the primary tension. Thread up correctly. Check needle-thread and bobbin-thread tensions. 5. The machine does not feed or feeds irregularly Sewing lint has collected between the feed dog teeth rows. Feed dog is lowered. Slide C (see page 31) is at right Remove needle plate, remove lint with brush. Push slide C (see page 31) to the left 6. Machine binds Loose threads in the hook race: Remove loose thread and apply one drop of oil to the hook 7. Machine does not sew the entered program Switch off the machine and back on again after about 1 0 seconds. Enter desired program again. Important notes: Before changing the sewing feet or needles, you must switch off the on/off switch. Do not start the threaded machine without fabric in it If you leave the machine unattended, even for a short time, do not forget to switch off the on/off switch. This is especially important when children are nearby. 1 1 L 1 C' U [j 1i ii 1.-I [ 136
-
 1
1 -
2
-
3
-
4
-
5
-
6
-
7
-
8
-
9
-
10
-
11
-
12
-
13
-
14
-
15
-
16
-
17
-
18
-
19
-
20
-
21
-
22
-
23
-
24
-
25
-
26
-
27
-
28
-
29
-
30
-
31
-
32
-
33
-
34
-
35
-
36
-
37
-
38
-
39
-
40
-
41
-
42
-
43
-
44
-
45
-
46
-
47
-
48
-
49
-
50
-
51
-
52
-
53
-
54
-
55
-
56
-
57
-
58
-
59
-
60
-
61
-
62
-
63
-
64
-
65
-
66
-
67
-
68
-
69
-
70
-
71
-
72
-
73
-
74
-
75
-
76
-
77
-
78
-
79
-
80
-
81
-
82
-
83
-
84
-
85
-
86
-
87
-
88
-
89
-
90
-
91
-
92
-
93
-
94
-
95
-
96
-
97
-
98
-
99
-
100
-
101
-
102
-
103
-
104
-
105
-
106
-
107
-
108
-
109
-
110
-
111
-
112
-
113
-
114
-
115
-
116
-
117
-
118
-
119
-
120
-
121
-
122
-
123
-
124
-
125
-
126
-
127
-
128
-
129
-
130
-
131
-
132
-
133
-
134
-
 135
135 -
 136
136 -
 137
137 -
 138
138 -
 139
139 -
 140
140 -
 141
141 -
 142
142
 |
 |
