Pfaff creative 7510 Owner's Manual - Page 94
Pfaff creative 7510 Manual
 |
View all Pfaff creative 7510 manuals
Add to My Manuals
Save this manual to your list of manuals |
Page 94 highlights
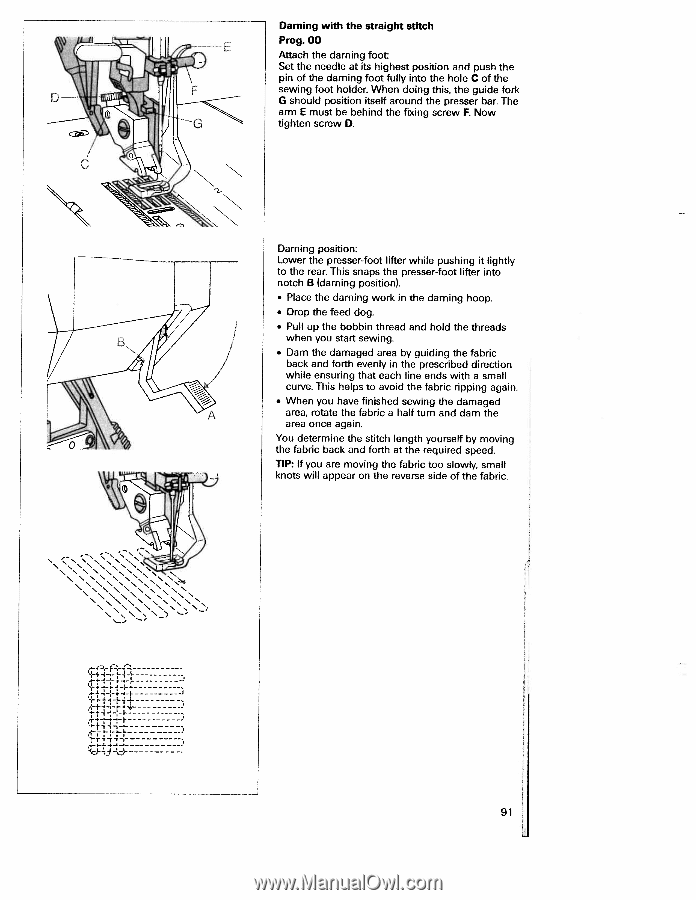
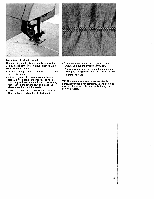
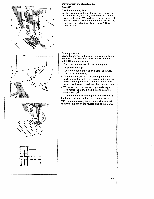
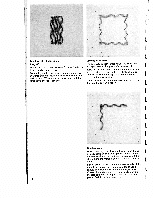
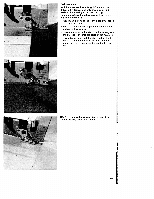
Darning with the straight stitch Prog. 00 Attach the darning foot Set the needle at its highest position and push the pin of the darning foot fully into the hole C of the sewing foot holder. When doing this, the guide fork G should position itself around the presser bar. The arm E must be behind the fixing screw F. Now tighten screw D. Darning position: Lower the presser-toot lifter while pushing it lightly to the rear. This snaps the presser-toot lifter into notch B (darning position>. • Place the darning work in the darning hoop. • Drop the teed dog. • Pull up the bobbin thread and hold the threads when you start sewing. • Darn the damaged area by guiding the fabric back and forth evenly in the prescribed direction while ensuring that each line ends with a small curve. This helps to avoid the fabric ripping again. • When you have finished sewing the damaged area, rotate the fabric a half turn and darn the area once again. You determine the stitch length yourself by moving the fabric back and forth at the required speed. TIP: If you are moving the fabric too slowly, small knots will appear on the reverse side of the fabric. 91
-
 1
1 -
2
-
3
-
4
-
5
-
6
-
7
-
8
-
9
-
10
-
11
-
12
-
13
-
14
-
15
-
16
-
17
-
18
-
19
-
20
-
21
-
22
-
23
-
24
-
25
-
26
-
27
-
28
-
29
-
30
-
31
-
32
-
33
-
34
-
35
-
36
-
37
-
38
-
39
-
40
-
41
-
42
-
43
-
44
-
45
-
46
-
47
-
48
-
49
-
50
-
51
-
52
-
53
-
54
-
55
-
56
-
57
-
58
-
59
-
60
-
61
-
62
-
63
-
64
-
65
-
66
-
67
-
68
-
69
-
70
-
71
-
72
-
73
-
74
-
75
-
76
-
77
-
78
-
79
-
80
-
81
-
82
-
83
-
84
-
85
-
86
-
87
-
88
-
 89
89 -
 90
90 -
 91
91 -
 92
92 -
 93
93 -
 94
94 -
 95
95 -
 96
96 -
 97
97 -
 98
98 -
 99
99 -
100
-
101
-
102
-
103
-
104
-
105
-
106
-
107
-
108
-
109
-
110
-
111
-
112
-
113
-
114
-
115
-
116
-
117
-
118
-
119
-
120
-
121
-
122
-
123
-
124
-
125
-
126
-
127
-
128
-
129
-
130
-
131
-
132
-
133
-
134
-
135
-
136
-
137
-
138
-
139
-
140
-
141
-
142
 |
 |