Philips CD4552B User manual
Philips CD4552B Manual
 |
UPC - 609585144972
View all Philips CD4552B manuals
Add to My Manuals
Save this manual to your list of manuals |
Philips CD4552B manual content summary:
- Philips CD4552B | User manual - Page 1
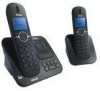
Register your product and get support at www.philips.com/welcome CD 455 SE 455 To insert with US Telephone Answering Machine ! Warning Use only rechargeable batteries. Charge the handset for 24 hours before use. - Philips CD4552B | User manual - Page 2
- Philips CD4552B | User manual - Page 3
Table of contents 1 Important Safety Instructions 4.8 4 2 Important 4.9 6 2.1 Power requirements 65 2.2 Conformity 7 5.1 2.3 Environmental What is standby mode? 17 8.2 4.7 Checking the signal strength 17 Table of contents Switching your handset ON/OFF 17 Menu structure 18 Call 22 - Philips CD4552B | User manual - Page 4
barring 36 before returning a call 31 12.6 Area code management 37 9.3 Returning a call 31 12.7 Auto prefix 37 9.4 Saving a call record to your phonebook 31 12.8 First ring 38 9.5 Deleting a call record 32 13 Network Services 39 9.6 Deleting all call records 32 13.1 Call forward - Philips CD4552B | User manual - Page 5
handset(s) 15 The System 43 19 Frequently asked questions 53 44 15.1 Registering handset(s) 44 20 Appendix 55 15.2 Un-registering a handset Equipment 58 16.9 Setting the ring delay 49 16.10 Remote access 50 17 Default (pre-programmed) settings 51 20.13 Do not attempt to repair or - Philips CD4552B | User manual - Page 6
locations. 16. Use caution when installing or modifying telephone lines to prevent electrical shock and/or fire. 17. Unplug this product from the wall outlet and refer servicing to qualified service personnel under the following conditions: A. When the power supply cord or plug is damaged or frayed - Philips CD4552B | User manual - Page 7
OBSERVED: 1. Use only the type and size of battery(ies) specified in the user manual. 2. Do not dispose of the battery(ies) in fire. They may explode. Check with local codes for possible special disposal instructions. 3. Do not open or mutilate the battery(ies). Released electrolyte is corrosive and - Philips CD4552B | User manual - Page 8
. Alternative arrangements should be made for access to emergency services. 2.1 Power requirements • This product requires an electrical supply from the power supply and telephone socket during a storm. • Do not use the handset in an explosive hazard area such as where there is gas leaking. • It is - Philips CD4552B | User manual - Page 9
may be retained if placed near or on the handset receiver. 2.2 Conformity We, Philips declare that the product is in compliance with the disposal Disposal instructions for batteries: Batteries should not be disposed of with general household waste. Packaging information: Philips has marked - Philips CD4552B | User manual - Page 10
and to stay well within the EMF standards applicable at the time of producing the products. 3. Philips is committed to develop, produce and market products that cause no adverse health effects. 4. Philips confirms that if its products are handled properly for their intended use, they are safe to use - Philips CD4552B | User manual - Page 11
benefit from the support that Philips offers, register your product at www.philips.com/welcome. 3.1 What's in the box Base station with Bracket Handset Battery door Belt clip Power supply NiMH AAA Rechargeable Batteries x 2 Line Cord* User Manual Guarantee Quick start guide Note *The line - Philips CD4552B | User manual - Page 12
signal E End /On/Off key End call Exit menu / operation m Turn handset on/off F Menu key d Access main menu G Phonebook/Down key Scroll down Keylock/Format key Dial * Lock / unlock keypad # Edit caller's number in call log review L Ringer Off/Pause key Dial # and enter pause Turn ringer on / off M - Philips CD4552B | User manual - Page 13
E Previous key p Skip backward during playback F Play/Stop key Play messages s Stop message playback G Next key V Skip forward during playback H Handset locator key Locate handset(s) Enter registration mode I Message counter Display message number Display answering machine operation Your phone 11 - Philips CD4552B | User manual - Page 14
you a visual message of what is happening on your handset. Battery is fully charged Battery is fully discharged Signal The main menu includes the Phonebook, Personal Set, Clock & Alarm, Advanced Set, Network Service and Answering Machine menus. From standby mode, you can, m • Press to enter the - Philips CD4552B | User manual - Page 15
the main adapter to a standard wall outlet. 4.2.1 Wall mounting the base (CD455) The base is designed to support wall mounting. To wall mount the base, follow the instructions below. ! Warning Other wall mounting methods are not recommended and may damage the product. 1 Remove the bracket from - Philips CD4552B | User manual - Page 16
base with a standard wall phone mounting jack. 4.2.2 Wall mounting the base (SE455) The base is designed to support wall mounting. To wall mount the base, follow the instructions below. ! Warning Other wall mounting methods are not recommended and may damage the product. 1 Remove the bracket from - Philips CD4552B | User manual - Page 17
the back of the base station. 4 Align the mounting holes on the back of the base with a standard wall phone mounting jack. 4.3 Install your handset ! Warning RISK OF EXPLOSION IF BATTERY IS REPLACED BY AN INCORRECT TYPE. Never use non-rechargeable batteries. Use recommended type supplied with this - Philips CD4552B | User manual - Page 18
the clock Your phone has a digital clock. Set the clock before initial use of the phone. 2 Slide the battery door firmly into place. 3 Place the handset on the base. m 4.5.1 Setting the date and time 1 Press . 2 Select CLOCK & ALARM > SET DATE/TIME. Press OK. 3 Use the digit keys to enter the date - Philips CD4552B | User manual - Page 19
between your handset and the base station. A steady icon means your handset and the base station are linked. A flashing icon means your handset and the will hear warning tones notifying you that your handset is almost out of range - lost link. Take your handset closer to the base station or your - Philips CD4552B | User manual - Page 20
keys to navigate within the menus. PHONEBOOK PERSONAL SET NEW ENTRY LIST EDIT ENTRY SELECT MELODY DELETE ENTRY DELETE ALL DIRECT MEMORY HANDSET NAME HANDSET TONES RING VOLUME RING TONES KEY BEEP 18 LEVEL 1 LEVEL 2 LEVEL 3 LEVEL 4 LEVEL 5 PROGRESSIVE OFF RING 1 RING 2 BUZZER BELL 1 BELL 2 MAPLE - Philips CD4552B | User manual - Page 21
NUMBER CONFERENCE ON/OFF CALL BARRING ENTER PIN MODE NUMBER XHD SOUND ON/OFF CHANGE PIN OLD PIN NEW PIN REGISTER UNREGISTER List of handsets RESET AREA CODE* AUTO PREFIX DETECT DIGIT PREFIX FLASH TIME SHORT/MEDIUM/LONG DIAL MODE* TONE/PULSE FIRST RING ON/OFF *This menu item - Philips CD4552B | User manual - Page 22
NETW. SERVICES CALL FORWARD ACTIVATE DEACTIVATE CHANGE CODES CALL FWD BUSY ACTIVATE DEACTIVATE CHANGE CODES CALL FWD UNANS ACTIVATE DEACTIVATE CHANGE CODES VOICEMAIL VOICEMAIL 2 INFO 1 INFO 2 CALL - Philips CD4552B | User manual - Page 23
ANSWER MACHINE PLAY DELETE ALL ANSWER ON/OFF RECORD OGM ON/OFF ANSWER & REC. ANSWER ONLY ANSWER MODE SETTINGS ANSWER & REC. ANSWER ONLY RING DELAY REMOTE ACCESS HS SCREENING VOICE LANGUAGE* CALL LOG CALL LIST SAVE NUMBER DELETE DELETE ALL ANSWER MACHINE REDIAL LIST SAVE NUMBER - Philips CD4552B | User manual - Page 24
be made for access to emergency services. 5.1 Making a call This For details, see "Checking the signal strength" r on page 17. 1 Press . 2 Dial the phone number. The number displays you will hear warning tones if your handset is almost out of battery. Charge your handset or your call may soon be - Philips CD4552B | User manual - Page 25
is not too close to your ear. Note Caller ID Service. Subscribe from your service provider. Tip Missed Call Alert. When a call is missed, your handset displays a notification message. The handset's LED and icon also flash. "Personalizing your phone's sounds" on page 34. Tip e Silent Ringer - Philips CD4552B | User manual - Page 26
the 2nd call. The number displays on the screen and is dialed out. Note Conference. The conference feature may require additional charges from your service provider. To start a conference call, while connected to two external calls, you can press OK, select CONFERENCE, and then press OK again. You - Philips CD4552B | User manual - Page 27
The outside call is now transferred to the other handset. 6.3 Making a conference call A 3-way conference call is a call between you, outside caller(s), and another handset user in your house. Note A 3-way conference call requires 2 handsets that share the same base station. i During an external - Philips CD4552B | User manual - Page 28
. 5 Press to end the conference call. Tip Auto Conference. You can join an ongoing r external call with another handset by pressing . See "Activating/ Deactivating auto conference" on page 36. i During the conference call, 1 Press to put the external call on hold and go back - Philips CD4552B | User manual - Page 29
7 Text and Numbers You can enter text and numbers for handset name, phonebook records, and other menu items. 7.1 Entering text and numbers 1 Find the key with the character you want. 2 Press it as many times as - Philips CD4552B | User manual - Page 30
. Each record can have a name up to 14 characters long and a number up to 24 digits long. 8.1 Viewing the phonebook Note Only one handset can view the d phonebook at one time. 1 Press . > 2 Select the contact you want to view. 3 Press to view the details of a record (name, number, VIP - Philips CD4552B | User manual - Page 31
all records 1 Press . 2 Select PHONEBOOK > DELETE ALL. Press OK. • The handset displays a confirmation request. 3 Press OK to confirm. • All records are deleted. key 2 may be preset to the voice mail number and information service number of your network operator respectively. In this case, key 1 - Philips CD4552B | User manual - Page 32
MEMORY. Press OK. 3 Select the quick dial key you want to cancel. Press OK. 4 Select DELETE to cancel the quick dial key. Press OK. • The handset displays a confirmation request. 5 Press OK to confirm. • The quick dial key is cancelled. 30 Phonebook - Philips CD4552B | User manual - Page 33
time and date. This feature is available if you have registered to the Caller ID service (CLI) with your service provider. Your phone can store up to 50 call records. The call log icon and the handset LED will blink to remind you of any unanswered calls received. If the identity of the - Philips CD4552B | User manual - Page 34
Deleting a call record 1 Enter the call list. 2 Select the record you want while browsing the log. Press OK. 3 Select DELETE. Press OK. • The handset displays a confirmation request. 4 Press OK to confirm. • The record is deleted. 9.6 Deleting all call records 1 Enter the call list. 2 Press OK to - Philips CD4552B | User manual - Page 35
redial records 1 Enter the redial list. 2 Press OK to enter the options menu while browsing the list. 3 Select DELETE ALL. Press OK. • The handset displays a confirmation request. 4 Press OK to confirm. • All records are deleted. 10.2 Redialing a call To call from the redial list, see "Calling from - Philips CD4552B | User manual - Page 36
on the m screen in standby. 1 Press . 2 Select PERSONAL SET > HANDSET NAME. Press OK. 3 Enter or edit the name. Use BACK to make corrections display language This feature only applies to model(s) with multiple-language support. Note Available languages for selection vary with m different countries. - Philips CD4552B | User manual - Page 37
> XHD SOUND. Press OK. 3 Select the new setting. Press OK. • The setting is saved. 11.2.5 During a call 1 Press OK to enter the options menu. The handset displays the Enhanced High Def voice setting you can change to. 2 Press OK to change the setting. • The setting is saved. Custom Options 35 - Philips CD4552B | User manual - Page 38
conference Auto conference lets you join an external r call with another handset by simply pressing . 12.2.1 Activating/Deactivating m auto conference 1 supports tone (DTMF) and pulse (rotary) dialing. Your 36 phone shall already be set up for use in your country. For details, consult your service - Philips CD4552B | User manual - Page 39
• The setting is saved. 12.6 Area code management This feature only applies to model(s) with area code support. This feature automatically removes the area code of an incoming call. You can define an area code (up Select ADVANCED SET > AUTO PREFIX. Press OK. 3 Enter the Detect number. Press OK. 37 - Philips CD4552B | User manual - Page 40
setting is saved. Note Empty Detect Number. If the user only sets the prefix number and leaves the detect number empty handset will not do any reformatting. 12.8 First ring This feature only applies to model(s) with first ring support. If you have subscribed for Caller ID service with your service - Philips CD4552B | User manual - Page 41
in your handset itself. Contact your network provider for more information about this feature. Note Incorrect codes. Network services may not the voicemail service center to retrieve your voicemail(s). Your phone supports 2 m voicemail service numbers. 1 Press . 2 Select NETW. SERVICES. Press OK - Philips CD4552B | User manual - Page 42
OK. 5 Enter or edit the voicemail number. Press OK. • The setting is saved. 13.3 Info center Your phone supports 2 info center numbers. m 13.3.1 Calling the info center 1 Press . 2 Select NETW. SERVICES. Press OK. 3 Select the info center you want. Press OK. 4 Select CALL. Press OK. • A call is made - Philips CD4552B | User manual - Page 43
enables you to prevent the person you are calling from seeing your name or number caller ID. m 13.6.1 Activating withhold ID 1 Press . 2 Select NETW. SERVICES > WITHHOLD ID > ACTIVATE. Press OK. • The withhold ID code is dialed out. 3 Enter the number you want to call. The number is dialed out - Philips CD4552B | User manual - Page 44
ringer is off, the alarm volume is set to level 1. 14.2 Easy call Easy call allows you to dial out a programmed number by pressing any handset key (except BACK). m 14.2.1 Activating easy call 1 Press . 2 Select ADVANCED SET > EASY CALL > MODE. Press OK. 3 Select ON. Press OK. 4 Enter the easy call - Philips CD4552B | User manual - Page 45
.2.3 Deactivating easy call 1 Press BACK during standby. • The easy call menu displays. 2 Select OFF. Press OK. • The setting is saved. V 14.4 Missing handset(s) 1 Press on the base station. • All the handsets connected to this V base station ring. 2 Press on the base station again to stop locating - Philips CD4552B | User manual - Page 46
described below are the procedures you will find in your handset. The procedures may vary according to the handset you want to register. In this case, refer to the manufacturer's instruction of the additional handset. Additional handsets must be registered to the base station before you can - Philips CD4552B | User manual - Page 47
request. 3 Press OK to confirm. • All settings have been reset. Note After reset, your handset's power switches off. It will switch back on in a few seconds after updating all the settings. All handsets return to the standby mode after reset. To see a list of default setting, see "Default - Philips CD4552B | User manual - Page 48
number shows: - The volume level during adjustment, or - The message number (blink for new messages) You can use the answering machine menu on the handset to change the settings of the answering machine. 16.1 Turning on the answering machine You can turn on the answering machine either through the - Philips CD4552B | User manual - Page 49
support. The answering machine language is the language for the pre-recorded greeting message and voice prompt instructions greeting message will play back automatically for review. Tip Restore Pre-recorded greeting message. • The handset plays the current greeting message. The Answering Machine 47 - Philips CD4552B | User manual - Page 50
you have received new messages on your answering machine, the answering machine display will keep flashing the number of new messages received and the handset will display a notification message. If you pick up the phone when the caller is leaving a message, the recording will stop and you can talk - Philips CD4552B | User manual - Page 51
step 4 if you selected ON or step 5 if you selected OFF. 4 Select the handset you want for screening. 5 Press OK. • The setting is saved. Note u During also see the icon flashing and a notification message on the handset. 16.9 Setting the ring delay Ring delay is the number of times - Philips CD4552B | User manual - Page 52
machine picks up the call. This setting only applies when your answering machine is switched on. You can change m this setting from 3 - 8 rings or economy. 1 Press . 2 Select ANSWER MACHINE > SETTINGS > RING DELAY. Press OK. 3 Select the new setting. Press OK. • The setting is saved. Tip Economy. - Philips CD4552B | User manual - Page 53
17 Default (pre-programmed) settings Language English Handset Name PHILIPS Services Reset Contrast Level 3 Conference On Dial Mode Tone Area Code [Empty] Auto Prefix [Empty] Handset Ring Melody RIng 1 Alarm Tone Bell 2 Receiver Volume Level 3 Handset Ring Volume Level 3 Handset - Philips CD4552B | User manual - Page 54
with 50 entries Battery • 2 x AAA NiMH Rechargeable 750mAh batteries Power consumption • Power consumption at idle mode: around 1.3W Weight and dimensions (CD455) • Handset: 120 grams • 163 x 26 x 46 mm (H x D x W) • Base: 230 grams • 82 x 115 x 134 mm (H x D x W) Weight and dimensions (SE455 - Philips CD4552B | User manual - Page 55
Frequently asked questions www.philips.com/support In this chapter, you will find the most frequently asked questions and answers about your phone. Connection Product behaviour Signal icon flashing • The handset may be out of range. Move closer. • If the handset displays UNREGISTERED, register - Philips CD4552B | User manual - Page 56
may be at a location with thick walls. Move the base. Handset does not ring • Check that the handset ringer is turned on. See page 34. Caller ID does not display • Service may not be activated. Check with your service provider. • The caller's information may be withheld or is unavailable. Cannot - Philips CD4552B | User manual - Page 57
that is also compliant. See installation instructions for details. 20.3 Notes • This equipment may not be used on coin service provided by the telephone company. • 20.4 Rights of the Phone Company Should your equipment cause trouble on your line which may harm the telephone network, the telephone - Philips CD4552B | User manual - Page 58
allow you to maintain uninterrupted service. 20.5 Interference Information This used in accordance with the instructions, may cause harmful interference to turning the equipment off and on, the user is encouraged to try to correct the Resolve Radio/TV Interference Problems". This booklet is - Philips CD4552B | User manual - Page 59
20.6 Noise Electrical pulse noise is present at one time or another. This is most intense during electrical storms. Certain kinds of electrical equipment, such as light dimmers, fluorescent bulbs, motors, fans, etc., also generate pulse noise. Because radio frequencies are susceptible to this, you - Philips CD4552B | User manual - Page 60
to the equipment may render the equipment void in product warranty and compliance. This could also void the user's authority to operate the equipment. US / Canada Service Center Philips Accessories & Computer Peripherals North America 1881 Route 46 West Ledgewood, NJ 07852 Phone: (800) 233-8413 20 - Philips CD4552B | User manual - Page 61
Answering a call 23 Answering Machine 46 Area code 37 Audio quality 35 Auto conference 36 Auto hang up 36 Auto prefix 37 C Call 22 Call barring 36 Call forward 39 the microphone 23 N Naming your handset 34 Network Services 39 O Outgoing messages (OGM) 47 Overview of the base 11 Overview of the - Philips CD4552B | User manual - Page 62
28 Power requirements 6 Pre-dialing 22 Q Quick dial 29 R Recycling & disposal 7 Redial List 33 Redialing a call 33 Redialing the last number 22 Registering handset 44 Remote access 50 Restoring default settings 44 Ringer melody 34 Ringer volume 34 S Setting the clock 16 Setting the ring delay 49 - Philips CD4552B | User manual - Page 63
ENGLISH - Philips CD4552B | User manual - Page 64
© 2008 Koninklijke Philips Electronics N.V. All rights reserved Reproduction in whole or in part is prohibited without the written consent of the copyright owner Document number: 3111 285 46303 Printed in China
-
 1
1 -
 2
2 -
 3
3 -
 4
4 -
 5
5 -
 6
6 -
 7
7 -
8
-
9
-
10
-
11
-
12
-
13
-
14
-
15
-
16
-
17
-
18
-
19
-
20
-
21
-
22
-
23
-
24
-
25
-
26
-
27
-
28
-
29
-
30
-
31
-
32
-
33
-
34
-
35
-
36
-
37
-
38
-
39
-
40
-
41
-
42
-
43
-
44
-
45
-
46
-
47
-
48
-
49
-
50
-
51
-
52
-
53
-
54
-
55
-
56
-
57
-
58
-
59
-
60
-
61
-
62
-
63
-
64
 |
 |

US
Telephone Answering Machine
Warning
Use only rechargeable batteries.
Charge the handset for 24 hours before use.
!
CD 455
SE 455
Register your product and get support at
www.philips.com/welcome
To insert with