Philips DV910VHS98 User manual - Page 14
Helpful Hints, Connecting to a, TV and a Dolb, y Digital or DTS Compatible, Audio Receiv
 |
View all Philips DV910VHS98 manuals
Add to My Manuals
Save this manual to your list of manuals |
Page 14 highlights
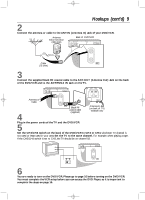
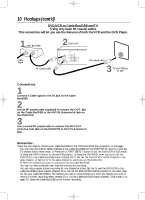
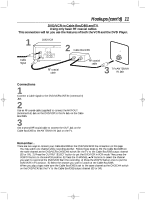
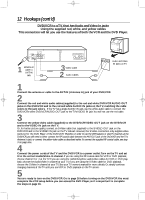
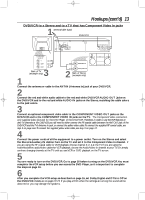
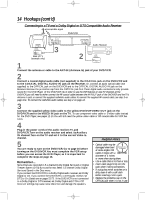
DV910(H9100).QX33 01.8.9 10:26 AM Page 14 14 Hookups (cont'd) Connecting to a TV and a Dolby Digital or DTS Compatible Audio Receiver 1antenna/cable signal DVD/VCR VIDEO 1 L/MONO AUDIO R in VIDEO IN Back of TV (example only) VIDEO 3 2 Audio Receiver COAXIAL DIGITAL AUDIO IN 1 Connect the antenna or cable to the ANT-IN (Antenna In) jack of your DVD/VCR. 2 Connect a coaxial digital audio cable (not supplied) to the COAXIAL jack on the DVD/VCR and to the COAXIAL DIGITAL AUDIO IN jack on the Receiver. Or, connect an audio optical cable (not supplied) to the OPTICAL jack on the DVD/VCR and to the OPTICAL DIGITAL AUDIO IN jack on the Receiver. Remove the protective cap from the OPTICAL jack first.These digital audio connections only provide sound for the DVD Player of the DVD/VCR. So, in order to use the VCR features or view TV channels at the DVD/VCR, you still need to either connect the RF coaxial cable between the ANT-OUT jack of the DVD/VCR and the TV's Antenna In jack, or connect the supplied red/white audio cables.To connect the supplied RF coaxial cable, see step 3 on page nine. To connect the red/white audio cables, see step 2 on page 12. 3 Connect the supplied yellow video cable to the yellow DVD/VCR VIDEO OUT jack on the DVD/VCR and to the VIDEO IN jack on the TV. To use component video cable or S-Video cable instead for the DVD Player, see pages 12-13.You will still need the yellow video cable or RF coaxial cable for VCR features. 4 Plug in the power cords of the audio receiver,TV, and DVD/VCR.Turn on the audio receiver and select its Auxiliary IN channel.Turn on the TV and set it to the correct Video In channel. 5 You are ready to turn on the DVD/VCR. Go to page 16 before turning on the DVD/VCR.You must complete the VCR setup before you can access the DVD Player, so it is important to complete the steps on page 16. Remember... Some Discs are recorded in 5.1 channel Dolby Digital Surround or Digital Theater System (DTS) Surround format. Select 5.1 channel Dolby Digital Surround Sound in the Disc menu. If you connect the DVD/VCR to a Dolby Digital audio receiver, set Dolby Digital to On. If you connect the DVD/VCR to a DTS audio receiver, set DTS to On. Details are on pages 72-73. If the DVD/VCR is not connected to a Dolby Digital or DTS receiver, set Dolby Digital and DTS to Off. Incorrect settings may cause noise distortion and damage the speakers. Helpful Hints • Optical cable may be damaged when bent Minimum 6 in. in diameter at acute angles. Coil cables in loops with a diameter of 6 inches or more when storing them. • Use a cable that is 9.8 feet or less. • Insert cable plugs firmly into the jacks when making connections. • If a plug has minor scratches or is dirty, clean it with a soft cloth before inserting it into a jack. • Replace the protective cap on the OPTICAL jack when it is not in use.
-
 1
1 -
2
-
3
-
4
-
5
-
6
-
7
-
8
-
 9
9 -
 10
10 -
 11
11 -
 12
12 -
 13
13 -
 14
14 -
 15
15 -
 16
16 -
 17
17 -
 18
18 -
 19
19 -
20
-
21
-
22
-
23
-
24
-
25
-
26
-
27
-
28
-
29
-
30
-
31
-
32
-
33
-
34
-
35
-
36
-
37
-
38
-
39
-
40
-
41
-
42
-
43
-
44
-
45
-
46
-
47
-
48
-
49
-
50
-
51
-
52
-
53
-
54
-
55
-
56
-
57
-
58
-
59
-
60
-
61
-
62
-
63
-
64
-
65
-
66
-
67
-
68
-
69
-
70
-
71
-
72
-
73
-
74
-
75
-
76
-
77
-
78
-
79
-
80
-
81
-
82
-
83
-
84
-
85
-
86
-
87
-
88
 |
 |
