Philips DV910VHS98 User manual - Page 37
Timer Recording cont'd
 |
View all Philips DV910VHS98 manuals
Add to My Manuals
Save this manual to your list of manuals |
Page 37 highlights
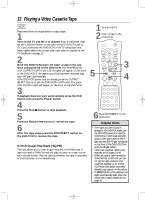
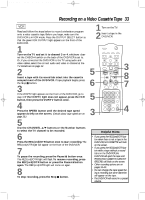
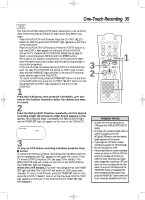
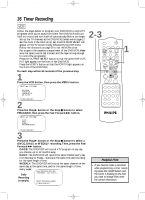
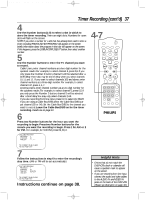
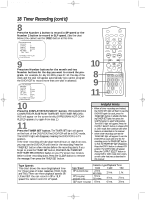
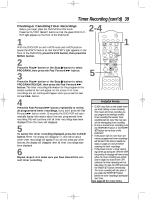
DV910(H9100).QX33 01.8.9 10:26 AM Page 37 Timer Recording (cont'd) 37 4 Use the Number buttons (1-8) to select a slot in which to store the timer recording. There are eight slots. Numbers for open slots will flash on the screen. NOTE: If you enter a number for a slot that has already been used to store a timer recording, PREVIOUSLY SET PROGRAM will appear on the screen briefly. Information about the program in that slot will appear on the screen. If this happens, press the DISPLAY/STATUS/EXIT button, then select another number. 5 Use the Number buttons to enter the TV channel you want to record. q Cable Users, enter channel numbers as a two-digit number for the quickest results. For example, to select channel 6, press 0,6. If you only press the Number 6 button, channel 6 will be selected after a brief delay. There also may be a brief delay when you select channels 10, 11, and 12. If you want to select channels 100 and above, enter channel numbers as a three-digit number. For example, to select channel 117, press 1, 1, 7. q Antenna Users, enter channel numbers as a two-digit number for the quickest results. For example, to select channel 5, press 0,5. If you only press the Number 5 button, channel 5 will be selected after a brief delay.You may only select channels 2-69. q If you are recording from line input, press 0,0 to select AV REAR. q If you are using a Cable Box/DBS, select the Cable Box/DBS output channel (03 or 04). Set the Cable Box/DBS to the channel you want to record. Leave the Cable Box/DBS on for the timer recording. Details are on page 10. 6 Press two Number buttons for the hour you want the recording to begin. Press two Number buttons for the minute you want the recording to begin. Press 1 for AM or 2 for PM. For example, for 9:30 PM, press 09, 30, 2. ONE TIME PROGRAM PROGRAM 1 CHANNEL 10 TIME ON - - : - - 4-7 MARKER POWER SETUP AUDIO SUBTITLE ANGLE MENU TITLE MODE OK RETURN DVD OUTPUT SELECT VCR SKIP/CHANNEL H/L CHANNEL/SKIP K/G B E D C REC /OTR F A-B CLEAR REPEAT DISPLAY 1 23 STATUS/EXIT SEARCH MODE 4 56 TIME SEARCH SLOW 7 89 ZOOM +10 0 TIMER SET VCR/TV MEMORY SPEED TO CORRECT PUSH CLEAR TO END PUSH EXIT 7 Follow the instructions in step 6 to enter the recording's stop time. (AM or PM will be set automatically.) ONE TIME PROGRAM PROGRAM 1 CHANNEL 10 TIME ON 09:30 PM TIME OFF - - : - - TO CORRECT PUSH CLEAR TO END PUSH EXIT Instructions continue on page 38. Helpful Hints • Entries that do not match the DVD/VCR's clock or calendar will cause a question mark to appear on the screen. • If you are recording from line input, connect the audio and video cables to the AUDIO IN and VIDEO IN jacks on the back of the DVD/VCR. (Please see illustration on page 40.)
-
 1
1 -
2
-
3
-
4
-
5
-
6
-
7
-
8
-
9
-
10
-
11
-
12
-
13
-
14
-
15
-
16
-
17
-
18
-
19
-
20
-
21
-
22
-
23
-
24
-
25
-
26
-
27
-
28
-
29
-
30
-
31
-
 32
32 -
 33
33 -
 34
34 -
 35
35 -
 36
36 -
 37
37 -
 38
38 -
 39
39 -
 40
40 -
 41
41 -
 42
42 -
43
-
44
-
45
-
46
-
47
-
48
-
49
-
50
-
51
-
52
-
53
-
54
-
55
-
56
-
57
-
58
-
59
-
60
-
61
-
62
-
63
-
64
-
65
-
66
-
67
-
68
-
69
-
70
-
71
-
72
-
73
-
74
-
75
-
76
-
77
-
78
-
79
-
80
-
81
-
82
-
83
-
84
-
85
-
86
-
87
-
88
 |
 |
