Philips DVD724CA User manual - Page 35
Progressive Scan, Picture Source
 |
View all Philips DVD724CA manuals
Add to My Manuals
Save this manual to your list of manuals |
Page 35 highlights
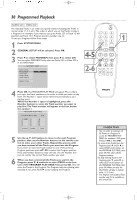
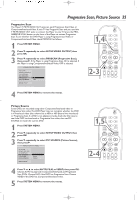
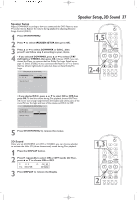
Progressive Scan, Picture Source 35 Progressive Scan The Player's Y PB PR VIDEO OUT jacks can send Progressive Scan Video or Component/Interlaced Video. If your TV has Progessive Scan and you used the Y PB PR VIDEO OUT jacks to connect the Player to your TV, press the PROGRESSIVE SCAN button on the front of the Player to activate Progressive Scan.To see whether the DVD Player is using Progressive Scan Video or Component/Interlaced Video, check PROSCAN as follows. 1 Press SYSTEM MENU. 2 Press 4 repeatedly to select SETUP VIDEO OUTPUT, then press OK. 3 Press 4 repeatedly to select PROSCAN (Progressive Scan), then press 2. If the Player is using Progressive Scan, ON is selected. If the Player is using Component/Interlaced Video, OFF is selected. - - VIDEO OUTPUT PAGE - - TV TYPE VIDEO OUTPUT TV DISPLAY PIC SOURCE PROSCAN F OFF BRIGHTNESS ON MAIN PAGE USE FRONT KEYPAD TO SET 4 Press SYSTEM MENU to remove the menus. 1,4 2-3 Picture Source Some DVDs are recorded using either Component/Interlaced video or Progressive Scan video.The DVD Player may not recognize whether the DVD is in Interlaced video (also referred to as 480i or 480 picture lines interlaced) or Progressive Scan. If a DVD is not playing correctly, check the Disc case to see if the DVD has Interlaced or Progressive Scan video, then set PIC SOURCE to match the current DVD. 1 Press SYSTEM MENU. 2 Press 4 repeatedly to select SETUP VIDEO OUTPUT, then press OK. 3 Press 4 repeatedly to select PIC SOURCE (Picture Source), then press 2. - - VIDEO OUTPUT PAGE - - TV TYPE VIDEO OUTPUT TV DISPLAY PIC SOURCE F AUTO PROSCAN FILM BRIGHTNESS VIDEO MAIN PAGE 4 Press 4 or 3 to select AUTO, FILM, or VIDEO, then press OK. Choose AUTO to play both Component/Interlaced and Progressive Scan DVDs. Choose FILM if the DVD has Progressive Scan. Choose VIDEO if the DVD has Component/Interlaced video. 5 Press SYSTEM MENU to remove the menus. 1,5 2-4
-
 1
1 -
2
-
3
-
4
-
5
-
6
-
7
-
8
-
9
-
10
-
11
-
12
-
13
-
14
-
15
-
16
-
17
-
18
-
19
-
20
-
21
-
22
-
23
-
24
-
25
-
26
-
27
-
28
-
29
-
 30
30 -
 31
31 -
 32
32 -
 33
33 -
 34
34 -
 35
35 -
 36
36 -
 37
37 -
 38
38 -
 39
39 -
 40
40 -
41
-
42
-
43
-
44
-
45
-
46
-
47
-
48
 |
 |
