Philips DVD962SA99 User manual - Page 10
Hookups cont'd
 |
View all Philips DVD962SA99 manuals
Add to My Manuals
Save this manual to your list of manuals |
Page 10 highlights
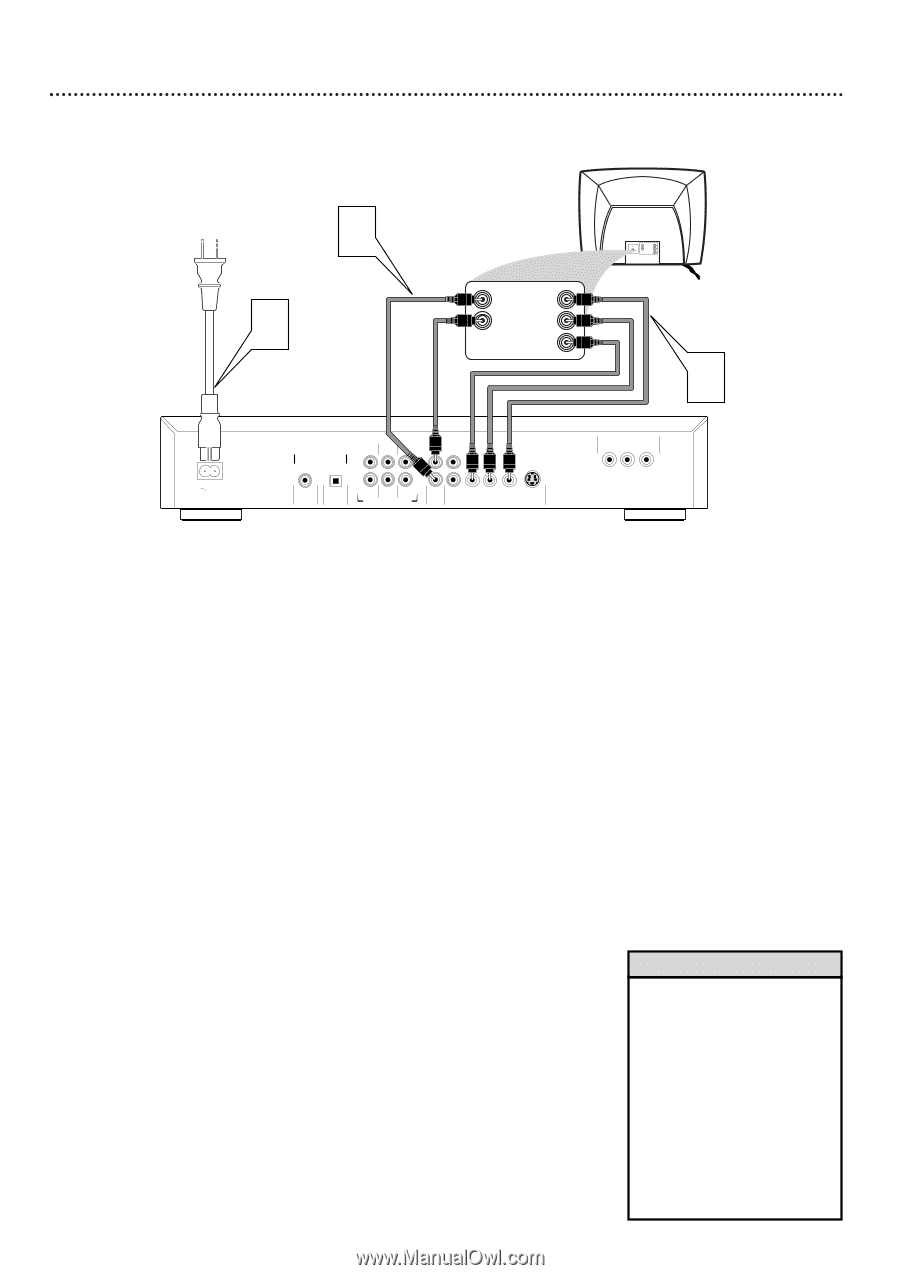
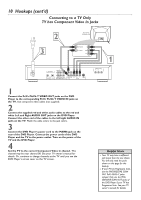
10 Hookups (cont'd) Connecting to a TV Only TV has Component Video In Jacks 2 3 Back of TV (example only) RIGHT AUDIO IN Y LEFT AUDIO IN Pb/Cb Pr/Cr RIGHT AUDIO IN Y LEFT AUDIO IN Pb/Cb Pr/Cr 1 MAINS DIGITAL AUDIO OUT PCM/MPEG2/Dolby Digital/DTS COAXIAL OPTICAL SURROUND CENTER FRONT L 1 L R SURROUND SUB WF FRONT MULTICHANNEL AUDIO OUT R 2 AUDIO CVBS Pr/Cr Pb/Cb Y OUT VIDEO OUT S-VIDEO PROGRESSIVE SCAN OUT Pr/Cr Pb/Cb Y 1 Connect the Pr/Cr Pb/Cb Y VIDEO OUT jacks on the DVD Player to the corresponding Pr/Cr Pb/Cb Y VIDEO IN jacks on the TV. Use component video cables (not supplied). 2 Connect the supplied red and white audio cables to the red and white Left and Right AUDIO OUT jacks on the DVD Player. Connect the other end of the cables to the left/right AUDIO IN jacks on the TV. Match the cable colors to the jack colors. 3 Connect the DVD Player's power cord to the MAINS jack on the rear of the DVD Player. Connect the power cords of the DVD Player and the TV to the power outlet. Turn on the power of the TV and the DVD Player. 4 Set the TV to the correct Component Video In channel. This channel may be near channel 00. See your TV owner's manual for details. Or, continue to change channels at the TV until you see the DVD Player's screen saver on the TV screen. Helpful Hints • Your TV may have a different jack panel than the one shown. You will only need the jacks shown on this page for this hookup. • If your TV has Progressive Scan, use the PROGRESSIVE SCAN OUT Pr/Cr Pb/Cb Y jacks instead. Only use the PROGRESSIVE SCAN OUT jacks of the DVD Player if your TV has Progressive Scan. See your TV owner's manual for details.
-
 1
1 -
2
-
3
-
4
-
 5
5 -
 6
6 -
 7
7 -
 8
8 -
 9
9 -
 10
10 -
 11
11 -
 12
12 -
 13
13 -
 14
14 -
 15
15 -
16
-
17
-
18
-
19
-
20
-
21
-
22
-
23
-
24
-
25
-
26
-
27
-
28
-
29
-
30
-
31
-
32
-
33
-
34
-
35
-
36
-
37
-
38
-
39
-
40
-
41
-
42
-
43
-
44
-
45
-
46
-
47
-
48
-
49
-
50
-
51
-
52
-
53
-
54
-
55
-
56
 |
 |