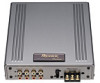
Pioneer DEQ-P9 Owner's Manual - Page 3
Display for the Person who Set Up - troubleshooting
 |
View all Pioneer DEQ-P9 manuals
Add to My Manuals
Save this manual to your list of manuals |
Page 3 highlights
ENGLISH ESPAÑOL Audio Adjustment
-
 1
1 -
 2
2 -
 3
3 -
 4
4 -
 5
5 -
 6
6 -
 7
7 -
 8
8 -
 9
9 -
10
-
11
-
12
-
13
-
14
-
15
-
16
-
17
-
18
-
19
-
20
-
21
-
22
-
23
-
24
-
25
-
26
-
27
-
28
-
29
-
30
-
31
-
32
-
33
-
34
-
35
-
36
-
37
-
38
-
39
-
40
-
41
-
42
-
43
-
44
-
45
-
46
-
47
-
48
-
49
-
50
-
51
-
52
-
53
-
54
-
55
-
56
-
57
-
58
-
59
-
60
-
61
-
62
-
63
-
64
 |
 |

Audio Adjustment <Network>
..............
27
What is the Multi-Amp System?
....................
27
Network Menu
................................................
28
-
Switching to the Network Menu
Time Alignment Adjustment
..........................
29
-
Switching to the
Time Alignment Adjustment Mode
-
Measuring the Distance to be Corrected
-
Inputting the Distance to be Corrected
Filter Adjustment
............................................
33
-
Switching to the Filter Adjustment Mode
-
Using the Mute function
-
Adjusting the Filter
Audio Adjustment
<Memory Functions>
........................
38
Memory Functions of
Adjusted Audio Menu
..............................
38
Switching to Memory Mode
..........................
39
-
Equalizer Menu
-
Network Menu
Storing the Adjustment Data in Memory
........
40
Recalling Data Stored in Memory
..................
41
-
Recalling Memory Using
Forward/Reverse Order
— Functions of Equalizer Menu —
-
Specifying the Memory Number Directly
Memory Protect function
................................
43
Memory Clearing Operations
..........................
44
Display for the Person who Set Up
the Audio Adjustments
....................
45
Inputting the Name
..........................................
45
Inputting Characters
........................................
45
Memory Data Memo
................................
48
Connecting the Units
..............................
51
Routing the Optical Cable
..............................
52
Setting Example
..............................................
52
Connection Diagram
......................................
53
Connecting the RCA Input Amplifier
............
54
Connecting the Power Terminal
......................
55
Connecting the IP-BUS and Optical Cable
......
56
-
Connecting the Cables
Installation
................................................
57
Installing the Unit
............................................
57
Troubleshooting
......................................
58
Checklist
..........................................................
58
Specifications
..........................................
59
2
ENGLISH
ESPA
Ñ
OL
DEUTSCH
FRAN
Ç
AIS
ITALIANO
NEDERLANDS