Pioneer DEQ-P9 Owner's Manual - Page 35
Switching to the Filter Adjustment Mode
 |
View all Pioneer DEQ-P9 manuals
Add to My Manuals
Save this manual to your list of manuals |
Page 35 highlights
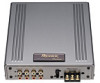
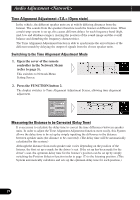
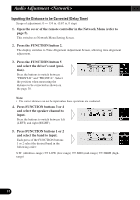
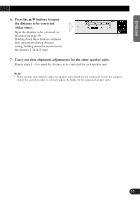
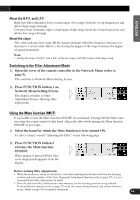
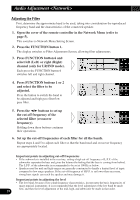
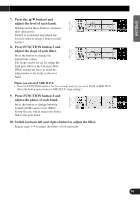
ENGLISH ESPAÑOL About the H.P.F. and L.P.F. High pass filter eliminates lower sound ranges (low-range) from the set up frequencies and allows high ranges through. Low pass filter eliminates upper sound ranges (high-range) from the set up frequencies and allows low ranges through. About the slope This value indicates how many dB the signals attenuate when the frequency increases (or decreases) 1 octave (unit: dB/oct.). Increasing the degree of the slope increases the degree of signal attenuation. Note: • Setting the slope of H.P.F. and L.P.F. of the low-range as PASS creates a full range setup. Switching to the Filter Adjustment Mode 1. Open the cover of the remote controller in the Network Menu (refer to page 5). This switches to Network Menu Setting Screen. 2. Press FUNCTION button 1 on Network Menu Setting Screen. The display switches to Filter Adjustment Screen, allowing filter adjustments. DEUTSCH FRANÇAIS ITALIANO NEDERLANDS Using the Mute function (MUT) It is possible to turn the Mute function ON/OFF for each band. Turning ON the Mute function stops the sound output for that band. Adjust the filter while turning the Mute function ON/OFF as necessary. 1. Select the band for which the Mute function is to be turned ON. To select a band, consult "Adjusting the Filter" on the following page. 2. Press FUNCTION button 5 switches the Mute function ON/OFF. When muting is turned ON the filter curve displayed disappears from the display. Before making filter adjustments • When the position is set up for the driver's seat after adjusting the distance between the listening position and each speaker of the Time Alignment Adjustment function (refer to page 29), it is rec- ommended that filter adjustments be made. • Store the different filter characteristics into memory, by the listening position set up with the Position Selector function (refer to page 17) or by the source being listened, and switch when nec- essary. Refer to page 38 for memory operations. 34
-
 1
1 -
2
-
3
-
4
-
5
-
6
-
7
-
8
-
9
-
10
-
11
-
12
-
13
-
14
-
15
-
16
-
17
-
18
-
19
-
20
-
21
-
22
-
23
-
24
-
25
-
26
-
27
-
28
-
29
-
 30
30 -
 31
31 -
 32
32 -
 33
33 -
 34
34 -
 35
35 -
 36
36 -
 37
37 -
 38
38 -
 39
39 -
 40
40 -
41
-
42
-
43
-
44
-
45
-
46
-
47
-
48
-
49
-
50
-
51
-
52
-
53
-
54
-
55
-
56
-
57
-
58
-
59
-
60
-
61
-
62
-
63
-
64
 |
 |