Samsung HMX-Q10BN User Manual (user Manual) (ver.1.0) (English) - Page 71
LCD Brightness, Guideline, Settings, Display
 |
UPC - 036725303829
View all Samsung HMX-Q10BN manuals
Add to My Manuals
Save this manual to your list of manuals |
Page 71 highlights
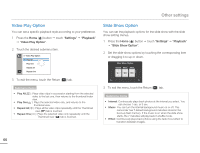
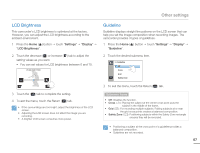
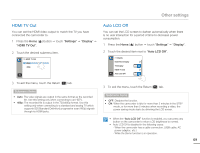
Other settings LCD Brightness This camcorder's LCD brightness is optimized at the factory. However, you can adjust the LCD brightness according to the ambient environment. 1 Press the Home ( ) button p touch "Settings" p "Display" p "LCD Brightness". 2 Touch the decrease ( ) or increase ( ) tab to adjust the setting values as you want. • You can set values for LCD brightness between 0 and 10. LCD Brightness 5 3 Touch the ( ) tab to complete the setting. 4 To exit the menu, touch the Return ( ) tab. • If the surroundings are too bright, adjust the brightness of the LCD screen. • Adjusting the LCD screen does not affect the image you are recording. • A brighter LCD screen consumes more power. Guideline Guideline displays straight line patterns on the LCD screen that can help you set the image composition when recording images. The camcorder provides 3 types of guidelines. 1 Press the Home ( ) button p touch "Settings" p "Display" p "Guideline". 2 Touch the desired submenu item. >> Guideline Off Cross Grid Safety Zone 3 To exit the menu, touch the Return ( ) tab. Submenu items • Off: Disables the function. • Cross ( ): Placing the subject at the center cross point puts the subject in the middle of the frame. • Grid ( ): For recording multiple subjects. Putting subjects at or near the grid cross points creates a balanced composition. • Safety Zone ( ): Positioning subjects within the Safety Zone rectangle ensures they will be recorded. • Positioning a subject at the cross point of a guideline provides a balanced composition. • Guidelines are not recorded. 67
-
 1
1 -
2
-
3
-
4
-
5
-
6
-
7
-
8
-
9
-
10
-
11
-
12
-
13
-
14
-
15
-
16
-
17
-
18
-
19
-
20
-
21
-
22
-
23
-
24
-
25
-
26
-
27
-
28
-
29
-
30
-
31
-
32
-
33
-
34
-
35
-
36
-
37
-
38
-
39
-
40
-
41
-
42
-
43
-
44
-
45
-
46
-
47
-
48
-
49
-
50
-
51
-
52
-
53
-
54
-
55
-
56
-
57
-
58
-
59
-
60
-
61
-
62
-
63
-
64
-
65
-
 66
66 -
 67
67 -
 68
68 -
 69
69 -
 70
70 -
 71
71 -
 72
72 -
 73
73 -
 74
74 -
 75
75 -
 76
76 -
77
-
78
-
79
-
80
-
81
-
82
-
83
-
84
-
85
-
86
-
87
-
88
-
89
-
90
-
91
-
92
-
93
-
94
-
95
-
96
-
97
-
98
-
99
-
100
-
101
-
102
-
103
-
104
-
105
-
106
-
107
-
108
-
109
-
110
-
111
-
112
-
113
 |
 |
