Samsung HMX-Q10BN User Manual (user Manual) (ver.1.0) (English) - Page 73
HDMI TV Out, Auto LCD Off, Settings, Display - usb cable
 |
UPC - 036725303829
View all Samsung HMX-Q10BN manuals
Add to My Manuals
Save this manual to your list of manuals |
Page 73 highlights
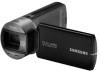
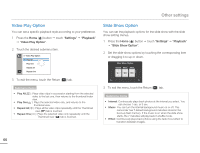
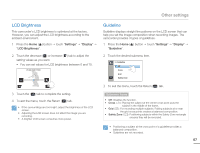
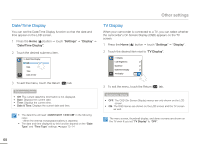
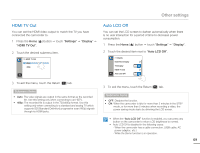
Other settings HDMI TV Out You can set the HDMI video output to match the TV you have connected the camcorder to. 1 Press the Home ( ) button p touch "Settings" p "Display" p "HDMI TV Out". 2 Touch the desired submenu item. >> HDMI TV Out Auto 480p Auto LCD Off You can set the LCD screen to darken automatically when there is no user interaction for a period of time to decrease power consumption. 1 Press the Home ( ) button p touch "Settings" p "Display". 2 Touch the desired item next to "Auto LCD Off". > Display Date/Time Display TV Display ON HDMI TV Out Auto LCD Off ON 3 To exit the menu, touch the Return ( ) tab. Submenu items • Auto: The video signals are output in the same format as the recorded file. Use this setting only when connecting to an HDTV. • 480p: The recorded file is output in the 720x480p format. Use this setting only when connecting to a standard and analog TV which supports SD (Standard Definition) progressive scan (480p) signals through its HDMI jacks. 3 To exit the menu, touch the Return ( ) tab. Submenu items • OFF: Disables the function. • ON: When the camcorder is idle for more than 2 minutes in the STBY mode, or for more than 5 minutes when recording a video, the power saving mode starts by dimming the LCD screen. • When the "Auto LCD Off" function is enabled, you can press any button on the camcorder to return LCD brightness to normal. • Auto LCD Off is disabled in the following cases: - When the camcorder has a cable connection. (USB cable, AC power adaptor, etc.) - While the Demo function is in operation. 69
-
 1
1 -
2
-
3
-
4
-
5
-
6
-
7
-
8
-
9
-
10
-
11
-
12
-
13
-
14
-
15
-
16
-
17
-
18
-
19
-
20
-
21
-
22
-
23
-
24
-
25
-
26
-
27
-
28
-
29
-
30
-
31
-
32
-
33
-
34
-
35
-
36
-
37
-
38
-
39
-
40
-
41
-
42
-
43
-
44
-
45
-
46
-
47
-
48
-
49
-
50
-
51
-
52
-
53
-
54
-
55
-
56
-
57
-
58
-
59
-
60
-
61
-
62
-
63
-
64
-
65
-
66
-
67
-
 68
68 -
 69
69 -
 70
70 -
 71
71 -
 72
72 -
 73
73 -
 74
74 -
 75
75 -
 76
76 -
 77
77 -
 78
78 -
79
-
80
-
81
-
82
-
83
-
84
-
85
-
86
-
87
-
88
-
89
-
90
-
91
-
92
-
93
-
94
-
95
-
96
-
97
-
98
-
99
-
100
-
101
-
102
-
103
-
104
-
105
-
106
-
107
-
108
-
109
-
110
-
111
-
112
-
113
 |
 |
