Samsung LNS3241D User Manual (ENGLISH) - Page 25
Picture Control, Using Automatic Picture Settings - no display
 |
UPC - 036725232419
View all Samsung LNS3241D manuals
Add to My Manuals
Save this manual to your list of manuals |
Page 25 highlights
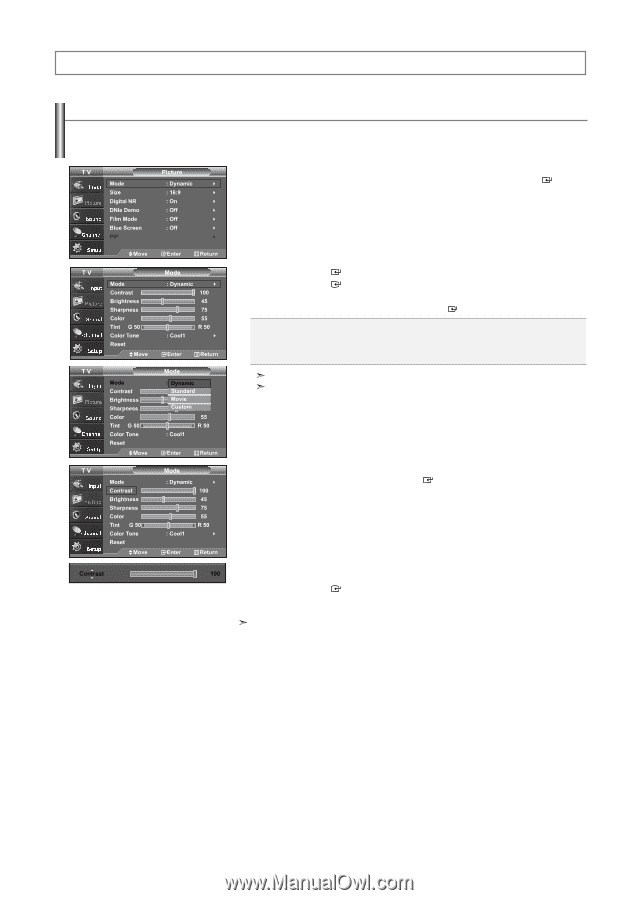
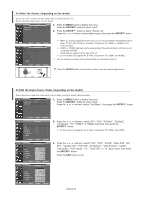
Picture Control Using Automatic Picture Settings Your TV has four automatic picture settings ("Dynamic", "Standard", "Movie", and "Custom") that are preset at the factory. You can activate either Dynamic, Standard, Movie, or Custom by making a selection from the menu. Or, you can select "Custom" which automatically recalls your personalized picture settings. 1. Press the MENU button to display the menu. Press the or buttons to select "Picture", then press the ENTER button. 2. Press the ENTER button to select "Mode". Press the ENTER button again. Press the or buttons to select the "Dynamic", "Standard", "Movie", or "Custom" picture setting. Press the ENTER button. Choose Dynamic to increase the clarity and sharpness of the picture. Choose Standard for the standard factory settings. Choose Movie when watching movies. Choose Custom if you want to adjust the settings according to personal preference. When in PC mode, Tint, Sharpness and Color are not available. Picture mode needs to be adjusted separately for each input. 3. Press the or buttons to select "Contrast", "Brightness", "Sharpness", "Color", or "Tint", then press the ENTER button. 4. Press the or buttons to decrease or increase the value of a particular item. For example, if you select "Contrast", pressing the button increases it. Press the ENTER button. Press the EXIT button to exit. • "Tint" doesn't operate in HDMI, PC or any Component mode. • The Tint cannot be adjusted while watching Digital TV. • Each adjusted setting will be stored separately according to its input mode. • When you make changes to Contrast, Brightness, Sharpness, Color, Tint , OSD color will also be adjusted accordingly. English-23
-
 1
1 -
2
-
3
-
4
-
5
-
6
-
7
-
8
-
9
-
10
-
11
-
12
-
13
-
14
-
15
-
16
-
17
-
18
-
19
-
 20
20 -
 21
21 -
 22
22 -
 23
23 -
 24
24 -
 25
25 -
 26
26 -
 27
27 -
 28
28 -
 29
29 -
 30
30 -
31
-
32
-
33
-
34
-
35
-
36
-
37
-
38
-
39
-
40
-
41
-
42
-
43
-
44
-
45
-
46
-
47
-
48
-
49
-
50
-
51
-
52
-
53
-
54
-
55
-
56
-
57
-
58
-
59
-
60
-
61
-
62
-
63
-
64
-
65
-
66
-
67
-
68
-
69
-
70
-
71
-
72
-
73
-
74
-
75
-
76
-
77
-
78
-
79
-
80
-
81
-
82
-
83
-
84
-
85
-
86
-
87
-
88
-
89
-
90
-
91
-
92
-
93
-
94
-
95
-
96
-
97
-
98
-
99
-
100
-
101
-
102
-
103
-
104
-
105
-
106
-
107
-
108
-
109
-
110
-
111
-
112
-
113
-
114
-
115
-
116
-
117
-
118
-
119
-
120
-
121
-
122
-
123
-
124
-
125
-
126
-
127
-
128
-
129
-
130
-
131
-
132
-
133
-
134
-
135
-
136
-
137
-
138
-
139
-
140
-
141
-
142
-
143
-
144
-
145
-
146
-
147
-
148
-
149
-
150
-
151
-
152
-
153
-
154
-
155
-
156
-
157
-
158
-
159
-
160
-
161
-
162
-
163
-
164
-
165
-
166
-
167
-
168
-
169
-
170
-
171
-
172
-
173
-
174
-
175
-
176
-
177
-
178
-
179
 |
 |