Samsung RF4289HARS User Manual (user Manual) (ver.0.1) (English, Spanish) - Page 7
Accessories And Required, Tools, Removing The Refrigerator, Doors - what s included
 |
UPC - 036725560529
View all Samsung RF4289HARS manuals
Add to My Manuals
Save this manual to your list of manuals |
Page 7 highlights
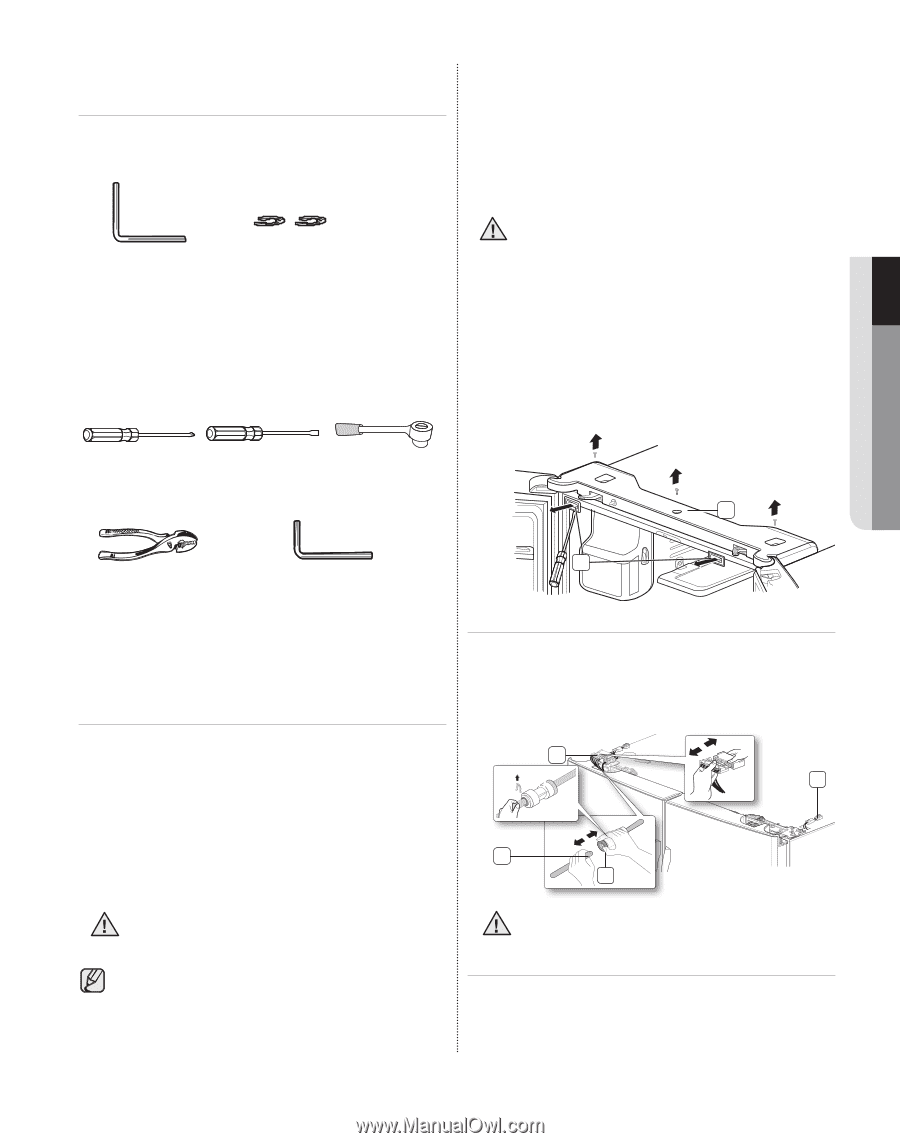
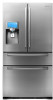
Accessories and required tools The following accessories are included with your refrigerator: Hex wrench Fastener Required Tools (Not provided) You need the following tools to complete the installation of your refirgerator: • Reattach the doors/drawer properly to avoid: - Moisture from air leakage. - Uneven door alignment. - Wasting energy due to improper door seal. Disassemble the refrigerator doors Be careful not to drop and scratch the doors WARNING while removing the doors. Disassemble the refrigerator doors 1. With the door opened, remove the cap top table ( 1 ) with a flat-blade screwdriver (-), and then close the door. Remove the 3 screws holding down the top table ( 2 ) and turn it with several wires connected. 01 setting up Philips screwdriver (+) Flat-blade screwdriver (-) Socket wrench (10mm) Pliers Allen wrench (3/16") (5mm) 2 1 Removing the refrigerator doors 2. Disconnect one connector ( 3 ) on the right side door and one connector ( 4 ) on the left side door. Remove the water line ( 5 ) while pressing the dark gray part ( 6 ) of the water line coupler. For some installations you need to remove the fridge 4 and flex doors and the freezer drawer so you can move the refrigerator to its final location. Do not remove the Red Clip (1/4") 3 doors/drawer if you don't need to. If you do not need to remove the refrigerator doors, go to Adjusting the Level on page 9. If you need to remove the doors. continue below. Before removing the door/drawer, make sure you 5 read the following items: 6 Disconnect power to the refrigerator before WARNING removing the doors or drawer. • Be careful not to drop, damage, or scratch the doors/drawer while removing them. • Be careful not to injure yourself while removing the doors/drawer. If a red clip is on the coupler, it must be caution removed before removing the tube. setting up _07
-
 1
1 -
 2
2 -
 3
3 -
 4
4 -
 5
5 -
 6
6 -
 7
7 -
 8
8 -
 9
9 -
 10
10 -
 11
11 -
 12
12 -
13
-
14
-
15
-
16
-
17
-
18
-
19
-
20
-
21
-
22
-
23
-
24
-
25
-
26
-
27
-
28
-
29
-
30
-
31
-
32
-
33
-
34
-
35
-
36
-
37
-
38
-
39
-
40
-
41
-
42
-
43
-
44
-
45
-
46
-
47
-
48
-
49
-
50
-
51
-
52
-
53
-
54
-
55
-
56
-
57
-
58
-
59
-
60
-
61
-
62
-
63
-
64
-
65
-
66
-
67
-
68
-
69
-
70
-
71
-
72
-
73
-
74
-
75
-
76
-
77
-
78
-
79
-
80
-
81
-
82
-
83
-
84
-
85
-
86
-
87
-
88
-
89
-
90
-
91
-
92
-
93
-
94
-
95
-
96
-
97
-
98
-
99
-
100
-
101
-
102
-
103
-
104
-
105
-
106
-
107
-
108
-
109
-
110
-
111
-
112
-
113
-
114
-
115
-
116
-
117
-
118
-
119
-
120
-
121
-
122
-
123
-
124
-
125
-
126
-
127
-
128
-
129
-
130
-
131
-
132
-
133
-
134
-
135
-
136
-
137
-
138
-
139
-
140
-
141
-
142
-
143
-
144
-
145
-
146
-
147
-
148
-
149
-
150
-
151
-
152
-
153
-
154
-
155
-
156
-
157
-
158
-
159
-
160
-
161
-
162
-
163
-
164
-
165
-
166
-
167
-
168
 |
 |