Samsung RF4289HARS User Manual (user Manual) (ver.0.1) (English, Spanish) - Page 75
Using The Doors, Using The Tilting Pocket, Removing The Freezer, Accessories
 |
UPC - 036725560529
View all Samsung RF4289HARS manuals
Add to My Manuals
Save this manual to your list of manuals |
Page 75 highlights
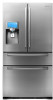
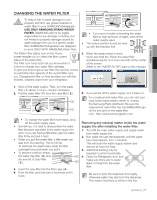
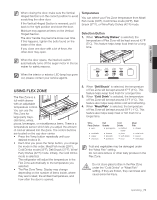
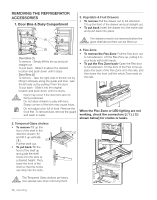
02 operating 1. Refer to page 7 for disassembly instructions. 2. Open the cover housing with a flat-blade screwdriver. Using the doors Ensure that the doors close all the way and are securely sealed. When the refrigerator door is only partially open, it will automatically close. But, the door will stay open if opened more than the auto close range and you must close it manually. 2. Super Extended Drawer • To remove-Pull the drawer out to full extension. Tilt up the rear of the drawer and lift straight out. • To put back-Place the drawer onto the rails ( 4 ) by tilting it up. Lower the drawer into place until it is horizontal and slide the drawer ( 3 ) in. 4 3 Using the tilting pocket You can use the Tilting Pocket to store a pizza up to 16 inches wide if you place it as shown in the illustration. 3. Freezer Drawer • To remove the freezer drawer-Pull the freezer drawer out fully. Tilt up the rear of the bin and lift it out to remove. • To put the freezer drawer back-Place the bin into the rail assembly. Removing the freezer accessories 1. Tilting Pocket • To remove-Remove the tilting pocket ( 1 ) by pulling both support guards ( 2 ) aside. Take out both support guards by pulling them aside. • To put back-Hook the ends of the tilting pocket ( 1 ) onto the support guards ( 2 ) and push down until they lock into place. Do not allow babies or children to go inside caution the freezer drawer. They could damage the refrigerator and seriously injure themselves. Do not sit on the freezer door. The door may break. Do not allow children to climb into the freezer drawer. Do not remove the divider. caution If trapped inside, children may get injured or WARNING suffocate to death. 1 2 operating _75
-
 1
1 -
2
-
3
-
4
-
5
-
6
-
7
-
8
-
9
-
10
-
11
-
12
-
13
-
14
-
15
-
16
-
17
-
18
-
19
-
20
-
21
-
22
-
23
-
24
-
25
-
26
-
27
-
28
-
29
-
30
-
31
-
32
-
33
-
34
-
35
-
36
-
37
-
38
-
39
-
40
-
41
-
42
-
43
-
44
-
45
-
46
-
47
-
48
-
49
-
50
-
51
-
52
-
53
-
54
-
55
-
56
-
57
-
58
-
59
-
60
-
61
-
62
-
63
-
64
-
65
-
66
-
67
-
68
-
69
-
 70
70 -
 71
71 -
 72
72 -
 73
73 -
 74
74 -
 75
75 -
 76
76 -
 77
77 -
 78
78 -
 79
79 -
 80
80 -
81
-
82
-
83
-
84
-
85
-
86
-
87
-
88
-
89
-
90
-
91
-
92
-
93
-
94
-
95
-
96
-
97
-
98
-
99
-
100
-
101
-
102
-
103
-
104
-
105
-
106
-
107
-
108
-
109
-
110
-
111
-
112
-
113
-
114
-
115
-
116
-
117
-
118
-
119
-
120
-
121
-
122
-
123
-
124
-
125
-
126
-
127
-
128
-
129
-
130
-
131
-
132
-
133
-
134
-
135
-
136
-
137
-
138
-
139
-
140
-
141
-
142
-
143
-
144
-
145
-
146
-
147
-
148
-
149
-
150
-
151
-
152
-
153
-
154
-
155
-
156
-
157
-
158
-
159
-
160
-
161
-
162
-
163
-
164
-
165
-
166
-
167
-
168
 |
 |