Samsung SPH-A640 User Manual (user Manual) (ver.f3) (English) - Page 149
Creating Your Sprint PCS Picture Mail Password, Camera
 |
View all Samsung SPH-A640 manuals
Add to My Manuals
Save this manual to your list of manuals |
Page 149 highlights
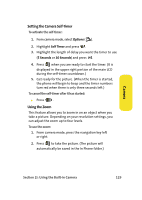
Ⅲ Erase to delete the picture you just took. Ⅲ Camera Mode to return to the camera to take additional pictures. Ⅲ Review Pictures to go to the In Phone folder to review your saved pictures. Ⅲ Postcard to take a picture of handwritten text and digitize the writing into your image. Once placed in the image, you can modify the colors, placement, and various other features. Creating Your Sprint PCS Picture Mail Password The first time you use any of the picture management options involving the Sprint PCS Picture Mail Web site, you will need to establish a Sprint PCS Picture Mail password through your phone. This password will also allow you to sign in to the Sprint PCS Picture Mail Web site at www.sprint.com/ picturemail to access and manage your uploaded pictures and albums. To create your Sprint PCS Picture Mail password: 1. Select Menu > Pictures > Online Albums. 2. Select View Albums or Upload Picture and press . (You will be prompted to Connect/Always Auto-connect. Enable PCS Vision if necessary and create a Sprint PCS Picture Mail password for your account by following the onscreen instructions.) Camera Note: If your Sprint PCS Service Plan does not include Sprint PCS Picture Mail, you will first be prompted to subscribe to the service for an additional monthly charge. 3. Enter a four- to eight-digit password and press . (You will be prompted to confirm your password.) 4. Please wait while the system creates your account. Section 2I: Using the Built-in Camera 127
-
 1
1 -
2
-
3
-
4
-
5
-
6
-
7
-
8
-
9
-
10
-
11
-
12
-
13
-
14
-
15
-
16
-
17
-
18
-
19
-
20
-
21
-
22
-
23
-
24
-
25
-
26
-
27
-
28
-
29
-
30
-
31
-
32
-
33
-
34
-
35
-
36
-
37
-
38
-
39
-
40
-
41
-
42
-
43
-
44
-
45
-
46
-
47
-
48
-
49
-
50
-
51
-
52
-
53
-
54
-
55
-
56
-
57
-
58
-
59
-
60
-
61
-
62
-
63
-
64
-
65
-
66
-
67
-
68
-
69
-
70
-
71
-
72
-
73
-
74
-
75
-
76
-
77
-
78
-
79
-
80
-
81
-
82
-
83
-
84
-
85
-
86
-
87
-
88
-
89
-
90
-
91
-
92
-
93
-
94
-
95
-
96
-
97
-
98
-
99
-
100
-
101
-
102
-
103
-
104
-
105
-
106
-
107
-
108
-
109
-
110
-
111
-
112
-
113
-
114
-
115
-
116
-
117
-
118
-
119
-
120
-
121
-
122
-
123
-
124
-
125
-
126
-
127
-
128
-
129
-
130
-
131
-
132
-
133
-
134
-
135
-
136
-
137
-
138
-
139
-
140
-
141
-
142
-
143
-
 144
144 -
 145
145 -
 146
146 -
 147
147 -
 148
148 -
 149
149 -
 150
150 -
 151
151 -
 152
152 -
 153
153 -
 154
154 -
155
-
156
-
157
-
158
-
159
-
160
-
161
-
162
-
163
-
164
-
165
-
166
-
167
-
168
-
169
-
170
-
171
-
172
-
173
-
174
-
175
-
176
-
177
-
178
-
179
-
180
-
181
-
182
-
183
-
184
-
185
-
186
-
187
-
188
-
189
-
190
-
191
-
192
-
193
-
194
-
195
-
196
-
197
-
198
-
199
-
200
-
201
-
202
-
203
-
204
-
205
-
206
-
207
-
208
-
209
-
210
-
211
-
212
-
213
-
214
-
215
-
216
-
217
-
218
-
219
-
220
-
221
-
222
-
223
-
224
-
225
-
226
-
227
-
228
-
229
-
230
-
231
-
232
-
233
-
234
-
235
-
236
-
237
-
238
-
239
-
240
-
241
-
242
-
243
-
244
-
245
-
246
-
247
-
248
-
249
-
250
-
251
-
252
-
253
-
254
-
255
-
256
-
257
-
258
-
259
-
260
-
261
-
262
-
263
-
264
-
265
 |
 |