Samsung WB150F User Manual Ver.1.3 (English) - Page 120
Advanced, Power management Setup, Resume on PME, Enabled, Start, Control Panel, and then open - drivers
 |
View all Samsung WB150F manuals
Add to My Manuals
Save this manual to your list of manuals |
Page 120 highlights
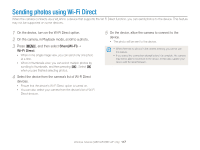
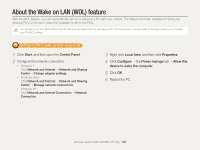
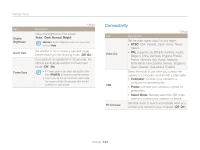
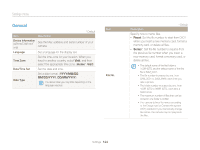
About the Wake on LAN (WOL) feature Setting the PC to turn on 1 Turn on the PC, and then press F2 while the PC is booting. • The BIOS setting menu will appear. 2 Select Advanced tab “ Power management Setup. 3 Select Resume on PME “ Enabled. 4 Press F10 to save your changes, and then continue booting. 5 Click Start, and then open the Control Panel. 6 Configure the network connection. • Windows 7: Click Network and Internet “ Network and Sharing Center “ Change adapter settings. • Windows Vista: Click Network and Internet “ Network and Sharing Center “ Manage network connections. • Windows XP: Click Network and Internet Connection “ Network Connection. 7 Select the drivers for the network adapter. 8 Click the Advanced tab, and then set the WOL menus. • You cannot use this feature across a firewall or if a security program has been installed. • To turn on the PC with the WOL feature, the PC must have an active connection to the LAN. Ensure that the indicator light on the PC's LAN port is on indicating that the LAN connection is active. • Depending on your PC model, the camera may only be able to wake the PC. • Depending on your PC's OS or drivers, the names of the WOL setting menu may vary. - examples of setting menu names: Enable PME, Wake on LAN, etc. - examples of setting menu values: Enable, Magic packet, etc. Wireless network (WB150F/WB152F only) 119
-
 1
1 -
2
-
3
-
4
-
5
-
6
-
7
-
8
-
9
-
10
-
11
-
12
-
13
-
14
-
15
-
16
-
17
-
18
-
19
-
20
-
21
-
22
-
23
-
24
-
25
-
26
-
27
-
28
-
29
-
30
-
31
-
32
-
33
-
34
-
35
-
36
-
37
-
38
-
39
-
40
-
41
-
42
-
43
-
44
-
45
-
46
-
47
-
48
-
49
-
50
-
51
-
52
-
53
-
54
-
55
-
56
-
57
-
58
-
59
-
60
-
61
-
62
-
63
-
64
-
65
-
66
-
67
-
68
-
69
-
70
-
71
-
72
-
73
-
74
-
75
-
76
-
77
-
78
-
79
-
80
-
81
-
82
-
83
-
84
-
85
-
86
-
87
-
88
-
89
-
90
-
91
-
92
-
93
-
94
-
95
-
96
-
97
-
98
-
99
-
100
-
101
-
102
-
103
-
104
-
105
-
106
-
107
-
108
-
109
-
110
-
111
-
112
-
113
-
114
-
 115
115 -
 116
116 -
 117
117 -
 118
118 -
 119
119 -
 120
120 -
 121
121 -
 122
122 -
 123
123 -
 124
124 -
 125
125 -
126
-
127
-
128
-
129
-
130
-
131
-
132
-
133
-
134
-
135
-
136
-
137
-
138
-
139
-
140
-
141
-
142
-
143
-
144
-
145
-
146
-
147
-
148
-
149
-
150
-
151
-
152
-
153
-
154
-
155
-
156
-
157
-
158
-
159
-
160
 |
 |