Sony PEGA-WL100 Operating Instructions - Page 27
Tap the checkbox of [Auto] in [IP Address], and remove
 |
UPC - 027242617728
View all Sony PEGA-WL100 manuals
Add to My Manuals
Save this manual to your list of manuals |
Page 27 highlights
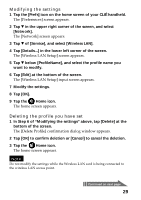
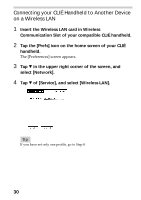
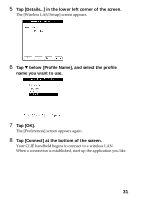
12 Tap V of [ch] below [Adhoc], and select a channel. Be sure to select the same channel for both your CLIÉ handheld and the other communication device. Select a channel from 1 to 11. 13 Tap [Advanced Setup] in the lower right corner of the screen. 14 Tap the checkbox of [Auto] in [IP Address], and remove the tick. The IP address input screen appears. Note Ad-hoc mode may not be established if "Auto" is checked. The connection works only when both of the PC without DHCP and CLIÉ handheld select "Auto". Most of the time, user has to enter static IP on CLIÉ handheld for the Ad-hoc mode. Continued on next page 27
-
 1
1 -
2
-
3
-
4
-
5
-
6
-
7
-
8
-
9
-
10
-
11
-
12
-
13
-
14
-
15
-
16
-
17
-
18
-
19
-
20
-
21
-
 22
22 -
 23
23 -
 24
24 -
 25
25 -
 26
26 -
 27
27 -
 28
28 -
 29
29 -
 30
30 -
 31
31 -
 32
32 -
33
-
34
-
35
-
36
-
37
-
38
-
39
-
40
 |
 |

27
12
Tap
V
of [ch] below [Adhoc], and select a channel.
Be sure to select the same channel for both your CLI
É
handheld
and the other communication device. Select a channel from 1 to
11.
13
Tap [Advanced Setup] in the lower right corner of the
screen.
14
Tap the checkbox of [Auto] in [IP Address], and remove
the tick.
The IP address input screen appears.
Note
Ad-hoc mode may not be established if
“
Auto
”
is checked.
The connection works only when both of the PC without DHCP and CLI
É
handheld select
“
Auto
”
. Most of the time, user has to enter static IP on CLI
É
handheld for the Ad-hoc mode.
Continued on next page