Sony PEGA-WL100 Operating Instructions - Page 33
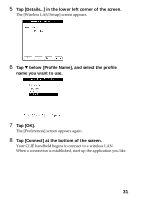
Subnet Maskoptional], and tap [OK]., Tap [Network]
 |
UPC - 027242617728
View all Sony PEGA-WL100 manuals
Add to My Manuals
Save this manual to your list of manuals |
Page 33 highlights
2 Rotate the Jog Dial navigator to select HotSync and press the Jog Dial navigator on the Application Launcher screen. The [HotSync] screen is displayed. You can also tap the [HotSync] icon to display the HotSync screen. 3 Tap the Menu icon, and tap [Primary PC Setup] from the [Option] menu. 4 Check that correct data is entered in [Primary PC Address] and [Subnet Mask(optional)], and tap [OK]. 5 Tap the Menu icon, and tap [Modem Sync Prefes] from the [Option] menu. 6 Tap [Network], and tap [OK]. 7 When the HotSync screen appears, tap [Modem], and then tap [Select Service]. 8 Tap V of [Service], select [Wireless LAN], and tap [Done]. Tip It is unnecessary to enter a telephone number in [Enter phone #]. Note It is also necessary to select [Wireless LAN] in [Service] on the [Network] screen of the [Preferences] that can be started from the home screen. Performing a HotSync operation When you finish the preparation of your CLIÉ handheld and your computer, tap the [HotSync] icon on the [HotSync] screen. Your CLIÉ handheld automatically connects to the network and begins a HotSync operation. When communication is not possible Following the above Step 3, erase the [Primary PC Name]. 33
-
 1
1 -
2
-
3
-
4
-
5
-
6
-
7
-
8
-
9
-
10
-
11
-
12
-
13
-
14
-
15
-
16
-
17
-
18
-
19
-
20
-
21
-
22
-
23
-
24
-
25
-
26
-
27
-
 28
28 -
 29
29 -
 30
30 -
 31
31 -
 32
32 -
 33
33 -
 34
34 -
 35
35 -
 36
36 -
 37
37 -
 38
38 -
39
-
40
 |
 |