Sony VPL AW15 Operating Instructions - Page 41
Cinema Black Pro, Contrast, Brightness, Color, Color Temp., Custom1
 |
UPC - 027242703094
View all Sony VPL AW15 manuals
Add to My Manuals
Save this manual to your list of manuals |
Page 41 highlights
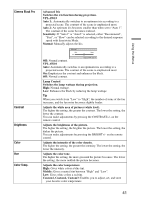
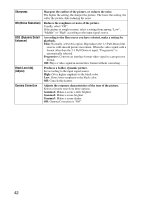
Cinema Black Pro Advanced Iris Switches the iris function during projection. VPL-AW15 Auto 1: .Automatically switches to an optimum iris according to a projected scene. The contrast of the scene is emphasized most. Auto 2: An optimum iris becomes smaller than when set to "Auto 1". The contrast of the scene becomes reduced. Sensitivity: If "Auto1" or "Auto2" is selected, either "Recommend", "Fast", or "Slow" can be selected according to the desired response speed with Sensitivity Mode. Manual: Manually adjusts the Iris. Using the Menus Contrast Brightness Color Hue Color Temp. Off: Normal contrast. VPL-AW10 Auto: Automatically switches to an optimum iris according to a projected scene. The contrast of the scene is emphasized most. On: Emphasizes the contrast and enhances the black. Off: Normal contrast. Lamp Control Switches the lamp wattage during projection. High: Normal wattage. Low: Enhances the black by reducing the lamp wattage. Tip When you switch from "Low" to "High", the number of turns of the fan increases, and the fan noise becomes slightly louder. Adjusts the white area of pictures (white level). The higher the setting, the greater the contrast. The lower the setting, the lower the contrast. You can make adjustments by pressing the CONTRAST+/- on the remote control. Adjusts the brightness of the picture. The higher the setting, the brighter the picture. The lower the setting, the darker the picture. You can make adjustments by pressing the BRIGHT+/- on the remote control. Adjusts the intensity of the color density. The higher the setting, the greater the intensity. The lower the setting, the lower the intensity. Adjusts the color tone. The higher the setting, the more greenish the picture becomes. The lower the setting, the more reddish the picture becomes. Adjusts the color temperature. High: Gives white colors a blue tint. Middle: Gives a neutral tint between "High" and "Low". Low: Gives white colors a red tint. Custom1, Custom2, Custom3: Enables you to adjust, set, and store your favorite color temperature. 41
-
 1
1 -
2
-
3
-
4
-
5
-
6
-
7
-
8
-
9
-
10
-
11
-
12
-
13
-
14
-
15
-
16
-
17
-
18
-
19
-
20
-
21
-
22
-
23
-
24
-
25
-
26
-
27
-
28
-
29
-
30
-
31
-
32
-
33
-
34
-
35
-
 36
36 -
 37
37 -
 38
38 -
 39
39 -
 40
40 -
 41
41 -
 42
42 -
 43
43 -
 44
44 -
 45
45 -
 46
46 -
47
-
48
-
49
-
50
-
51
-
52
-
53
-
54
-
55
-
56
-
57
-
58
-
59
-
60
-
61
-
62
-
63
-
64
-
65
-
66
-
67
-
68
-
69
-
70
-
71
-
72
-
73
-
74
-
75
-
76
 |
 |
