Symphonic SR90VE Owner's Manual - Page 13
Connections
 |
View all Symphonic SR90VE manuals
Add to My Manuals
Save this manual to your list of manuals |
Page 13 highlights
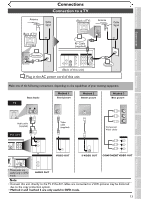
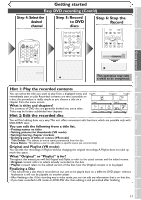
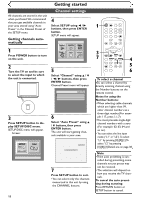
Before you start Connections Getting started Recording Connections Connection to a TV Antenna Cable Signal (Back of TV) Antenna Cable Signal (Back of TV) or 1 Disconnect 3 Connect RF Cable (supplied) DVD DIGITAL AUDIO AUDIO OUT OUT S-VIDEO COMPONENT VIDEO OUT Y L COAXIAL R CB IN CR OUT DVD/VCR AUDIO IN AUDIO OUT ANTENNA IN L L R R VIDEO IN VIDEO OUT OUT (Back of this unit) 4 Plug in the AC power cord of this unit. or 2 Connect Playing discs Editing Changing the SETUP menu VCR functions Others Español Make one of the following connections, depending on the capabilities of your existing equipment. Basic Audio TV AUDIO IN Method 1 Good picture VIDEO IN Method 2 Better picture S-VIDEO IN Method 3 Best picture COMPONENT VIDEO IN Y CB CR Audio cable (supplied) This unit DVD AUDIO S-VIDEO OUT COMPONENT VIDEO OUT Y L CB IN R CR OUT DVD/VCR AUDIO IN AUDIO OUT ANTENNA IN L L R R VIDEO IN VIDEO OUT OUT DVD/VCR AUDIO OUT L R DVD DIGITAL AUDIO AUDIO OUT OUT S-VIDEO COMPONENT VIDEO OUT Y L COAXIAL R CB IN CR OUT DVD/VCR AUDIO IN AUDIO OUT ANTENNA IN L L R R VIDEO IN VIDEO OUT OUT or DVD AUDIO OUT L R Video cable (supplied) DVD/VCR VIDEO OUT VIDEO OUT S-Video cable (not supplied) Component Video cables (not supplied) DVD S-VIDEO OUT S-VIDEO OUT DVD COMPONENT VIDEO OUT Y CB CR COMPONENT VIDEO OUT • These jacks are useful only in DVD mode. AUDIO OUT Note • Connect this unit directly to the TV. If the A/V cables are connected to a VCR, pictures may be distorted due to the copy protection system. • Method 2 and method 3 are only useful in DVD mode. 13
-
 1
1 -
2
-
3
-
4
-
5
-
6
-
7
-
 8
8 -
 9
9 -
 10
10 -
 11
11 -
 12
12 -
 13
13 -
 14
14 -
 15
15 -
 16
16 -
 17
17 -
 18
18 -
19
-
20
-
21
-
22
-
23
-
24
-
25
-
26
-
27
-
28
-
29
-
30
-
31
-
32
-
33
-
34
-
35
-
36
-
37
-
38
-
39
-
40
-
41
-
42
-
43
-
44
-
45
-
46
-
47
-
48
-
49
-
50
-
51
-
52
-
53
-
54
-
55
-
56
-
57
-
58
-
59
-
60
-
61
-
62
-
63
-
64
-
65
-
66
-
67
-
68
-
69
-
70
-
71
-
72
-
73
-
74
-
75
-
76
-
77
-
78
-
79
-
80
-
81
-
82
-
83
-
84
-
85
-
86
-
87
-
88
-
89
-
90
-
91
-
92
-
93
-
94
-
95
-
96
-
97
-
98
-
99
-
100
-
101
-
102
-
103
-
104
-
105
-
106
-
107
-
108
 |
 |
