Symphonic SR90VE Owner's Manual - Page 23
When Auto Clock Setting is selected to Auto or
 |
View all Symphonic SR90VE manuals
Add to My Manuals
Save this manual to your list of manuals |
Page 23 highlights
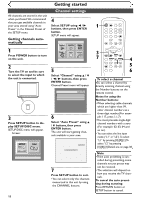
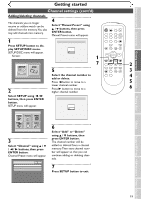
Before you start Connections Getting started Recording Getting started Setting the clock (cont'd) 7 8 Press K / L buttons to select AM or PM, then press ENTER button. Clock menu will appear, then the settings will be activated. Press SETUP button to exit. Although seconds are not displayed, they begin counting from zero. Setup > Clock Clock Setting Auto Clock Setting Daylight Saving Time VCR DVD Auto ON POWER REC SPEED AUDIO OPEN/CLOSE .@/: 1 GHI 4 PQRS 7 DISPLAY ABC 2 JKL 5 TUV 8 SPACE 0 VCR DEF 3 MNO CH 6 WXYZ VIDEO/TV 9 SLOW DVD PAUSE PLAY 8 STOP REC/OTR SETUP TIMER PROG. REC MONITOR ENTER MENU/LIST TOP MENU RETURN 7 CLEAR/C-RESET ZOOM SKIP SKIP SEARCH MODE CM SKIP When "Auto Clock Setting" is selected to "Auto" or "Manual", change it to "OFF" as follows: Repeat steps (1) to (3) in "Manual Clock Setting". 4 Select "Auto Clock Setting" using K / L buttons, then press ENTER button. Option window will appear. Setup > Clock Clock Setting Auto Clock Setting Daylight Saving Time VCR DVD OFF AAuuttoo OMfaf nual 5 Select "OFF" using K / L buttons, then press ENTER button. 6 Press SETUP button to exit. 6 PLAY STOP REC/OTR SETUP TIMER PROG. REC MONITOR ENTER MENU/LIST TOP MENU RETURN CLEAR/C-RESET ZOOM SKIP SEARCH MODE CM SKIP SKIP 4 5 Playing discs Editing Changing the SETUP menu VCR functions Others Español 23
-
 1
1 -
2
-
3
-
4
-
5
-
6
-
7
-
8
-
9
-
10
-
11
-
12
-
13
-
14
-
15
-
16
-
17
-
 18
18 -
 19
19 -
 20
20 -
 21
21 -
 22
22 -
 23
23 -
 24
24 -
 25
25 -
 26
26 -
 27
27 -
 28
28 -
29
-
30
-
31
-
32
-
33
-
34
-
35
-
36
-
37
-
38
-
39
-
40
-
41
-
42
-
43
-
44
-
45
-
46
-
47
-
48
-
49
-
50
-
51
-
52
-
53
-
54
-
55
-
56
-
57
-
58
-
59
-
60
-
61
-
62
-
63
-
64
-
65
-
66
-
67
-
68
-
69
-
70
-
71
-
72
-
73
-
74
-
75
-
76
-
77
-
78
-
79
-
80
-
81
-
82
-
83
-
84
-
85
-
86
-
87
-
88
-
89
-
90
-
91
-
92
-
93
-
94
-
95
-
96
-
97
-
98
-
99
-
100
-
101
-
102
-
103
-
104
-
105
-
106
-
107
-
108
 |
 |
