Symphonic SR90VE Owner's Manual - Page 33
One-touch timer recording
 |
View all Symphonic SR90VE manuals
Add to My Manuals
Save this manual to your list of manuals |
Page 33 highlights
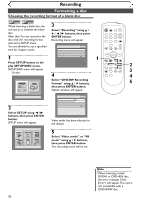
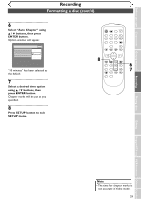
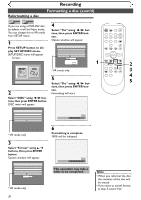
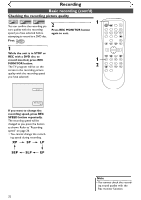
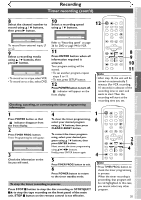
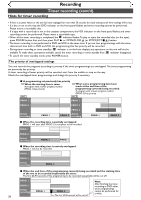
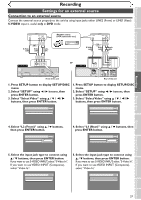
Recording One-touch timer recording Before you start Connections Getting started Recording Playing discs DVD-R Video DVD-RW VR DVD-RW This is a simple way to set the recording time in blocks of 30 4 Select a desired channel to 2 POWER REC SPEED AUDIO OPEN/CLOSE minutes. Check that the disc you are recording onto has enough space for the time you set. When the recording finishes the recorder automatically goes into standby. record using CH K / L buttons or number buttons. 5 Press REC/OTR button, then .@/: 1 GHI 4 PQRS 7 DISPLAY ABC 2 JKL 5 TUV 8 SPACE 0 VCR DEF 3 MNO CH 6 WXYZ VIDEO/TV 9 SLOW DVD PAUSE 4 First: DVD 1 press REC/OTR button PLAY repeatedly until a desired 5 recording time (30 minutes to 8 hours) appears on the TV STOP REC/OTR SETUP TIMER PROG. 5 REC MONITOR ENTER Turn on the unit and load a screen. MENU/LIST TOP MENU RETURN recordable disc. Recording will start. CLEAR/C-RESET ZOOM SKIP SKIP Make sure that the TV input is set on the unit. SEARCH MODE CM SKIP This operation may take a while to be recognized. 2 Select a recording speed using REC SPEED button. Refer to "Recording speed" on page 26. 3 Make sure that the recording format is set to the desired mode. Refer to "Formatting a disc" on pages 28-30. When a DVD-RW disc is loaded: You can choose Video mode or VR mode from SETUP menu. "Video mode" has been selected as the default. Refer to "Choosing the recording format of a blank disc" on pages 28-29. When a DVD-R disc is loaded: DVD-R discs will always be in Video mode. I 0:30 0:30 (Normal Recording) 1:00 8:00 7:30 When reaches the specified time, the unit will be turned off automatically. To cancel the one-touch timer recording within the specified time, press STOP C button. This operation may take a while to be completed. Note • The unit will be turned off automatically under the conditions following. 1)No space remained on the disc. 2)When a power failure occurs. • If OTR is finished in DVD during playback or REC mode in VCR, the DVD will be in STOP mode and the VCR keeps the current mode. 33 Editing Changing the SETUP menu VCR functions Others Español
-
 1
1 -
2
-
3
-
4
-
5
-
6
-
7
-
8
-
9
-
10
-
11
-
12
-
13
-
14
-
15
-
16
-
17
-
18
-
19
-
20
-
21
-
22
-
23
-
24
-
25
-
26
-
27
-
 28
28 -
 29
29 -
 30
30 -
 31
31 -
 32
32 -
 33
33 -
 34
34 -
 35
35 -
 36
36 -
 37
37 -
 38
38 -
39
-
40
-
41
-
42
-
43
-
44
-
45
-
46
-
47
-
48
-
49
-
50
-
51
-
52
-
53
-
54
-
55
-
56
-
57
-
58
-
59
-
60
-
61
-
62
-
63
-
64
-
65
-
66
-
67
-
68
-
69
-
70
-
71
-
72
-
73
-
74
-
75
-
76
-
77
-
78
-
79
-
80
-
81
-
82
-
83
-
84
-
85
-
86
-
87
-
88
-
89
-
90
-
91
-
92
-
93
-
94
-
95
-
96
-
97
-
98
-
99
-
100
-
101
-
102
-
103
-
104
-
105
-
106
-
107
-
108
 |
 |
