TP-Link TL-WR842ND TL-WR842ND V1 User Guide - Page 89
Click Here To Add New Host List
 |
View all TP-Link TL-WR842ND manuals
Add to My Manuals
Save this manual to your list of manuals |
Page 89 highlights
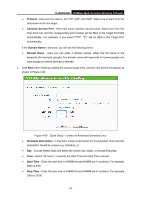
TL-WR842ND 300Mbps Multi-Function Wireless N Router 4. Click Next when finishing creating the advanced schedule entry, and the next screen will appear as shown in Figure 4-70. Figure 4-70 Quick Setup - Create an Internet Access Control Entry ¾ Rule - In this field, create a name for the rule. Note that this name should be unique (e.g. Rule_1). ¾ Host - In this field, select a host from the drop-down list for the rule. The default value is the Host Description you set just now. ¾ Target - In this filed, select a target from the drop-down list for the rule. The default value is the Target Description you set just now. ¾ Schedule - In this field, select a schedule from the drop-down list for the rule. The default value is the Schedule Description you set just now. ¾ Status - In this field, there are two options, Enable or Disable. Select Enable so that the rule will take effect. Select Disable so that the rule won't take effect. 5. Click Finish to complete adding a new rule. Method Two: 1. Click the Add New... button and the next screen will pop up as shown in Figure 4-71. 2. Give a name (e.g. Rule_1) for the rule in the Rule Name field. 3. Select a host from the Host drop-down list or choose "Click Here To Add New Host List". 4. Select a target from the Target drop-sown list or choose "Click Here To Add New Target List". 5. Select a schedule from the Schedule drop-down list or choose "Click Here To Add New Schedule". 6. In the Status field, select Enabled or Disabled to enable or disable your entry. - 81 -
-
 1
1 -
2
-
3
-
4
-
5
-
6
-
7
-
8
-
9
-
10
-
11
-
12
-
13
-
14
-
15
-
16
-
17
-
18
-
19
-
20
-
21
-
22
-
23
-
24
-
25
-
26
-
27
-
28
-
29
-
30
-
31
-
32
-
33
-
34
-
35
-
36
-
37
-
38
-
39
-
40
-
41
-
42
-
43
-
44
-
45
-
46
-
47
-
48
-
49
-
50
-
51
-
52
-
53
-
54
-
55
-
56
-
57
-
58
-
59
-
60
-
61
-
62
-
63
-
64
-
65
-
66
-
67
-
68
-
69
-
70
-
71
-
72
-
73
-
74
-
75
-
76
-
77
-
78
-
79
-
80
-
81
-
82
-
83
-
 84
84 -
 85
85 -
 86
86 -
 87
87 -
 88
88 -
 89
89 -
 90
90 -
 91
91 -
 92
92 -
 93
93 -
 94
94 -
95
-
96
-
97
-
98
-
99
-
100
-
101
-
102
-
103
-
104
-
105
-
106
-
107
-
108
-
109
-
110
-
111
-
112
-
113
-
114
-
115
-
116
-
117
-
118
-
119
-
120
-
121
-
122
-
123
-
124
-
125
-
126
-
127
-
128
-
129
-
130
 |
 |
