Toshiba LX835-D3340 User Guide - Page 44
Refresh your PC (with user’s data), USB Flash, Finish, Settings
 |
View all Toshiba LX835-D3340 manuals
Add to My Manuals
Save this manual to your list of manuals |
Page 44 highlights
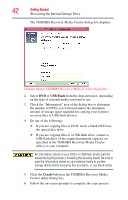
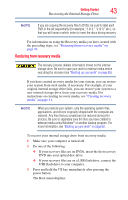
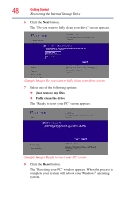
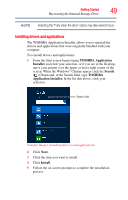
44 Getting Started Recovering the Internal Storage Drive 4 Using the arrow keys, select the DVD option or the USB Flash option, depending on which type of media you are using, and then press the ENTER key. 5 A warning screen appears, stating that when the recovery is executed all data on your internal storage drive will be deleted and rewritten. Click Yes to continue. 6 Follow the on-screen instructions to complete the recovery process. When the process is complete, a message displays indicating that the drive has been recovered. 7 Click Finish to restart the computer. Refresh your PC (with user's data) Using "Refresh your PC" recovers your internal storage drive to factory default state and attempts to save your data. Toshiba does not guarantee successful data back-up. Please make a complete back up of your data to external media before executing the recovery. For more information, see "Backing up your work" on page 60. You can recover the factory default software (refresh your PC), while the computer will attempt to back up your data using the utilities stored on your computer's internal storage drive: TECHNICAL NOTE: Your data will be copied into the backup folder. All of the data will be moved to this folder during the recovery process, however the current directory structure will be retained. 1 From the Start or Desktop screen, move your pointer over the upper or lower right corner of the screen. 2 When the Windows® Charms appear click the Settings ( ) Charm.
-
 1
1 -
2
-
3
-
4
-
5
-
6
-
7
-
8
-
9
-
10
-
11
-
12
-
13
-
14
-
15
-
16
-
17
-
18
-
19
-
20
-
21
-
22
-
23
-
24
-
25
-
26
-
27
-
28
-
29
-
30
-
31
-
32
-
33
-
34
-
35
-
36
-
37
-
38
-
 39
39 -
 40
40 -
 41
41 -
 42
42 -
 43
43 -
 44
44 -
 45
45 -
 46
46 -
 47
47 -
 48
48 -
 49
49 -
50
-
51
-
52
-
53
-
54
-
55
-
56
-
57
-
58
-
59
-
60
-
61
-
62
-
63
-
64
-
65
-
66
-
67
-
68
-
69
-
70
-
71
-
72
-
73
-
74
-
75
-
76
-
77
-
78
-
79
-
80
-
81
-
82
-
83
-
84
-
85
-
86
-
87
-
88
-
89
-
90
-
91
-
92
-
93
-
94
-
95
-
96
-
97
-
98
-
99
-
100
-
101
-
102
-
103
-
104
-
105
-
106
-
107
-
108
-
109
-
110
-
111
-
112
-
113
-
114
-
115
-
116
-
117
-
118
-
119
-
120
-
121
-
122
-
123
-
124
-
125
-
126
-
127
-
128
-
129
-
130
-
131
-
132
-
133
-
134
-
135
-
136
-
137
-
138
-
139
-
140
-
141
-
142
-
143
-
144
-
145
-
146
-
147
-
148
 |
 |