ViewSonic VPC101 User Manual
ViewSonic VPC101 Manual
 |
View all ViewSonic VPC101 manuals
Add to My Manuals
Save this manual to your list of manuals |
ViewSonic VPC101 manual content summary:
- ViewSonic VPC101 | User Manual - Page 1
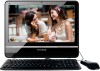
ViewSonic® VPC101 All-in-One PC Model No. : VS12602 - ViewSonic VPC101 | User Manual - Page 2
if not installed and used in accordance with the instructions, may cause harmful interference to radio communications. However, , the user is encouraged to try to correct the interference by one or more of the following measures: • Reorient or relocate the than 0.004% Lead. ViewSonic VPC101 i - ViewSonic VPC101 | User Manual - Page 3
489-17 V1.2.1 (2002) EN 62311 (2008) Notified Countries: Germany, UK, Netherlands, Belgium, Sweden, Denmark, Finland, France, Italy, Spain, Austria, Ireland, Portugal, Greece, Luxembourg, Estonia, Latvia, Lithuania, Czech Republic, Slovakia, Slovenia, Hungary, Poland and Malta. ViewSonic VPC101 ii - ViewSonic VPC101 | User Manual - Page 4
unit has been damaged in any way, such as: if the power-supply cord or plug is damaged, if liquid is spilled onto or objects fall into the unit, if the unit is exposed to rain or moisture, or if the unit does not operate normally or has been dropped. ViewSonic VPC101 iii - ViewSonic VPC101 | User Manual - Page 5
steel containing up to 0.35% lead by weight, aluminium containing up to 0.4% lead by weight and as a cooper alloy containing up to 4% lead by weight. ViewSonic VPC101 iv - ViewSonic VPC101 | User Manual - Page 6
ViewSonic® Corporation, 2009. All rights reserved. Microsoft®, Windows®, Windows NT®, and the Windows® logo are registered trademarks of Microsoft® Corporation in the United States and other countries. ViewSonic by Macrovision. Reverse engineering or disassembly is prohibited. ViewSonic VPC101 v - ViewSonic VPC101 | User Manual - Page 7
for you to print the registration form, which you may mail or fax to ViewSonic. For Your Records Product Name: Model Number: Document Number: Serial Number: Purchase Date: VPC101 ViewSonic All-in-One PC VS12602 VPC101-1_UG_ENG Rev. 1B 09-21-09 Product disposal at end of product life The - ViewSonic VPC101 | User Manual - Page 8
the power 14 Connecting the wired keyboard and mouse 15 Customizing the mouse settings 15 Turning on the PC 16 Turning off the PC 16 Configuring the display 17 Brightness control 17 Using the PC ...18 Connecting to the Internet 18 Connecting to a wired network 18 ViewSonic VPC101 1 - ViewSonic VPC101 | User Manual - Page 9
items with your touch screen 26 Using the Peripheral Devices 27 Connecting USB devices 27 Removing USB devices 28 Cleaning and care 29 Screen and computer 29 Cleaning the screen and computer 29 Storing your computer 30 CDs and DVDs (ViewSonic Wizard CD and System Recovery and Driver Disk 30 - ViewSonic VPC101 | User Manual - Page 10
45 Power problems 45 Internet access problems 46 Optical discs problems 47 Display problems 48 Keyboard and mouse problems 49 Sound and microphone problems 50 Miscellaneous problems 51 Specifications ...52 Other information 54 Customer Support 54 Limited Warranty 55 ViewSonic VPC101 3 - ViewSonic VPC101 | User Manual - Page 11
documentation • ViewSonic Wizard CD (containing this manual) provides information about using your computer, cleaning and maintaining the monitor and the accessories, and the common solutions to the problems you may encounter while using your computer. • System Recovery and Driver Disk provides - ViewSonic VPC101 | User Manual - Page 12
transport. The appearance and contents of your package may be different from those illustrated below due to regional variations. Standard items All-in-One PC power adapter power cord Quick Start Guide ViewSonic Wizard CD System Recovery and Driver Disk mouse keyboard ViewSonic VPC101 5 - ViewSonic VPC101 | User Manual - Page 13
(for select adjustments to your work field at your fingertips. The touch models) screen will responsively react with your fingertip commands. 4 Speakers The internal speakers deliver high-quality audio while listening to music or watching your home videos and DVD discs. ViewSonic VPC101 6 - ViewSonic VPC101 | User Manual - Page 14
to know the PC Power. Press to turn on your computer. LCD display switch your computer. Auto-adjust. Press to automatically optimizes and adjusts the screen while displaying computer from overheating. The internal fans blow hot air away from heatsensitive components in the computer. ViewSonic VPC101 - ViewSonic VPC101 | User Manual - Page 15
PC Keep the vents clean and free of dirt and dust, as blocking it may cause serious thermal problems. 2 Computer stand You can adjust the back computer sound from your PC when watching videos cable to connect your computer with a network or the power cord to this port to power the computer. - ViewSonic VPC101 | User Manual - Page 16
Right-side view Getting to know the PC No. Item 1 CD/DVD drive 2 Eject button Description Press the Eject button and insert a CD/DVD into this drive to play drive and burn the data with CD/ DVD recording applications installed on your system. Press to open the disc tray. ViewSonic VPC101 9 - ViewSonic VPC101 | User Manual - Page 17
, or other data stored in the memory cards. This reader supports the following card types: • Secure Digital (SD) • MultiMedia Card (MMC) • Memory Stick (MS) • Memory Stick Pro (MS Pro) Wired keyboard as you type. 2. key: Press to switch between character insert mode. ViewSonic VPC101 10 - ViewSonic VPC101 | User Manual - Page 18
Getting to know the PC 3. Mute key: Press to mute the volume. 4. Volume screen, select "Control Panel" to open the "Adjusting your computer's settings" window, then select "Keyboard", and make adjustments in the opened "Keyboard Properties" dialog box according to your preference. ViewSonic VPC101 - ViewSonic VPC101 | User Manual - Page 19
LED indicator goes off. 2 LCD display power • When the monitor is on, the LED indicator lights up in green. 3 CD/DVD drive activity • When the CD/DVD drive is in use, the LED indicator flashes green. • When the CD/DVD drive is not in use, the LED indicator goes off. ViewSonic VPC101 12 - ViewSonic VPC101 | User Manual - Page 20
your computer. 1. Gently lay the screen face down on a flat clean padded surface. 2. Pull up the computer stand until it is at the maximum height. Please ensure the computer stand has been pulled up to its fully extended position, so that your computer may stand firm and upright. ViewSonic VPC101 - ViewSonic VPC101 | User Manual - Page 21
panel of the computer to make cable connections. Connecting the power The illustrations may differ from product supplied for your region. 1. Connect the power cable to the supplied power adapter. 2. Connect the power plug to the power jack on the rear panel of the monitor. ViewSonic VPC101 14 - ViewSonic VPC101 | User Manual - Page 22
the procedures below. 1. Click the Start menu at the bottom left corner of your screen. 2. Select Control Panel to open the Adjusting your computer's settings window. 3. Select Mouse to open the Mouse Properties dialog box. 4. Make adjustments according to your preference. ViewSonic VPC101 15 - ViewSonic VPC101 | User Manual - Page 23
After you finish the installation of your computer, press the Power button on the front panel of the computer to turn it on. Then follow the on-screen instructions to complete the initial setup. Turning off the PC To turn off the system, close all the active windows, and then click the Start menu at - ViewSonic VPC101 | User Manual - Page 24
Setting up the PC Configuring the display You may press the Auto-adjust button to automatically optimize and adjust the screen settings while displaying video source from the D-sub input jack. Brightness increase the level or press the Decrease button to decrease the level. ViewSonic VPC101 17 - ViewSonic VPC101 | User Manual - Page 25
memory cards, and taking control of your computer via the touchscreen point, please refer to the manuals that shipped with the product service from an ISP. - You have set up the broadband modem (DSL or cable). 2. Connect the computer LAN port to the modem with an Ethernet cable. ViewSonic VPC101 - ViewSonic VPC101 | User Manual - Page 26
Using the PC 3. Open the Web browser and access the wireless network service area. - have purchased the Internet service from an ISP. - have inserted the wireless LAN card to the computer and installed its drivers. - have set list. , to open a list of available wireless ViewSonic VPC101 19 - ViewSonic VPC101 | User Manual - Page 27
Using the PC If the selected network requires security to test the network connection. To disable WLAN manually, click "Disconnect" from the Wireless Network Connection list. Using the webcam Your computer comes with a built-in 1.3 megapixel webcam at dark or too light. ViewSonic VPC101 20 - ViewSonic VPC101 | User Manual - Page 28
a disc When the optical disc drive is in use, the indicator lights up and flashes. When the indicator light is flashing, do not move the computer. 1. Press the Eject button on the drive, as shown below. ViewSonic VPC101 21 - ViewSonic VPC101 | User Manual - Page 29
the disc tray. Using the PC 3. With the label side facing forward, place the disc in the center of the disc tray. 4. Gently push the disc tray back into the disk slot. 5. The optical disc drive indicator is on and your computer will start to read the disc you just inserted. ViewSonic VPC101 22 - ViewSonic VPC101 | User Manual - Page 30
selected software, please see its manual or online help. 3. Follow the on-screen instructions to complete burning process. Removing a disc 1. Ensure the optical disc driver indicator is off. 2. Press the Eject button on the drive. 3. Pull out the disc tray and remove the disc. ViewSonic VPC101 23 - ViewSonic VPC101 | User Manual - Page 31
disk slot. Using memory cards Your computer comes with a 4-in-1 media card reader which allows you to exchange and share your data stored on your memory cards with other devices, such as your mobile phones and digital cameras. The media card reader supports the following memory card types: • Secure - ViewSonic VPC101 | User Manual - Page 32
the PC Your system will automatically detect the inserted memory card and then display the content of the memory card. If no window appears on the desktop, click "Start", select "Computer" to open the Computer window, then double-click the memory card icon to access the data stored on the memory - ViewSonic VPC101 | User Manual - Page 33
software first. Use the touch screen as follows: • Tap once for a single mouse click. • Tap twice for a double mouse click • Press and hold an item to open the item's menu, then move your finger to the appropriate menu item. When your remove your finger, the item is selected. ViewSonic VPC101 26 - ViewSonic VPC101 | User Manual - Page 34
and mouse. 2. If your USB device hasn't been connected with the USB cable, connect one end of the USB cable into the USB port on your device. 3. Connect the other end of the USB cable into the computer's USB port. The following USB device illustration is for reference only. ViewSonic VPC101 27 - ViewSonic VPC101 | User Manual - Page 35
USB device. You may review the contents of the device in the Windows Explorer. Removing USB devices To avoid data or equipment damage while removing the USB devices from the computer, please always follow the . 5. Gently remove the USB device from the USB port on the computer. ViewSonic VPC101 28 - ViewSonic VPC101 | User Manual - Page 36
ensure proper care of your monitor, keyboard and mouse. Screen and computer As your LCD screen is a product made of glass which is equipped with high touchscreen technology, it is recommended that you should handle the screen and computer with special care while performing maintenance on them, since - ViewSonic VPC101 | User Manual - Page 37
When transporting your computer, we recommend you pack the computer in its original packaging. CDs and DVDs (ViewSonic Wizard CD and System Recovery and Driver Disk) Your computer is shipped with a ViewSonic Wizard CD, containing this user manual, and a System Recovery and Driver Disk, allowing you - ViewSonic VPC101 | User Manual - Page 38
mouse, unplug the USB cable to disconnect the keyboard from the computer. To properly disconnect the USB cable, see Removing USB devices. wireless keyboard or mouse only, if your keyboard or mouse has a power button, turn it off. 2. For wireless keyboard or mouse only, remove ViewSonic VPC101 31 - ViewSonic VPC101 | User Manual - Page 39
chapter is for your reference only. The actual items or settings on your VPC101 may differ. To run BIOS setup, press the key immediately when the ViewSonic logo appears on the screen during system startup. The logo shows up on the screen for only a few seconds, so you must press the key at - ViewSonic VPC101 | User Manual - Page 40
Setup Utility The BIOS setup main screen can be divided into four areas: Area 1 2 3 4 Descriptions Displays the configuration menus for your computer. Displays the ways of exiting BIOS setup. Displays keyboard instructions for moving around and making selections. Displays brief information about - ViewSonic VPC101 | User Manual - Page 41
box below. Menu Hard Disk Boot Priority CD-ROM Boot Priority Network Boot Priority Descriptions Press to access its submenu. Use or to specify a device and then use or to change the sequence. Press to save the changes and exit the menu. ViewSonic VPC101 34 - ViewSonic VPC101 | User Manual - Page 42
Option Video Memory Size BIOS Setup Utility Press to access its submenu. Use or to specify a device. Press to save the changes or to cancel the change and exit the menu. To select a boot device manually, press when the ViewSonic logo appears on the screen during - ViewSonic VPC101 | User Manual - Page 43
that you have just specified. When you select this menu and press , a message window will appear. • Typing and then pressing will disregard any changes and restart the system. • Typing will cancel this command and return to the BIOS setup main screen. ViewSonic VPC101 36 - ViewSonic VPC101 | User Manual - Page 44
ViewSonic® Recovery Manager - helps you reinstall the factory-shipped operating system and hardware drivers. For details, see Running ViewSonic® -One PC. The system boots up and the ViewSonic® logo appears. 2. When the screen displays F3..., quickly press the button on the keyboard. If Windows - ViewSonic VPC101 | User Manual - Page 45
System Recovery 4. Click OK. 5. Another confirmation message appears, as below. Click OK. 6. Click OK to continue. System recovery is initiated and the following screen appears. ViewSonic VPC101 38 - ViewSonic VPC101 | User Manual - Page 46
window appears. 8. Click OK to restart your All-in-One PC. Restarting may take several seconds to finish. 9. After restarting, Windows Setup Wizard appears to help you configure basic settings. Follow the on-screen instructions to complete setup and start using your All-in-One PC. ViewSonic VPC101 - ViewSonic VPC101 | User Manual - Page 47
image. This image contains the operating system, drivers, and software program files that were originally installed on your computer at the factory. The recovery disc you create can be used only with your computer, and it works on factory-installed Windows operating systems only. It is strongly - ViewSonic VPC101 | User Manual - Page 48
System Recovery 4. Click Recovery Disc Creation Tool. 5. Click YES. ViewSonic VPC101 41 - ViewSonic VPC101 | User Manual - Page 49
, and then click YES. 7. Click OK to continue. 8. Follow the on-screen instructions to complete the disc burning process. 9. The following window appears to inform you that the recovery disc has been created. Click OK. 10. Store the recovery disc in a safe place for future use. ViewSonic VPC101 42 - ViewSonic VPC101 | User Manual - Page 50
screen displays the following message, quickly press any key within 2 seconds. 3. When the following window appears, click Recovery to Factory Default. 4. A confirmation window appears. Click YES. 5. Click YES to continue recovering your computer to its original factory condition. ViewSonic VPC101 - ViewSonic VPC101 | User Manual - Page 51
screen appears. 7. After the system has been restored, the following window appears. Click OK to restart your All-in-One PC. Restarting may take several seconds to finish. 8. After restarting, follow the on-screen instructions to complete setup and start using your All-in-One PC. ViewSonic VPC101 - ViewSonic VPC101 | User Manual - Page 52
the message and follow the on-screen instruction if any. For further details, refer to the documentation or user manual of the program or hardware. Frequently asked questions (FAQ) Power problems Symptom I have pressed the Power button, but my computer cannot start up. Possible solution • Check - ViewSonic VPC101 | User Manual - Page 53
Internet access problems Troubleshooting Symptom My computer cannot access a modem or a router or access point, refer to the documentation or user manual of the unit. - Update the firmware of your wireless router or access point to the are not experiencing technical problems. ViewSonic VPC101 46 - ViewSonic VPC101 | User Manual - Page 54
problems Troubleshooting (preferably an unused one) to test if the computer is on. • Ensure the optical disc driver indicator is on while you press the Eject button on the optical disc drive. • Click Start > Computer Computer to check the space available on your hard disk drive. ViewSonic VPC101 47 - ViewSonic VPC101 | User Manual - Page 55
the brightness level. • Press the Auto-adjust button on the front panel of the computer. • Check if the monitor is running at its native resolution. - Right-click the desktop, and then select Screen Resolution. In the opened window, set the Resolution to 1366 x 768, and then click Apply and OK to - ViewSonic VPC101 | User Manual - Page 56
and mouse problems Troubleshooting Symptom Keyboard or mouse commands are not recognized by the computer. I cannot receiver is properly connected to the computer, and the keyboard or mouse is within its range. - If your keyboard or mouse has a power button, turn it on. . ViewSonic VPC101 49 - ViewSonic VPC101 | User Manual - Page 57
Sound and microphone problems Troubleshooting Symptom I hear noise when connecting a headphone to the computer. I do not supported by Windows Media Player. For more information about available codecs, see the documentation for Windows Media Player at the Microsoft web site. ViewSonic VPC101 50 - ViewSonic VPC101 | User Manual - Page 58
for Windows Media Player at the Microsoft web site. • Ensure that the memory card is fully inserted into the card reader slot. • Ensure that the memory card is one of the supported types. For more information, see Media card reader. • Try restarting your computer. - When the computer is - ViewSonic VPC101 | User Manual - Page 59
VPC101 Intel® Atom 230 processor, 1.6GHz Single Core, FSB 533MHz Intel® Atom 330 processor, 1.6GHz Dual Core, FSB 533MHz (for select models) Intel® 945GC + ICH7 Microsoft Windows Input: 1 • DC-In: 1 USB keyboard and USB mouse 4-in-1 memory card reader (MS/MS-Pro/SD/MMC) Integrated Intel® 10/100/1000 - ViewSonic VPC101 | User Manual - Page 60
lbs Gross: 7.5 kg / 16.52 lbs Intel®, the Intel logo, Intel Core, and Core Inside are trademarks of Intel Corporation in the U.S. and other countries. ViewSonic VPC101 53 - ViewSonic VPC101 | User Manual - Page 61
/uk/ uk/ support/call-desk/ [email protected] Korea www.kr.viewsonic.com Latin America (Argentina) www.viewsonic.com/la/ Latin America (Chile) www.viewsonic.com/la/ T= 080 333 2131 T= 0800 666 0194 T= 800 440 303 [email protected] [email protected] soporte@viewsonic - ViewSonic VPC101 | User Manual - Page 62
prepaid in the original container to an authorized ViewSonic service center or ViewSonic. 4. For additional information or the name of the nearest ViewSonic service center, contact ViewSonic. 4.3: ViewSonic All-in-One PC Warranty Page 1 of 2 AIO PC_LW01 Rev. 1a 02-11-09 ViewSonic VPC101 55 - ViewSonic VPC101 | User Manual - Page 63
warranty information and service on ViewSonic products sold outside of the U.S.A. and Canada, contact ViewSonic or your local ViewSonic dealer. The viewsoniceurope.com under Support/Warranty Information. 4.3: ViewSonic All-in-One PC Warranty ViewSonic VPC101 Page 2 of 2 AIO PC_LW01 Rev. 1a 02 - ViewSonic VPC101 | User Manual - Page 64
-
 1
1 -
 2
2 -
 3
3 -
 4
4 -
 5
5 -
 6
6 -
 7
7 -
8
-
9
-
10
-
11
-
12
-
13
-
14
-
15
-
16
-
17
-
18
-
19
-
20
-
21
-
22
-
23
-
24
-
25
-
26
-
27
-
28
-
29
-
30
-
31
-
32
-
33
-
34
-
35
-
36
-
37
-
38
-
39
-
40
-
41
-
42
-
43
-
44
-
45
-
46
-
47
-
48
-
49
-
50
-
51
-
52
-
53
-
54
-
55
-
56
-
57
-
58
-
59
-
60
-
61
-
62
-
63
-
64
 |
 |

ViewSonic
®
VPC101
All-in-One PC
Model No. : VS12602