Weider 9900i Uk Manual - Page 32
Attach the Burn Bracket 14 and the Burn Band
 |
View all Weider 9900i manuals
Add to My Manuals
Save this manual to your list of manuals |
Page 32 highlights
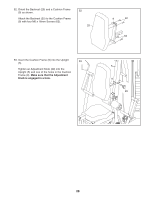
59. Press the Top Cover (27) onto the Top Frame (6) as shown. 59 Orient the Burn Band (26) and the Burn Bracket (14) as shown. Insert the Burn Band into the Burn Bracket. Attach the Burn Bracket (14) and the Burn Band (26) to the Top Frame (6) with two M6 x 45mm Bolts (85) and two M6 Locknuts (87). 27 6 87 14 85 26 60. Attach one side of the Containment Bracket (109) to the Center Shroud (33) with two M4 x 60 12mm Bolts (107) and two M4 Locknuts (108). Then, attach the other side of the Containment Bracket (109) to the Right Side Shroud (34) with two M4 x 12mm Bolts (107) and two M4 Locknuts (108). Insert the Burn Band (26) through the center of the Containment Bracket (109). 26 34 108 109 107 108 33 107 32
-
 1
1 -
2
-
3
-
4
-
5
-
6
-
7
-
8
-
9
-
10
-
11
-
12
-
13
-
14
-
15
-
16
-
17
-
18
-
19
-
20
-
21
-
22
-
23
-
24
-
25
-
26
-
 27
27 -
 28
28 -
 29
29 -
 30
30 -
 31
31 -
 32
32 -
 33
33 -
 34
34 -
 35
35 -
 36
36 -
 37
37 -
38
-
39
-
40
-
41
-
42
-
43
-
44
-
45
-
46
-
47
-
48
 |
 |

32
59
27
87
6
59. Press the Top Cover (27) onto the Top Frame
(6) as shown.
Orient the Burn Band (26) and the Burn Bracket
(14) as shown. Insert the Burn Band into the
Burn Bracket.
Attach the Burn Bracket (14) and the Burn Band
(26) to the Top Frame (6) with two M6 x 45mm
Bolts (85) and two M6 Locknuts (87).
14
85
26
60. Attach one side of the Containment Bracket
(109) to the Center Shroud (33) with two M4 x
12mm Bolts (107) and two M4 Locknuts (108).
Then, attach the other side of the Containment
Bracket (109) to the Right Side Shroud (34) with
two M4 x 12mm Bolts (107) and two M4
Locknuts (108).
Insert the Burn Band (26) through the center of
the Containment Bracket (109).
60
107
107
109
108
108
33
34
26