Weider 9900i Uk Manual - Page 9
M10 x 55mm Bolts 79, two M10 Washers 88
 |
View all Weider 9900i manuals
Add to My Manuals
Save this manual to your list of manuals |
Page 9 highlights
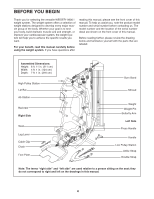
5. Orient the Leg (10) as shown. 5 Attach the Leg (10) to the Base (1) with two M10 x 55mm Bolts (79), two M10 Washers (88), and two M10 Locknuts (74). Do not fully tighten the Locknuts yet. 10 74 74 6. Orient the Seat Tube (8) as shown. Attach the Leg (10) to the Seat Tube (8) with two M10 x 68mm Bolts (66), two M10 Washers (88), and two M10 Locknuts (74). Do not fully tighten the Locknuts yet. Attach the Seat Tube (8) to the Upright (5) with two M10 x 93mm Bolts (63), two M10 Washers (88), and two M10 Locknuts (74). Do not fully tighten the Locknuts yet. See steps 1, 4, 5, and 6. Tighten the M10 Locknuts (74). 1 88 88 79 6 74 74 8 10 74 88 74 5 88 63 66 88 9
-
 1
1 -
2
-
3
-
 4
4 -
 5
5 -
 6
6 -
 7
7 -
 8
8 -
 9
9 -
 10
10 -
 11
11 -
 12
12 -
 13
13 -
 14
14 -
15
-
16
-
17
-
18
-
19
-
20
-
21
-
22
-
23
-
24
-
25
-
26
-
27
-
28
-
29
-
30
-
31
-
32
-
33
-
34
-
35
-
36
-
37
-
38
-
39
-
40
-
41
-
42
-
43
-
44
-
45
-
46
-
47
-
48
 |
 |

9
5.
Orient the Leg (10) as shown.
Attach the Leg (10) to the Base (1) with two
M10 x 55mm Bolts (79), two M10 Washers (88),
and two M10 Locknuts (74).
Do not fully
tighten the Locknuts yet.
5
74
10
88
88
79
1
74
6
8
5
74
6.
Orient the Seat Tube (8) as shown.
Attach the Leg (10) to the Seat Tube (8) with
two M10 x 68mm Bolts (66), two M10 Washers
(88), and two M10 Locknuts (74).
Do not fully
tighten the Locknuts yet.
Attach the Seat Tube (8) to the Upright (5) with
two M10 x 93mm Bolts (63), two M10 Washers
(88), and two M10 Locknuts (74).
Do not fully
tighten the Locknuts yet.
See steps 1, 4, 5, and 6.
Tighten the M10
Locknuts (74).
63
88
74
10
74
74
88
88
66