Whirlpool GBS277PDB Technical Guide - Page 26
Removing The Oven Light Transformer, & The Control Power Transformer
 |
View all Whirlpool GBS277PDB manuals
Add to My Manuals
Save this manual to your list of manuals |
Page 26 highlights
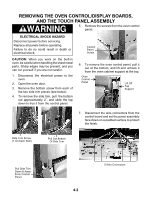
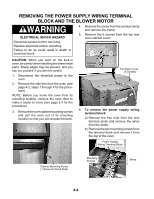
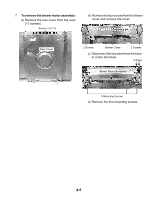
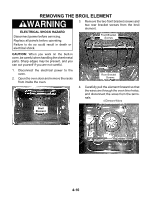
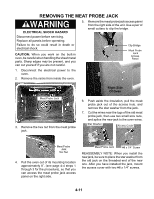
REMOVING THE OVEN LIGHT TRANSFORMER & THE CONTROL POWER TRANSFORMER WARNING ELECTRICAL SHOCK HAZARD 3. Remove the mounting screw from the transformer you are servicing and unhook the tab from the oven chassis slot. Disconnect power before servicing. Replace all panels before operating. Failure to do so could result in death or electrical shock. Light Transformer Transformer Screws CAUTION: When you work on the built-in oven, be careful when handling the sheet metal parts. Sharp edges may be present, and you can cut yourself if you are not careful. Control Pwr Transformer 1. Disconnect the electrical power to the oven. 2. Remove the control panel from the oven (see page 4-2, steps 1 through 6 for the procedure). Position the control panel forward so you can access either transformer. Oven Light & Control Power Transformers 4. Disconnect the four wires from the LOAD and LINE terminals of the transformer. NOTE: The LOAD and LINE terminals are different sizes so that you cannot make a mistake when reconnecting the wires (see below). Light Transformer Control Power Transformer Wht & Blk (Small) (2) Red (Small) Wht & Blk (Large) (2) Blue (Large) 4-6
-
 1
1 -
2
-
3
-
4
-
5
-
6
-
7
-
8
-
9
-
10
-
11
-
12
-
13
-
14
-
15
-
16
-
17
-
18
-
19
-
20
-
 21
21 -
 22
22 -
 23
23 -
 24
24 -
 25
25 -
 26
26 -
 27
27 -
 28
28 -
 29
29 -
 30
30 -
 31
31 -
32
-
33
-
34
-
35
-
36
-
37
-
38
-
39
-
40
-
41
-
42
-
43
-
44
-
45
-
46
-
47
-
48
-
49
-
50
-
51
-
52
-
53
-
54
-
55
-
56
-
57
-
58
-
59
-
60
 |
 |