Whirlpool GBS277PDB Technical Guide - Page 48
Failure/error Display Codes
 |
View all Whirlpool GBS277PDB manuals
Add to My Manuals
Save this manual to your list of manuals |
Page 48 highlights
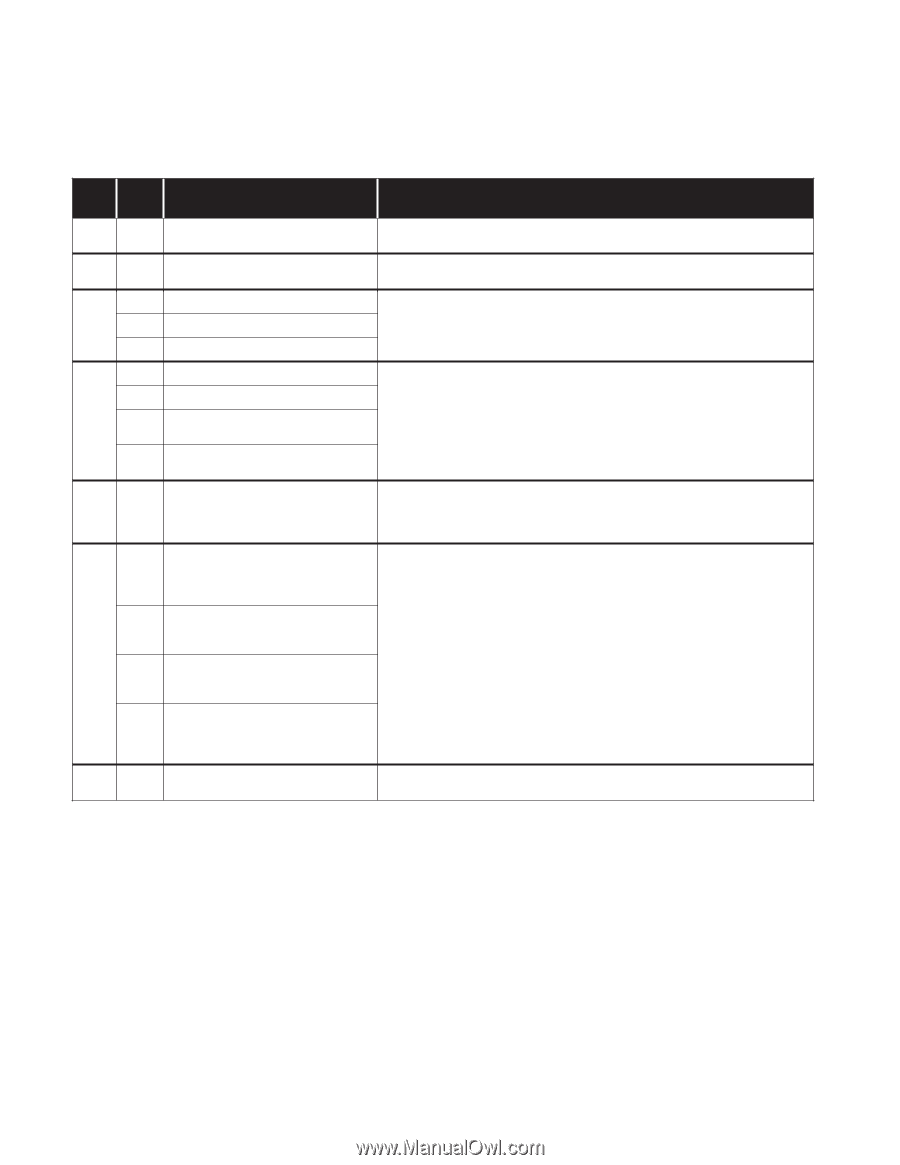
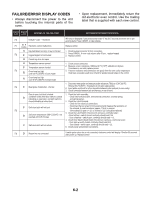
FAILURE/ERROR DISPLAY CODES • Always disconnect the power to the unit before touching the internal parts of the oven. • Upon replacement, immediately return the old electronic oven control. Use the mailing label that is supplied with each new control. FAULT ERROR CODE CODE MEANING OF FAILURE CODE F0 Default F code - No failure F1 All E Codes Electronic control malfunction E0 Key held down too long, or key is shorted F2 E1 Keypad keytail not connected E5 Cancel key drive line open E0 Temperature sensor opened E1 Temperature sensor shorted F3 E2 Oven temp too high (over 301°C [575°F] in Cook mode) E3 Oven temp too high (over 510°C [950°F] in Clean mode) F4 E1 Meat probe malfunction - shorted Door is open, but latch is locked E0 (condition exists when door switch is closed indicating an open door, and latch switch is closed indicating a locked door) E1 Self clean latch will not lock F5 E5 Self clean temperature (288°C [550°F] ) not reached within 45 minutes E7 Self clean latch will not unlock RECOMM ENDED REPAIR PROCEDURE Will only be displayed if user presses and holds "0" key for 5 seconds and there are no preexisting faults. Press CANCEL to clear display. Replace control. 1. Check keypad connector for firm connection. 2. Press CANCEL. If error code returns after 60 sec., replace keypad. 3. Replace control. 1. Check sensor connection. 2. Measure sensor resistance (1080Ω at 21°C [70°F]; add 2Ω per degree). If resistance is not valid, replace sensor. 3. If sensor resistance and connections are good, then the oven cavity temperature must have exceeded a safe level. Check for welded-closed relays on the control. 1. Disconnect meat probe and measure probe resistance: (78kΩ at 15.6°C [60°F]; 37kΩ at 32.2°C [90°F] ). If resistance is not valid, replace probe. 2. Insert probe and check for a firm connection between probe and jack (in oven cavity). 3. Check connection between jack and harness (in rear of oven). 1. Check the latch assembly: - Check latch arm pivot joint, arm/solenoid connection, solenoid spring, and spring washer. 2. Check the Latch Solenoid: - Check for firm electrical connections. - Disconnect the two wires from the solenoid and measure the resistance of the solenoid. A small resistance (approx. 175 Ω) is normal. If the solenoid is open (∞ Ω ) or shorted (0 Ω) it should be replaced. 3. Check the Latch Switch: Disconnect it and use a continuity tester: - Door latched = switch closed, continuity should read 0 Ω. - Door unlatched = switch open, continuity should read ∞ Ω . 4. Check Door Open/Closed Switch. Disconnect it and use a continuity tester: - Door open = switch closed, continuity should read 0 Ω. - Door closed = switch open, continuity should read ∞ Ω . 5. Check power and element connections. F6 E0 Return line not connected If switch pulse return line is not connected, electronic control will display F6 within 60 seconds after power up. Replace control. 6-2
-
 1
1 -
2
-
3
-
4
-
5
-
6
-
7
-
8
-
9
-
10
-
11
-
12
-
13
-
14
-
15
-
16
-
17
-
18
-
19
-
20
-
21
-
22
-
23
-
24
-
25
-
26
-
27
-
28
-
29
-
30
-
31
-
32
-
33
-
34
-
35
-
36
-
37
-
38
-
39
-
40
-
41
-
42
-
 43
43 -
 44
44 -
 45
45 -
 46
46 -
 47
47 -
 48
48 -
 49
49 -
 50
50 -
 51
51 -
 52
52 -
 53
53 -
54
-
55
-
56
-
57
-
58
-
59
-
60
 |
 |