Yamaha DGX-530 Owner's Manual - Page 110
Found New Hardware Wizard. Click [Next]., File Signature Verification], - drivers
 |
UPC - 086792880303
View all Yamaha DGX-530 manuals
Add to My Manuals
Save this manual to your list of manuals |
Page 110 highlights
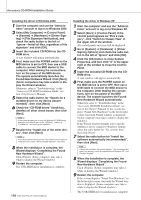
Accessory CD-ROM Installation Guide Installing the driver in Windows 2000 1 Start the computer and use the "Administrator" account to log on to Windows 2000. 2 Select [My Computer] ➔ [Control Panel] ➔ [System] ➔ [Hardware] ➔ [Driver Signing] ➔ [File Signature Verification], and check the radio button to the left of "Ignore-Install all files, regardless of file signature" and click [OK]. 3 Insert the included CD-ROM into the CDROM drive. A start window will appear automatically. 4 First, make sure the POWER switch on the MIDI device is set to OFF, then use a USB cable to connect the MIDI device to the computer. After making the connections, turn on the power of the MIDI device. The system automatically launches the Found New Hardware Wizard. Click [Next]. (Some computers may take a while to display the Wizard window.) Otherwise, refer to "Troubleshooting" in the "Accessory CD-ROM Installation Guide" section of the Owner's Manual. 5 Select the radio button for "Search for a suitable driver for my device [recommended]", then click [Next]. 6 Check the "CD-ROM drives" check box, deselect all other check boxes, then click [Next]. NOTE • If the system prompts you to insert the Windows CD-ROM during detection of the drivers, point to the "USBdrv2k_" folder (e.g., D:\USBdrv2k_) and continue the installation. 7 Deselect the "Install one of the other drivers", then click [Next]. NOTE • If the Wizard panel informs you that "The software you are about to install does not contain a Microsoft digital signature", click [Yes]. 8 When the installation is complete, the Wizard displays "Completing the Found New Hardware Wizard". Click [Finish]. (Some computers may take a while to display the Wizard window.) 9 Restart the computer. The USB-MIDI driver installation is complete. 110 DGX-530/YPG-535 Owner's Manual Installing the driver in Windows XP 1 Start the computer and use the "Administrator" account to log on to Windows XP. 2 Select [Start] ➔ [Control Panel]. If the control panel appears as "Pick a category", click "Switch to Classic View" in the upper left of the window. All control panels and icons will be displayed. 3 Go to [System] ➔ [Hardware] ➔ [Driver Signing Options] and check the radio button to the left of "Ignore" and click [OK]. 4 Click the [OK] button to close System Properties, and then click "X" in the upper right of the window to close the Control Panel. 5 Insert the included CD-ROM into the CDROM drive. A start window will appear automatically. 6 First, make sure the POWER switch on the MIDI device is set to OFF, then use a USB cable to connect the MIDI device to the computer. After making the connections, turn on the power of the MIDI device. The system launches the Found New Hardware Wizard automatically. Otherwise, refer to "Troubleshooting" in the "Accessory CD-ROM Installation Guide" section of the Owner's Manual. If the system displays "Found New Hardware" in the lower right corner, wait until Wizard window is displayed. (Some computers may take a while to display the window.) If the Wizard window prompts you to specify whether or not to connect to Windows Update, select the radio button for "No, not this time", then click [Next]. 7 Select the radio button for "Install the software automatically (recommended)", then click [Next]. NOTE • If during the installation the system displays "...has not passed Win- dows Logo testing to verify its compatibility with Windows XP", click [Continue Anyway]. 8 When the installation is complete, the Wizard displays "Completing the Found New Hardware Wizard". Click [Finish]. (Some computers may take a while to display the Wizard window.) 9 Restart the computer. If the system displays "Found New Hardware" in the lower right corner, wait until the Wizard window is displayed. (Some computers may take a while to display the Wizard window.) The USB-MIDI driver installation is complete.
-
 1
1 -
2
-
3
-
4
-
5
-
6
-
7
-
8
-
9
-
10
-
11
-
12
-
13
-
14
-
15
-
16
-
17
-
18
-
19
-
20
-
21
-
22
-
23
-
24
-
25
-
26
-
27
-
28
-
29
-
30
-
31
-
32
-
33
-
34
-
35
-
36
-
37
-
38
-
39
-
40
-
41
-
42
-
43
-
44
-
45
-
46
-
47
-
48
-
49
-
50
-
51
-
52
-
53
-
54
-
55
-
56
-
57
-
58
-
59
-
60
-
61
-
62
-
63
-
64
-
65
-
66
-
67
-
68
-
69
-
70
-
71
-
72
-
73
-
74
-
75
-
76
-
77
-
78
-
79
-
80
-
81
-
82
-
83
-
84
-
85
-
86
-
87
-
88
-
89
-
90
-
91
-
92
-
93
-
94
-
95
-
96
-
97
-
98
-
99
-
100
-
101
-
102
-
103
-
104
-
 105
105 -
 106
106 -
 107
107 -
 108
108 -
 109
109 -
 110
110 -
 111
111 -
 112
112 -
 113
113 -
 114
114 -
 115
115 -
116
-
117
-
118
-
119
-
120
-
121
-
122
-
123
-
124
-
125
-
126
-
127
-
128
-
129
-
130
-
131
-
132
-
133
-
134
-
135
-
136
-
137
-
138
-
139
-
140
-
141
-
142
-
143
-
144
 |
 |