Yamaha HTR-5590 Owner's Manual - Page 33
Input Modes and Indications, Notes on the digital signal, Notes on playing DTS-CD/LDs
 |
View all Yamaha HTR-5590 manuals
Add to My Manuals
Save this manual to your list of manuals |
Page 33 highlights
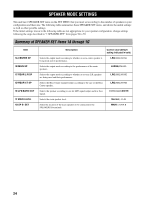
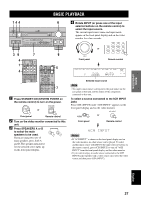
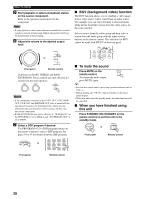
INTRODUCTION PREPARATION BASIC OPERATION Input Modes and Indications This unit comes with various input jacks. You can set the priority of the input signal among different types of input signals. Press MODE (the input selector button that you have pressed to select the input source on the remote control) repeatedly until the desired input mode is shown on the front panel display and on the video monitor. A PHONO TUNER CD or MODE V-AUX CBL/SAT MD/TAPE CD-R D-TV/LD VCR 1 VCR2/DVR DVD Front panel Remote control V AUX VCR2/DVR VCR 1 CBL/SAT D TV/LD DVD MD/TAPE CD R TUNER CD PHONO SP DVD AUTO A VOLUME L R Input mode AUTO: DTS: ANALOG: In this mode, the input signal is automatically selected in the following order: 1) Digital signal 2) Analog signal In this mode, only the digital input signal encoded with DTS is selected even if another signal is input at the same time. In this mode, only the analog input signal is selected even if a digital signal is input at the same time. Notes • If digital signals are input from both the COAXIAL and OPTICAL jacks, the digital signal from the COAXIAL jack has precedence over the OPTICAL jack. • In playing the disc encoded with Dolby Digital or DTS on some LD or DVD players, the sound output delays for a moment when playback resumes after a search because the digital signal is selected again. • When playing the LD source that has not been digitally recorded, the sound may not be output for some LD players. In this case, set the input mode to ANALOG. y • When AUTO is selected, this unit automatically determines the type of signal. If this unit detects a Dolby Digital or DTS signal, the decoder automatically switches to the appropriate setting. • When you turn on the power of this unit, the input mode is set according to "8 INPUT MODE" on the SET MENU (see page 62 for details). BASIC PLAYBACK I Notes on the digital signal The digital input jacks of this unit can handle up to a 96 kHz sampling digital signal. Both OPTICAL and COAXIAL input jacks can be used to input the digital signal up to 48 kHz. However when inputting a higher digital signal than 48 kHz, be aware of the following points. • DSP programs cannot be selected. Sound will be output as normal 2-channel stereo sound from only the left and right main speakers. • Use the coaxial input (COAXIAL IN) jack to input over 96 kHz digital signals. The signals may not be correctly played back if the optical input (OPTICAL IN) jack is used. • Level adjustment for effect speakers other than a subwoofer is not possible. I Notes on playing DTS-CD/LDs • If the digital output data of the player has been processed in any way, you may not be able to perform DTS decoding even if you make a digital connection between this unit and the player. • If you play a source encoded with a DTS signal and set the input mode to ANALOG, this unit reproduces the noise of an unprocessed DTS signal. When you want to play a DTS source, be sure to connect the source to a digital input jack and set the input mode to AUTO or DTS. • If you switch the input mode to ANALOG while playing a source encoded with a DTS signal, this unit reproduces no sound. • If you play a source encoded with a DTS signal with the input mode set to AUTO; - This unit automatically switches to the DTSdecoding mode (The "t" indicator lights up.) after having detected the DTS signal. When playback of the DTS source is completed, the "t" indicator may flash. While this indicator is flashing, only DTS source can be played. If you want to play a normal PCM source soon, set the input mode back to AUTO. - The "t" indicator may flash when a search or skip operation is performed while the DTS source is playing back with the input mode set to AUTO. If this status continues for longer than 30 seconds, this unit will automatically switch from "DTS-decoding" mode to PCM digital signal input mode. The "t" indicator will turn off. ADVANCED OPERATION ADDITIONAL INFORMATION APPENDIX English 29
-
 1
1 -
2
-
3
-
4
-
5
-
6
-
7
-
8
-
9
-
10
-
11
-
12
-
13
-
14
-
15
-
16
-
17
-
18
-
19
-
20
-
21
-
22
-
23
-
24
-
25
-
26
-
27
-
 28
28 -
 29
29 -
 30
30 -
 31
31 -
 32
32 -
 33
33 -
 34
34 -
 35
35 -
 36
36 -
 37
37 -
 38
38 -
39
-
40
-
41
-
42
-
43
-
44
-
45
-
46
-
47
-
48
-
49
-
50
-
51
-
52
-
53
-
54
-
55
-
56
-
57
-
58
-
59
-
60
-
61
-
62
-
63
-
64
-
65
-
66
-
67
-
68
-
69
-
70
-
71
-
72
-
73
-
74
-
75
-
76
-
77
-
78
-
79
-
80
-
81
-
82
-
83
-
84
-
85
-
86
-
87
-
88
 |
 |
