Yamaha HTR-5590 Owner's Manual - Page 65
Input Rename, 7 I/o Assignment, 7a Cmpnt-v Input For, Component Video Input Jacks, A] And [b]
 |
View all Yamaha HTR-5590 manuals
Add to My Manuals
Save this manual to your list of manuals |
Page 65 highlights
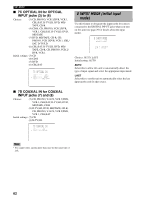
INTRODUCTION PREPARATION BASIC OPERATION 6 INPUT RENAME Use this feature to change the name of the input which appears on the OSD or the front panel display. 1 Press an input selector button (or use INPUT) to select the input you want to change the name of. 6 INPUT RENAME DVD ≥ DVD -/+ : Position / : Character 2 Press AMP to select the AMP AMP mode. 3 Press j / i to place the _ (under-bar) under the space or the character you want to edit. 6 INPUT RENAME DVD ≥ DVD -/+ : Position / : Character 4 Press u/d to select the character you want to use and j / i to move to the next one. • Press d to change the character in the following order, or press u to go in the reverse order. A to Z, a space, 0 to 9, a space, a to z, a space, #, *, +, and so on. • Follow the foregoing procedure to rename other inputs. 6 INPUT RENAME DVD ≥ DVD1 -/+ : Position / : Character SET MENU 7 I/O ASSIGNMENT It is possible to assign jacks according to the component to be used if this unit's COMPONENT VIDEO input jack or DIGITAL INPUT/OUTPUT jack settings (component names for jacks) differ from that component. This makes it possible to change the jack assignment and effectively connect more component. Once you assign, you can select that component with INPUT (or the input selector buttons on the remote control). I 7A CMPNT-V INPUT for COMPONENT VIDEO INPUT jacks [A] and [B] Choices: [A] DVD, V-AUX, VCR 2/DVR, VCR 1, CBL/SAT, D-TV/LD [B] CBL/SAT, D-TV/LD, DVD, V-AUX, VCR 2/DVR, VCR 1 Initial settings: [A] DVD [B] CBL/SAT 7A CMPNT-V INPUT ≥ [A DVD [B CBL/SAT I 7B OPTICAL OUT for OPTICAL OUTPUT jacks (1) and (2) Choices: (1) MD/TAPE, CD-R, CD, PHONO, V-AUX, VCR 2/DVR, VCR 1, CBL/ SAT, D-TV/LD, DVD (2) CD-R, CD, PHONO, V-AUX, VCR 2/ DVR, VCR 1, CBL/SAT, D-TV/LD, DVD, MD/TAPE Initial settings: (1) MD/TAPE (2) CD-R 7B OPTICAL OUT ≥ (1 MD/TAPE (2 CD-R Note • You can use up to 8 characters to rename the inputs. 5 Press i repeatedly to exit from INPUT RENAME. ADVANCED OPERATION ADDITIONAL INFORMATION APPENDIX English 61
-
 1
1 -
2
-
3
-
4
-
5
-
6
-
7
-
8
-
9
-
10
-
11
-
12
-
13
-
14
-
15
-
16
-
17
-
18
-
19
-
20
-
21
-
22
-
23
-
24
-
25
-
26
-
27
-
28
-
29
-
30
-
31
-
32
-
33
-
34
-
35
-
36
-
37
-
38
-
39
-
40
-
41
-
42
-
43
-
44
-
45
-
46
-
47
-
48
-
49
-
50
-
51
-
52
-
53
-
54
-
55
-
56
-
57
-
58
-
59
-
 60
60 -
 61
61 -
 62
62 -
 63
63 -
 64
64 -
 65
65 -
 66
66 -
 67
67 -
 68
68 -
 69
69 -
 70
70 -
71
-
72
-
73
-
74
-
75
-
76
-
77
-
78
-
79
-
80
-
81
-
82
-
83
-
84
-
85
-
86
-
87
-
88
 |
 |
