Yamaha HTR-5590 Owner's Manual - Page 60
SPEAKER SET (speaker mode settings), 1A CENTER SP center speaker
 |
View all Yamaha HTR-5590 manuals
Add to My Manuals
Save this manual to your list of manuals |
Page 60 highlights
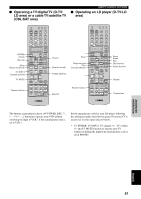
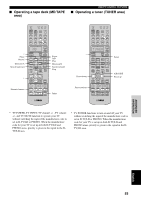
SET MENU 4 Press j / i once to enter the setup mode of the selected item. The last setting you adjusted appears on the video monitor or on the front panel display. + TV VOL CH - PRESET TV MUTE SELECT TV VOL - CH + PRESET 2 LOW FRQ TEST ≥ TEST TONE.........OFF OUTPUT...MAIN L/R FRQ 88Hz Depending on the item, press u/d to select a sub item. + TV VOL CH - PRESET TV MUTE SELECT TV VOL - CH + PRESET 2 LOW FRQ TEST TEST TONE.........OFF ≥ OUTPUT...MAIN L/R FRQ 88Hz 5 Press j / i repeatedly to change the setting of the item. + TV VOL CH - PRESET TV MUTE SELECT TV VOL - CH + PRESET 2 LOW FRQ TEST ≥ TEST TONE............ON OUTPUT...MAIN L/R FRQ 88Hz 6 Press u/d repeatedly until the menu disappears or simply press one of the DSP program group button to exit from the SET MENU. + TV VOL CH - PRESET TV MUTE SELECT TV VOL - CH + PRESET or HALL 1 CHURCH 2 JAZZ CLUB 3 ROCK CONCERT 4 ENTERTAINMENT 5 MUSIC VIDEO 6 TV THEATER 7 MOVIE THEATER 1 8 MOVIE THEATER 2 9 /DTS SUR. 10 0 SELECT 11 +10 EX/ES 12 CHP/INDEX Memory back-up The memory back-up circuit prevents the stored data from being lost even if this unit is in the standby mode. However if the power cord is disconnected from the AC outlet, or the power supply is cut for more than one week, the stored data will be lost. If so, adjust the items again. 1 SPEAKER SET (speaker mode settings) Use this feature to select suitable output modes for your speaker configuration. Notes • When 96-kHz sampling digital signals are input to this unit, level adjustments in items 1B,1E and 1F are possible, but those in items 1A,1C and 1D are not affected. • When 6CH INPUT is selected as the input source, level adjustments in items 1A through 1E are not affected. y • Select SML if the woofer diameter of you speaker is smaller than 16 cm. If it is larger than 16 cm, select LRG. I 1A CENTER SP (center speaker mode) By adding a center speaker to your speaker configuration, this unit can provide good dialog localization for many listeners and superior synchronization of sound and images. The OSD shows a large, small or no center speaker depending on how you set this item. Choices: LRG (large), SML (small), NONE Initial setting: LRG LRG Select this if you have a large center speaker. The entire range of the center channel signal is directed to the center speaker. 1A CENTER SP LRG SML NONE SML Select this if you have a small center speaker. The lowfrequency signals (90 Hz and below) of the center channel are directed to the speakers selected with "1E LFE/BASS OUT". 1A CENTER SP LRG SML NONE NONE Select this if you do not have a center speaker. All of the center channel signal are directed to the left and right main speakers. 1A CENTER SP LRG SML NONE 56
-
 1
1 -
2
-
3
-
4
-
5
-
6
-
7
-
8
-
9
-
10
-
11
-
12
-
13
-
14
-
15
-
16
-
17
-
18
-
19
-
20
-
21
-
22
-
23
-
24
-
25
-
26
-
27
-
28
-
29
-
30
-
31
-
32
-
33
-
34
-
35
-
36
-
37
-
38
-
39
-
40
-
41
-
42
-
43
-
44
-
45
-
46
-
47
-
48
-
49
-
50
-
51
-
52
-
53
-
54
-
 55
55 -
 56
56 -
 57
57 -
 58
58 -
 59
59 -
 60
60 -
 61
61 -
 62
62 -
 63
63 -
 64
64 -
 65
65 -
66
-
67
-
68
-
69
-
70
-
71
-
72
-
73
-
74
-
75
-
76
-
77
-
78
-
79
-
80
-
81
-
82
-
83
-
84
-
85
-
86
-
87
-
88
 |
 |
