Yamaha HTR-5590 Owner's Manual - Page 51
Learn Feature, Programming a new remote, control function
 |
View all Yamaha HTR-5590 manuals
Add to My Manuals
Save this manual to your list of manuals |
Page 51 highlights
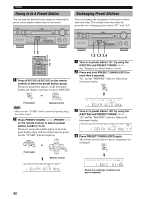
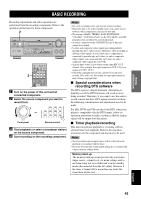
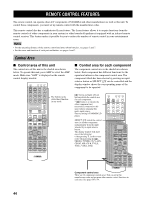
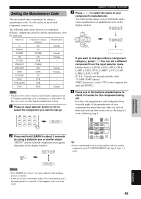
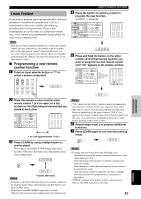
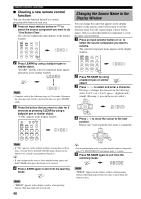
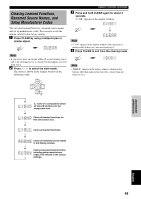
INTRODUCTION PREPARATION REMOTE CONTROL FEATURES Learn Feature If you want to program functions not included in the basic operations covered by the manufacturer code, or a manufacturer code is not available, the following procedure needs to be performed. The possible programming area is the same as a component control area, so the buttons are programmable independently for each source component area. Note • This remote control transmits infrared rays. If the other remote control also uses infrared rays, this remote control can learn most of the other remote control's functions. However, you may not be able to program some special signals or extremely long transmissions. (Refer to the operation instructions for the other remote control.) I Programming a new remote control function 1 Press an input selector button or A to select a source component. SYSTEM POWER STANDBY SLEEP 6CH INPUT A PHONO TUNER CD V-AUX CBL/SAT MD/TAPE CD-R D-TV/LD VCR 1 VCR2/DVR DVD VOL - POWER AV POWER TV AMP + AUDIO POWER TV REC DISC SKIP SELECT POWER AV AMP D-TV/LD VCR 1 VCR2/DVR DVD SELECT V-AUX CBL/SAT MD/TAPE CD-R D-TV/LD VCR 1 VCR2/DVR DVD CD PHONO TUNER A V-AUX CBL/SAT MD/TAPE CD-R SLEEP 6CH INPUT STANDBY SYSTEM POWER CD PHONO TUNER A RE-NAME CLEAR LEARN TRANSMIT 4 Press the button for which you want to program the new function. "LEARN" is displayed. 5 Press and hold the button on the other remote control that has the function you want to program into this remote control until "OK" appears in the display window. SLEEP 6CH INPUT STANDBY SYSTEM POWER RE-NAME CLEAR LEARN TRANSMIT BASIC OPERATION ADVANCED OPERATION ADDITIONAL INFORMATION 2 Place this remote control and the other remote control 1 to 4 cm apart on a flat surface so that their infrared transmitters are aimed at each other. TRANSMIT SYSTEM POWER A STANDBY RE-NAME CLEAR LEARN PHONO TUNER V-AUX CBL/SAT MD/TAPE CD-R D-TV/LD VCR 1 VCR2/DVR DVD POWER TV SLEEP 6CH INPUT POWER AV CD SELECT AMP 1 to 4 cm (approximately 1 inch) 3 Press LEARN by using a ballpoint pen or similar object. Do not press and hold LEARN longer than three seconds. Otherwise this unit enters the manufacturer code setting mode. LEARN Notes Flashes alternately • Complete each of the following steps in 30 seconds. Otherwise, the learning mode will be automatically canceled. In this case, press LEARN again. • Do not press and hold LEARN longer than 3 seconds. Otherwise this unit enters the manufacturer code setting mode. Notes • "NG" appears in the display window when programming has not been done correctly. In this case, start over from step 4. • This remote control can learn approximately 120 functions. However depending on the signals learned, "FULL" may appear in the display window much earlier than this number. In this case, clear unnecessary programmed functions to make further learning on the remote control. 6 Repeat steps 4 and 5 to program additional functions. 7 Press LEARN again to exit from the learning mode. LEARN Notes • Learning may not be possibe in the following cases: - when the batteries in the remote control for this unit or other components are weak - when the distance between the two remote controls is too much or too little - when the remote control infrared windows are not facing at the appropriate angle - when the remote control is exposed to the direct sunlight - when the function to be programmed is continuous or uncommon • "ERROR" appears in the display window when pressing buttons other than indicated in each step. 47 APPENDIX English
-
 1
1 -
2
-
3
-
4
-
5
-
6
-
7
-
8
-
9
-
10
-
11
-
12
-
13
-
14
-
15
-
16
-
17
-
18
-
19
-
20
-
21
-
22
-
23
-
24
-
25
-
26
-
27
-
28
-
29
-
30
-
31
-
32
-
33
-
34
-
35
-
36
-
37
-
38
-
39
-
40
-
41
-
42
-
43
-
44
-
45
-
 46
46 -
 47
47 -
 48
48 -
 49
49 -
 50
50 -
 51
51 -
 52
52 -
 53
53 -
 54
54 -
 55
55 -
 56
56 -
57
-
58
-
59
-
60
-
61
-
62
-
63
-
64
-
65
-
66
-
67
-
68
-
69
-
70
-
71
-
72
-
73
-
74
-
75
-
76
-
77
-
78
-
79
-
80
-
81
-
82
-
83
-
84
-
85
-
86
-
87
-
88
 |
 |
