Yamaha PSR-5700 Owner's Manual (getting Started)
Yamaha PSR-5700 Manual
 |
View all Yamaha PSR-5700 manuals
Add to My Manuals
Save this manual to your list of manuals |
Yamaha PSR-5700 manual content summary:
- Yamaha PSR-5700 | Owner's Manual (getting Started) - Page 1
OWNER'S MANUAL Getting Started BEDIENUNGSANLEITUNG Kurzanleitung MODE D'EMPLOI Pour commencer MANUAL DE INSTRUCCIONES Para empezar - Yamaha PSR-5700 | Owner's Manual (getting Started) - Page 2
this page and those indicated in the safety instruction section. CAUTION RISK OF ELECTRIC SHOCK DO NOT OPEN CAUTION: TO REDUCE THE RISK OF ELECTRIC SHOCK. DO NOT REMOVE COVER (OR BACK). NO USER-SERVICEABLE PARTS INSIDE. REFER SERVICING TO QUALIFIED SERVICE PERSONNEL. The exclamation point within the - Yamaha PSR-5700 | Owner's Manual (getting Started) - Page 3
electronic keyboard. The Yamaha PSR-5700 PortaTone combines the most advanced AWM tone generation technology with state-of-the-art digital electronics and features to give you stunning sound quality with maximum musical enjoyment. The Interactive Accompaniment and Super Style Play features, in - Yamaha PSR-5700 | Owner's Manual (getting Started) - Page 4
provided by the PSR-5700. The Advanced Features manual covers: G The sequencer. G The custom accompaniment programmer. G Custom voice editing. G The PSR-5700's digital effects. G Floppy disk operations. G And a range of other functions including MIDI operations and General MIDI Level 1 protocol - Yamaha PSR-5700 | Owner's Manual (getting Started) - Page 5
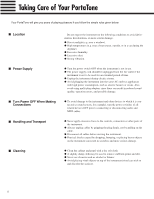
of Your PortaTone Your PortaTone will give Unplug the instrument during electric storms. G Avoid plugging the instrument into the same AC outlet as all related devices OFF prior to connecting or disconnecting audio and MIDI cables. G Never apply excessive force to the controls, connectors - Yamaha PSR-5700 | Owner's Manual (getting Started) - Page 6
, etc.) can cause the disk to become stuck in the disk drive. G The PSR-5700 contains no user serviceable parts. Opening it or tampering with it in anyway can lead to irreparable damage and possibly electric shock. Refer all servicing to qualified YAMAHA personnel. YAMAHA is not responsible for - Yamaha PSR-5700 | Owner's Manual (getting Started) - Page 7
, page 26] ! EXIT Button Advanced Features, page 26] @ TO DISK Button ...... [Advanced Features, page 42] # DISK IN USE Lamp page 40] $ FROM DISK Button [Advanced Features, page 44] 6 % DISK ORCHESTRA/GENERAL MIDI Button page 40, Advanced Features, page 50] ^ ORCHESTRATION Buttons and Indicators - Yamaha PSR-5700 | Owner's Manual (getting Started) - Page 8
7/BASS ACCOMP./RHYTHM O Sequencer/Custom Accompaniment Programmer Control Buttons Advanced Features, page 4~6, 16~17] RECORD DELETE EDIT p (Top) r (Rewind) f (Forward) P PITCH BEND/GLISSANDO Wheel page 37] a MODULATION/EFFECT Wheel page 37] s Disk Drive page 25, 40] d Disk Eject Button page 40 - Yamaha PSR-5700 | Owner's Manual (getting Started) - Page 9
and R jacks deliver the output of the PSR-5700 for connection to a keyboard amplifier, stereo sound system, a mixing console, or tape recorder. If you will be connecting the PSR-5700 to a monaural sound system, use only SELECT" function described on page 37 of the Ad- vanced Features manual. 8 - Yamaha PSR-5700 | Owner's Manual (getting Started) - Page 10
" of several MIDI instruments or other devices. The MIDI OUT connector transmits MIDI data generated by the PSR-5700 (e.g. note and velocity data produced by playing the keyboard). More details on MIDI are provided on page 50 of the Advanced Features manual. The Music Stand The PSR-5700 is supplied - Yamaha PSR-5700 | Owner's Manual (getting Started) - Page 11
sequences DETAIL 100% using the PSR-5700 sequencer functions. Plug the AC power cord into a convenient AC outlet, then press the [POWER] button to turn the PSR-5700 ON. *** YAMAHA PORTATONE *** *** PSR-5700 *** >00:Piano Press the [DEMO] Button DEMO PSR-5700 DEMONSTRATION Song=1 ClubRock - - Yamaha PSR-5700 | Owner's Manual (getting Started) - Page 12
I Before You Begin FUNCTION EXIT Before playing your PSR-5700 for the first time, it might be a until "F6" appears on the LED display (this is the UTILITY mode). Now press the [t] button (HARMONY TYPE) to the right of the LCD panel a few times until the following display appears: A. B. C. MODE s - Yamaha PSR-5700 | Owner's Manual (getting Started) - Page 13
on the keyboard at the same time is reduced. The split point for the PSR-5700 is initially function described on page 40 of the Advanced Features manual. When the "ORCH.2+1" mode is selected and TUBA 48 BRASS 1 49 BRASS 2 BANK 9 90 SPACE PIANO 91 STRINGS & HARPSCD 92 BELL STRINGS 93 CLARINET & - Yamaha PSR-5700 | Owner's Manual (getting Started) - Page 14
Playing the PSR-5700 VOICE PART USTAIN ORCH. 2 ORCH. CUSTOM 1 VOICE Press the [ORCH. 1] or [ORCH. 2] may change slightly at one or more points on the keyboard. Some voices may also shift octaves on some of the lowest and highDETAIL est keys of the keyboard. This is due to the way in which the - Yamaha PSR-5700 | Owner's Manual (getting Started) - Page 15
Playing the PSR-5700 Keyboard Percussion >98:Drum Kit 00:Eurobeat 99:Pop.Drum When voice number 98 (DRUM KIT) or 99 (POP DRUM KIT) is selected, you can play 59 different drums and percussion instruments on the keyboard. The drums and percussion instruments played by the various keys are marked by - Yamaha PSR-5700 | Owner's Manual (getting Started) - Page 16
pitch of the PSR-5700 in a number of ways. TRANSPOSE/TUNE This function allows the overall pitch of the PSR-5700 to be transposed LCD panel). A. B. C. MODE s < > TRANSPOSE/ TUNE t OCTAVE CHANGE HARMONY TYPE Use the left [-] and [+] buttons to set the desired degree of transposition, and - Yamaha PSR-5700 | Owner's Manual (getting Started) - Page 17
panel). A. B. C. MODE s < > TRANSPOSE/ TUNE t OCTAVE CHANGE HARMONY TYPE X Set the Octave Change As Required OCTAVE CHANGE Orc2=Normal Orc1=Normal - + may suddenly shift octaves when played at the extreme ends of the keyboard if they are set to a lower or higher octave than normal. - Yamaha PSR-5700 | Owner's Manual (getting Started) - Page 18
PSR-5700 >00:Piano 1 00 TYPE • REVERB ON/OFF • REVERB TYPE & ORCH. 1/ORCH. 2 DEPTH • EFFECT ON/OFF • EFFECT TYPE & ORCH. 1/ORCH. 2 DEPTH • SUSTAIN ON/OFF (when external SUSTAIN switch not connected) Voice registration data can be saved to floppy disk. See page 46 of the Advanced Features manual - Yamaha PSR-5700 | Owner's Manual (getting Started) - Page 19
hand section of the keyboard (i.e. all keys to the left of and including the split-point key - normally F#2), while the PSR-5700 supplies appropriately orchestrated rhythm, bass, and chord accompaniment in the selected style. The Fingered Chord mode will accept the chord types listed below (notes in - Yamaha PSR-5700 | Owner's Manual (getting Started) - Page 20
keyboard - of course, it's normal to choose a bass voices for the left hand. No automatic bass and chord accompaniment is produced, although the Interactive Accompaniment feature (page 24) does affect the rhythm sound. Voices created using the PSR-5700 Custom Voice feature (Advanced Features manual - Yamaha PSR-5700 | Owner's Manual (getting Started) - Page 21
you intend to play on the right-hand section of the keyboard and the ORCH. 2 voice if you use the split mode, the PSR-5700 automatically determines the voices to be used for the accompaniment bass and chords according the accompaniment style you select. V Set the Tempo - + TEMPO When you select - Yamaha PSR-5700 | Owner's Manual (getting Started) - Page 22
start: Any of the above start types can be synchronized to the first note or chord played on the left-hand section of the keyboard (i.e. keys to the left of the first beat of odd-numbered measures in all time signatures. A Yamaha FC5 footswitch plugged into the rear panel FOOT SW. jack can also be - Yamaha PSR-5700 | Owner's Manual (getting Started) - Page 23
soon as you play any chord that the PSR-5700 can "recognize" on the left-hand section of the keyboard in the FINGERED CHORD mode (see fingering chart keyboard. This automatic switching of the solo mode can be turned off via the Auto Solo function described on page 40 of the Advanced Features manual - Yamaha PSR-5700 | Owner's Manual (getting Started) - Page 24
STOP Using the Accompaniment Section The PSR-5700 provides two types of automatic breaks or "fill the button is released. A Yamaha FC5 footswitch plugged into the rear 37 of the Advanced Features manual. The transitions between the left-hand section of the keyboard while the rhythm is stopped. Please - Yamaha PSR-5700 | Owner's Manual (getting Started) - Page 25
on the keyboard (i.e. play more notes, faster, and/or harder) the PSR-5700 will automatically switch to the VERSE 2 variation to better support what you ACCOMPANIMENT Mode 1 is selected - see page 40 of the Advanced Features manual. I Auto Solo When the AUTO SOLO function is turned ON (ON - Yamaha PSR-5700 | Owner's Manual (getting Started) - Page 26
disk style to the [DISK] style button on the PSR-5700 panel. Z Insert the Data Disk Insert the data disk into the PSR-5700 disk drive (located below the right end of the keyboard) with the disk shutter facing the drive slot and the label side facing upward. X Press [FROM DISK] TO DISK DISK - Yamaha PSR-5700 | Owner's Manual (getting Started) - Page 27
Super Style Play The PSR-5700's 36 internal styles and the external disk style each have 4 different preset "panel setups" that can be instantly selected via the SUPER STYLE PLAY buttons - [VERSE A], [VERSE B], [CHORUS A], and [CHORUS B] - to create different musical textures. The SUPER STYLE PLAY - Yamaha PSR-5700 | Owner's Manual (getting Started) - Page 28
CHORUS 1/2. SUPER STYLE PLAY cannot be used with accompaniment styles created using the Custom Accompaniment feature described on page 15 of the Advanced DETAIL Features manual. Super Style Play setup data can be saved to floppy disk. See page 46 of the Advanced Features manual for details. HINT - Yamaha PSR-5700 | Owner's Manual (getting Started) - Page 29
Using the Pads The PSR-5700 features 8 "PADs" above the keyboard that can be used in a variety of ways: G MULTI: When the MULTI mode is selected, the 4 pads marked "PHRASE" and the 4 pads marked "CHORD" can be used to record and play back short sequences of notes and chords, respectively. G PERC: - Yamaha PSR-5700 | Owner's Manual (getting Started) - Page 30
soon as you play on the keyboard using the ORCHESTRA 1 voice (i.e. the right-hand section of the keyboard if the split play mode or note data played by the phrase pads can not be recorded by the PSR-5700 sequencer (Advanced Features manual, page 3), the phrase pad DETAIL events (i.e. the fact that a - Yamaha PSR-5700 | Owner's Manual (getting Started) - Page 31
keyboard when the AUTO BASS CHORD feature is engaged. The recorded chords can then be played back at any time - even while playing on the keyboard for recording, it will automatically be turned ON. Further, if the MANUAL BASS mode is seDETAIL lected, the FINGERED CHORD mode will automatically be - Yamaha PSR-5700 | Owner's Manual (getting Started) - Page 32
appear on the display, since chord playback will not function in the Manual Bass mode.. Chord pad playback can be recorded by the PSR-5700 sequencer. HINT Chord pad data can be saved to and loaded from disk (Advanced Features manual, page 46), but can not be memorized by the Panel Registration - Yamaha PSR-5700 | Owner's Manual (getting Started) - Page 33
created using the CUSTOM VOICE EDIT functions described on page 27 of the Advanced Features manual cannot be assigned to DETAIL the percussion pads. C Press [REC/STOP] be saved to and loaded from disk (Advanced Features manual, page 45, 46), but can not be memorized by the Panel Registration DETAIL - Yamaha PSR-5700 | Owner's Manual (getting Started) - Page 34
on the assigned instrument, some pads will play continuously as long as they are held. The PERC pad sounds are not affected by the PSR-5700 PITCH BEND wheel or EFFECT settings. DETAIL The PERC BREAK Function MULTI REPEAT PERC. BREAK TEMPO SYNCHRO MODE SELECT If you press the button immediately - Yamaha PSR-5700 | Owner's Manual (getting Started) - Page 35
the [Tap Start] pad can be used to set any desired tempo (within the PSR-5700's 40 to 280 beats per minute range) by simply tapping on the pad at elapse before the required number of taps have been entered, if a different style is selected, or if the accompaniment [STOP] button is pressed. If the - Yamaha PSR-5700 | Owner's Manual (getting Started) - Page 36
G faster 5 faster G a tempo 6 a tempo G slower 7 slower G rit. (Ritardando) 8 rit. Using the Pads Tap the [faster] pad to increase the tempo by a fixed amount, whether the accompaniment is playing or not. If this pad is used during an accelerando or ritardando, the accelerando or ritardando stops - Yamaha PSR-5700 | Owner's Manual (getting Started) - Page 37
on page 38 of the Advanced HINT Features manual. I Harmony ON VOIC ORCH. 2v1 LEFT keyboard produces automatic harmony matched to the accompaniment chords. The type of harmony produced can be selected via the Harmony Type continuously, while decay-type voices such as piano decay more slowly (as - Yamaha PSR-5700 | Owner's Manual (getting Started) - Page 38
from C-1 to C7 (i.e. MIDI note numbers 12 through 108). keyboard. Rolling the MODULATION/EFFECT wheel upward (away from you) increases the effect or modulation depth. Use the WHEEL SELECT function described on page 39 of the Advanced Features manual to select effect or modulation operation. The type - Yamaha PSR-5700 | Owner's Manual (getting Started) - Page 39
Panel Registration The PSR-5700 Panel Registration feature can be used to memorize 16 complete control-panel setups (2 banks, 8 setups each) that you can recall whenever needed. INITIAL PANEL REGIST A1 ROMANTIC PIANO When the PSR-5700 is in its initial factory-preset condition, the panel - Yamaha PSR-5700 | Owner's Manual (getting Started) - Page 40
user registration setup is recalled. DETAIL The preset registration setups can be recalled by using the initialization procedure described on page 50 of the Advanced Features manual. registration data can be saved to floppy disk. See page 46 of the Advanced Features manual for details. HINT 39 - Yamaha PSR-5700 | Owner's Manual (getting Started) - Page 41
while the others are played automatically. • PSR-5700 supports General MIDI Level 1 as well as DOC. For more information, refer to page 50 of the Advanced Features manual. G Automatic Performance Z Insert the DOC Disk X Select a Song Number DISK ORCHESTRA PLAY Song=ALL Mode=L+R - + C Press - Yamaha PSR-5700 | Owner's Manual (getting Started) - Page 42
G Playing Back only Specific Parts DISK ORCHESTRA PLAY Song=ALL Mode=L+R - + By turning off the left- or right-hand melody part, or both, you can practice playing those parts on the PSR-5700 keyboard. Sheet music is provided with the Disk Orchestra Collection disks. Use the [-] and [+] buttons - Yamaha PSR-5700 | Owner's Manual (getting Started) - Page 43
MIDI local control is turned OFF. You have attempted to play a new chord before fully releasing the previous chord in the left-hand section of the keyboard. You are using single-finger type fingering in the fingered mode, or vice-versa. The PSR-5700 is constantly checking for the presence of a disk - Yamaha PSR-5700 | Owner's Manual (getting Started) - Page 44
all tracks AF-11 Delete file AF-47 Demo GS-10 Disk AF-42 Disk error messages AF-48 Disk free area AF-47 Disk functions AF-45 Disk orchestra mode voice list AF-253 Disk orchestra/general MIDI button AF-50 Disk style GS-25 DOC disk playback GS-40 DOC mode AF-52 DOC/GM mode AF-50 Drum - Yamaha PSR-5700 | Owner's Manual (getting Started) - Page 45
Left-hand keyboard section GS-22 Location GS-4 M Manual bass GS-19 Manuals, about the GS-3 Measure/beat AF-19 Memory backup AF-49 Metronome AF-7 MIDI AF-49 MIDI bulk dump AF-58 MIDI channel setting AF-54 MIDI connectors GS-9 MIDI function tree AF-242 MIDI switch AF-56 MIDI system AF - Yamaha PSR-5700 | Owner's Manual (getting Started) - Page 46
Q Quantize AF-10, 21 R Recall initial data AF-50 Record track selection AF-4 Recordable parameters (sequencer AF-4 Recording type AF-8 Release AF-29 Remote control mode AF-52 Remove event AF-13, 23 Rename file AF-46 Replace recording AF-8 Resonance AF-30 Reverb GS-37 Reverb depth AF-35 - Yamaha PSR-5700 | Owner's Manual (getting Started) - Page 47
Fingering Chart/Akkordliste/Tablature/Gráfica de digitación • Notes in parentheses ( ) can be omitted. • Chord types marked with an asterisk (*) can be played in any inversion (i.e. the root does not have to be the lowest note in the chord). • Please determine - Yamaha PSR-5700 | Owner's Manual (getting Started) - Page 48
• Les notes entre parenthèses ( ) peuvent être omises. • Les accords marqués d'un astérisque (*) peuvent être joués dans n'importe qu'elle inversion (il n'est pas nécessaire que la note fondamentale de l'accord soit la note la plus basse). • Veuillez déterminer quels accords que vous allez utiliser - Yamaha PSR-5700 | Owner's Manual (getting Started) - Page 49
Fingering Chart/Akkordliste/Tablature/Gráfica de digitación Minor major seventh* Moll mit großer Septime* Septième majeure mineure* Séptima mayor menor* Seventh* Dur-Septakkord* Septième* Séptima* CmM7 C7 Seventh flatted fifth Dur-Septakkord mit verminderter Quinte Quinte bémol septième Séptima - Yamaha PSR-5700 | Owner's Manual (getting Started) - Page 50
Fingering Chart/Akkordliste/Tablature/Gráfica de digitación Seventh suspended fourth* Septakkord mit vorgehaltener Quarte* Quarte suspendue septième* Séptima cuarta suspendida* Added ninth* Dur-Akkord mit hinzugefügter None* Neuvième ajoutée* Novena añadida* Minor added ninth* Moll-Akkord mit - Yamaha PSR-5700 | Owner's Manual (getting Started) - Page 51
Fingering Chart/Akkordliste/Tablature/Gráfica de digitación Minor seventh ninth* Moll-Septakkord mit hinzugefügter None* Neuvième septième mineure* Manor de séptima novena* Major seventh ninth* Dur-Akkord mit großer Septime und hinzugefügter None* Neuvième septième majeure* Mayor de séptima novena - Yamaha PSR-5700 | Owner's Manual (getting Started) - Page 52
Fingering Chart/Akkordliste/Tablature/Gráfica de digitación Major seventh flatted fifth* Dur-Akkord mit großer Septime und verminderter Quinte* Quinte bémol septième majeure* Mayor de séptima quinta bemol* Augmented Übermäßig Augmenté Aumentada CM7 -5 Caug C(D#bMM77-5-5) DM7 -5 C#aug (Dbaug) - Yamaha PSR-5700 | Owner's Manual (getting Started) - Page 53
type of product to any power supply or adapter other than one described in the owners manual, on the name plate, or specifically recommended by Yamaha electrical service this product beyond that described in the user-maintenance instructions. All other servicing should be referred to qualified service - Yamaha PSR-5700 | Owner's Manual (getting Started) - Page 54
according to the instructions found in the users manual, may cause OFF" and "ON", please try to eliminate the problem by using one of the following measures: Relocate type of product. If you can not locate the appropriate retailer, please contact Yamaha Corporation of America, Electronic Service - Yamaha PSR-5700 | Owner's Manual (getting Started) - Page 55
daß der/die/das Portable Keyboard Typ: PSR-5700 (Gerät, Typ, Bezeichnung) plug. • This applies only to products distributed by Yamaha-Kemble Music (U.K.) Ltd. CANADA THIS DIGITAL APPARATUS DOES DES COMMUNICATIONS DU CANADA. CAUTION: TO PREVENT ELECTRIC SHOCK, MATCH WIDE BLADE OF PLUG TO WIDE - Yamaha PSR-5700 | Owner's Manual (getting Started) - Page 56
-
 1
1 -
 2
2 -
 3
3 -
 4
4 -
 5
5 -
 6
6 -
 7
7 -
8
-
9
-
10
-
11
-
12
-
13
-
14
-
15
-
16
-
17
-
18
-
19
-
20
-
21
-
22
-
23
-
24
-
25
-
26
-
27
-
28
-
29
-
30
-
31
-
32
-
33
-
34
-
35
-
36
-
37
-
38
-
39
-
40
-
41
-
42
-
43
-
44
-
45
-
46
-
47
-
48
-
49
-
50
-
51
-
52
-
53
-
54
-
55
-
56
 |
 |
OWNER’S MANUAL
Getting Started
BEDIENUNGSANLEITUNG
Kurzanleitung
MODE D’EMPLOI
Pour commencer
MANUAL DE INSTRUCCIONES
Para empezar