Yamaha RM1x Owner's Manual - Page 12
Real Time Controller Knobs & [KNOB] Button - used
 |
View all Yamaha RM1x manuals
Add to My Manuals
Save this manual to your list of manuals |
Page 12 highlights
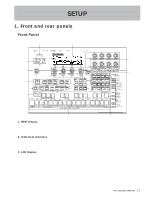
SETUP 4. Display Knobs The four knobs located immediately below the LCD display directly control the corresponding parameters on the display. For example, in the main PATTERN mode Display Knob 1 can be used to select a style, and Display Knob 4 can be used to set the BPM. More details are provided in the "Basic Operation" section beginning on page 23. 5. Function Buttons and Indicators The function buttons - [F1] through [F4] - are similar to the Display Knobs in that they directly control the corresponding functions on the LCD display, but only when the related indicator is lit. More details are provided in the "Basic Operation" section beginning on page 23. 6. VOLUME Control Adjusts the volume of the RM1x audio output via the rear-panel OUTPUT and PHONES jacks. 7. Real Time Controller Knobs & [KNOB] Button These knobs allow the corresponding parameters to be controlled in real time during pattern or song playback. The parameters listed on the panel below the knobs are the default pre-assigned parameters, but other parameters can be assigned as required via the SETUP submode KNOB ASSIGN function (page 74). The knobs can be switched to control one of two different parameter groups - "A" and "B" - via the [KNOB] button. The "A" parameter group (the upper default parameters listed on the panel) are selected when the [KNOB] indicator is lit, and the "B" group (the lower parameters) is selected when the [KNOB] indicator is out. Different parameters can be assigned to both the "A" and "B" groups via the KNOB ASSIGN function mentioned above. 8. Cursor Buttons The cursor buttons move the "cursor" around the LCD display screen, highlighting the various parameters that are available for editing (the RM1x cursor appears as a dark block with inverse characters). 9. [NO -1] and [YES +1] Buttons The [NO -1] and [YES +1] buttons are used to edit (change the value of) the parameter at which the cursor is currently located. The [NO -1] button decrements (decreases stepwise) the value of the selected parameter, while the [YES +1] button increments (increases stepwise) the parameter. Press either button briefly to decrement or increment the parameter by one, or hold the button for continuous decrementing of incrementing in the specified direction. The [NO -1] and [YES +1] button are also used to respond to certain prompts when they appear. Press [YES +1] to go ahead with the operation, or [NO -1] to cancel. 10. DISPLAY [] Buttons When the selected mode or submode (page 23) includes more parameters than can fit on the display at one time, arrow symbols will appear at the left and/or right side of the display to indicate that more parameters are available in the indicated direction(s). The DISPLAY [] buttons can be used to scroll the display in the corresponding direction when this occurs. 11. MODE and SUBMODE Buttons The four MODE buttons select the main RM1x operating modes (PATTERN, PATTERN CHAIN, SONG, and UTILITY), while the SUBMODE buttons select a range of submodes via which you can access the RM1x's detailed programming features. Details on mode and submode selection are provided in the "Basic Operation" section beginning on page 23. 12 RM1x SEQUENCE REMIXER
-
 1
1 -
2
-
3
-
4
-
5
-
6
-
 7
7 -
 8
8 -
 9
9 -
 10
10 -
 11
11 -
 12
12 -
 13
13 -
 14
14 -
 15
15 -
 16
16 -
 17
17 -
18
-
19
-
20
-
21
-
22
-
23
-
24
-
25
-
26
-
27
-
28
-
29
-
30
-
31
-
32
-
33
-
34
-
35
-
36
-
37
-
38
-
39
-
40
-
41
-
42
-
43
-
44
-
45
-
46
-
47
-
48
-
49
-
50
-
51
-
52
-
53
-
54
-
55
-
56
-
57
-
58
-
59
-
60
-
61
-
62
-
63
-
64
-
65
-
66
-
67
-
68
-
69
-
70
-
71
-
72
-
73
-
74
-
75
-
76
-
77
-
78
-
79
-
80
-
81
-
82
-
83
-
84
-
85
-
86
-
87
-
88
-
89
-
90
-
91
-
92
-
93
-
94
-
95
-
96
-
97
-
98
-
99
-
100
-
101
-
102
-
103
-
104
-
105
-
106
-
107
-
108
-
109
-
110
-
111
-
112
-
113
-
114
-
115
-
116
-
117
-
118
-
119
-
120
-
121
-
122
-
123
-
124
-
125
-
126
-
127
-
128
-
129
-
130
-
131
-
132
-
133
-
134
-
135
-
136
-
137
-
138
-
139
-
140
-
141
-
142
-
143
-
144
-
145
-
146
-
147
-
148
-
149
-
150
-
151
-
152
-
153
-
154
 |
 |
