Yamaha SY85 Owner's Manual (getting Started) (image) - Page 54
Record the Next Part, Select the Step Record Mode, Press [RUN]
 |
View all Yamaha SY85 manuals
Add to My Manuals
Save this manual to your list of manuals |
Page 54 highlights
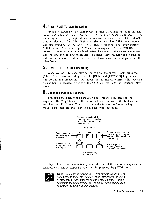
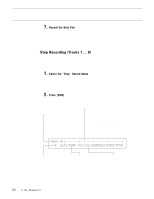
7. Record the Next Part When you're satisfied that the first track is OK, go back to step 3-2 and select a new record track, then record. Continue this process until your composition is complete. For difficult tracks you might want to use the step record mode, described below. s Step Recording (Tracks 1 ... 8) Step recording allows you to input parts note by note, rest by rest, without having to actually play the part on the keyboard. This is ideal for entering difficult parts from written music, or for extremely complex or fast passages that would be impossible to play in real time. 1. Select the "Step" Record Mode The sequencer record mode is entered in the same was as described in the "REALTIME RECORDING" section, above. Instead of choosing the "repl" or "over" record mode, select "step." You can also select a time signature at this point if nothing has been recorded yet. 2. Press [RUN] Press the [RUN] key to call the step record display. Measure & beat number. A measure and beat number display of "M004-03," for example, would mean "fourth measure, third beat." The measure and beat number correspond to the position of the cursor under the step write input display line. Step write input display line. Each dash represents a 32nd beat. Plus signs mark the beginning of each beat specified by the selected time signature. The example below corresponds to a 1/4 ... 4/4 time signature. If an 8-beat time signature (1/8 ... 8/8) were selected, plus signs would appear every 4 32nd beats. The cursor is placed under the appropriate beat of the display line by using the data entry dial. The position of the cursor is also reflected by the measure and beat number displays to the left. M001-01 0``Gate=NORM`Vel=norm[ERASE][PGM]=P¡A1 Note length to be entered. A "0" indicates that no note will be entered. Standard note lengths from 32nd to whole notes, including dotted versions, are displayed in this position in standard written form. Others are displayed as numbers. Gate time. Select "STAC" (staccato), "NORM" or "SLUR" by repeatedly pressing the [F3] function key. "STAC" = 50% gate time. "NORM" = 80% gate time. "SLUR" = 99% gate time. Sets the note velocity value to "norm", "acc1", "acc2", "acc3", or "fix/ kbd". These values can be independently assigned in the utility mode. 52 5. The Sequencer
-
 1
1 -
2
-
3
-
4
-
5
-
6
-
7
-
8
-
9
-
10
-
11
-
12
-
13
-
14
-
15
-
16
-
17
-
18
-
19
-
20
-
21
-
22
-
23
-
24
-
25
-
26
-
27
-
28
-
29
-
30
-
31
-
32
-
33
-
34
-
35
-
36
-
37
-
38
-
39
-
40
-
41
-
42
-
43
-
44
-
45
-
46
-
47
-
48
-
 49
49 -
 50
50 -
 51
51 -
 52
52 -
 53
53 -
 54
54 -
 55
55 -
 56
56 -
 57
57 -
 58
58 -
 59
59 -
60
-
61
-
62
-
63
-
64
-
65
-
66
-
67
-
68
-
69
-
70
-
71
 |
 |
