Zenith H20H52DT Operating Guide
Zenith H20H52DT Manual
 |
View all Zenith H20H52DT manuals
Add to My Manuals
Save this manual to your list of manuals |
Zenith H20H52DT manual content summary:
- Zenith H20H52DT | Operating Guide - Page 1
Model Number H20H52DT HW20H52DT zenith ® Please read this manual carefully before operating your set. Retain it for future reference. Record model number and serial number of the set. See the label attached on the back cover and quote this information to your dealer when you require service. table - Zenith H20H52DT | Operating Guide - Page 2
Support/Service please call: 1-888-865-3026 www.zenith.com WARNING RISK OF ELECTRIC SHOCK RECORD THE MODEL NUMBER The serial number of this HealthViewTM TV is located on the back of the cabinet. For future reference, we suggest that you record the serial number here: MODEL NO. H20H52DT/HW20H52DT - Zenith H20H52DT | Operating Guide - Page 3
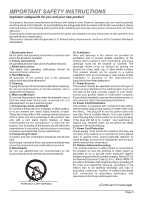
using the new product, and save them for future reference. Observing the simple precautions discussed in this guide should follow the manufacturer's instructions, and should use a mounting accessory recommended by to proper grounding of the mast and supporting structure, grounding of the lead-in - Zenith H20H52DT | Operating Guide - Page 4
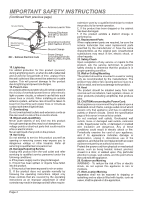
INSTRUCTIONS (Continued from previous page) Ground Clamp Electric Service Equipment NEC - National Electrical Code Antenna Lead in Wire Antenna Discharge Unit (NEC) Section 810-20 Grounding Conductor (NEC Section 810-21) Ground Clamps Power Service the specification page of this owner's manual to - Zenith H20H52DT | Operating Guide - Page 5
output) 9 Pillow Speaker 10 Step 2. Channel Search and Reception Setup Auto Program 11 (Select Antenna, or cable service then do channel search) Front Panel Controls 12 Optional Installer's Remote Key Functions 13 On-Screen Menus Overview 14 Step 3. Customize the TV's Features Setup - Zenith H20H52DT | Operating Guide - Page 6
with the Zenith HealthView TV. RF Coaxial Wire (75 ohm) TV Back ANTENNA CABLE TV SPEAKER M.P.I. PILLOW SPEAKER VIDEO IN SPEAKER OUT AUDIO IN TV Back Panel (Expanded View) TV Back ANTENNA CABLE TV SPEAKER M.P.I. PILLOW SPEAKER VIDEO IN SPEAKER OUT AUDIO IN TV Back Panel (Expanded - Zenith H20H52DT | Operating Guide - Page 7
. If you're using a cable box, Auto Program might only find the channel the cable service is on (usually channel 3 or 4). RF Coaxial Wire (75 ohm) ANTENNA CABLE TV SPEAKER M.P.I. PILLOW SPEAKER VIDEO IN SPEAKER OUT AUDIO IN TV Back Panel (Expanded View) TV Back ANTENNA CABLE TV SPEAKER - Zenith H20H52DT | Operating Guide - Page 8
4 Plug in the TV. The HealthView TV is designed to operate on standard current, 120-volt 60 Hertz AC. Do not attempt to operate it on DC power. Go to page 11 to Auto Program the 5 TV. Page 8 TV Back ANTENNA CABLE TV SPEAKER M.P.I. PILLOW SPEAKER VIDEO IN SPEAKER OUT AUDIO IN TV Back Panel - Zenith H20H52DT | Operating Guide - Page 9
Auto Program the TV. TV Back VCR Back VCR Back AV Panel In output switch 3 4 Out Video Audio Leave the VCR and the television tuned to channel three or four and use the cable box to change channels. ANTENNA CABLE TV SPEAKER M.P.I. PILLOW SPEAKER VIDEO IN SPEAKER OUT AUDIO IN TV Back Panel - Zenith H20H52DT | Operating Guide - Page 10
External Speaker Connection (8-ohm) Connect Speaker out to an 8-ohm speaker as shown. TV Back ANTENNA CABLE TV SPEAKER M.P.I. PILLOW SPEAKER VIDEO IN SPEAKER OUT AUDIO IN TV Back Panel (Expanded View) Speaker Back 8-ohm Speaker In A/V cables not included with TV Page 10 - Zenith H20H52DT | Operating Guide - Page 11
Connect a Pillow Speaker to the HealthView TV. Locate the Pillow Speaker Output jack on 1 the back of the HealthView TV. Connect an accessory pillow speaker or 2 wired remote control unit to this 6-pin jack. Select PILLOW SPKR on the rear panel 3 of the HealthView TV. Use a pillow speaker by Curbell - Zenith H20H52DT | Operating Guide - Page 12
Optional Installer and Patient Remote Controls: Shown herein are optional remote controls that can be used by the installer and the patient. Be advise that these remote controls are NOT included with this TV. However, these remotes can be purchased separately, see your Zenith dealer. Mini Glossary - Zenith H20H52DT | Operating Guide - Page 13
Front Panel Controls Using the front control panel to operate the television. 1 Press the POWER button to turn on the HealthView TV. 2 Use the CHANNEL button to cycle through available channels. 3 Use the VOLUME button to adjust the sound level of the HealthView TV. 4 Press CAPTIONS repeatedly - Zenith H20H52DT | Operating Guide - Page 14
, or User menus. Use SELECT to choose an option and ADJ (adjust) to change the selected option. POWER TV/FM FLSHBK MUTE CC VOLUME + - CHANNEL -+ 1 2 3 4 5 6 7 8 9 0 ENTER BED 1 BED 2 TIMER MENU BANK SELECT CH PREVIEW ADJ ADJ 124-213-06 remote control part number HP602 FLASHBK - Zenith H20H52DT | Operating Guide - Page 15
remote, the installer can accsess all the menus below. Menu Name Page Description Setup Menu Adjusts the basic characteristics of the TV Auto Program 11 Automatically finds and stores active channels to scroll through using Channel Up/Down. Add/Del/Blnk 15 Manually Control 24 with the use - Zenith H20H52DT | Operating Guide - Page 16
Use Channel Up/Down to select the option and choose Added. Note: If the option was turned off in the Service TIMER CAPTIONS LANGUAGE CH 44 ADDED POWER FLSHBK MUTE CC TV/FM 1 VOLUME + - CHANNEL -+ 3 1 2 for good. Just select it using the NUMBER keypad on the remote, or add it later. Mini - Zenith H20H52DT | Operating Guide - Page 17
labels. The 20 programmable labels can be customized for your needs. Each programmable label has 5 characters spaces available. To Program a Channel Label First select a channel using the NUMBER keypad and ENTER or the Channel Up/Down arrows, on the optional Installer's remote control. (To select - Zenith H20H52DT | Operating Guide - Page 18
adjust the clock time one hour, or have the TV adjust it automatically. Manual: User sets the time on the clock. 3 Use ENTER repeatedly to remove menus. AUTO OFF ON AUTO AUTO EASTERN CENTRAL MOUNTAIN PACIFIC MANUAL 10:43 AM TIMER 1 2 3 4 5 6 7 8 9 0 ENTER BED 1 BED 2 TIMER MENU - Zenith H20H52DT | Operating Guide - Page 19
PM ON/OFF TIMER ON On the optional HP602 Installer's remote, press 1 MENU repeatedly until the Setup menu appears. POWER 2 Press to highlight the Timer option, press the Right arrow. TV/FM FLSHBK MUTE CC Use SELECT to choose an option. Use the 3 number keypad and/or the Left/Right ADJ - Zenith H20H52DT | Operating Guide - Page 20
TEXT 1 TEXT 2 TEXT 3 TEXT 4 OFF Use MENU, SELECT, and ADJ Left/Right to choose the optional Installer's remote. POWER FLSHBK MUTE CC TV/FM Quick . Standard closed captioning is available using the Caption 1 option. 0 allow the Concierge TV to receive the the bottom of your TV screen; usually the - Zenith H20H52DT | Operating Guide - Page 21
the Setup menu appears. Use the SELECT key on the remote control, to 2 highlight Language on the screen. Press the Right/Left ADJ arrow to choose one of 3 the following options: English, Spanish or French. 4 Press ENTER to return to TV viewing. POWER TV/FM FLSHBK MUTE CC VOLUME + - CHANNEL - Zenith H20H52DT | Operating Guide - Page 22
SELECT on the installer's remote control, choose Contrast on the screen. 3 Using the Right/Left ADJ arrow, change the contrast 1 level to your preference. 7 8 9 0 ENTER 4 BED 1 BED 2 TIMER MENU BANK 4 Press ENTER, or MENU one more time to return to TV viewing, or repeat from step two to - Zenith H20H52DT | Operating Guide - Page 23
way as described on page 17. For manual clock set, use the number keypad. Use TIMER to change AM/PM, followed 4 by ENTER to clear the screen. 3 Use SELECT to choose which option you wish to set Up. 4 Use ADJ Left/Right to set those options. POWER TV/FM FLSHBK MUTE CC VOLUME + - CHANNEL - Zenith H20H52DT | Operating Guide - Page 24
to the correct time. Set the clock in this menu the same way as described on page 17. To manually set the clock, highlight the Clock Set option, then use the numbers on the remote to enter the current time directly. Press TIMER to choose AM or PM, then press ENTER to remove - Zenith H20H52DT | Operating Guide - Page 25
into the TV's memory. Viewer ratings are specified for both TV and the motion picture industry; both rating systems can be used. The TV to normal operation, if a patient has either forgotten the password or has left Parental Control Block active after departing. On the installer's remote control - Zenith H20H52DT | Operating Guide - Page 26
instructions below to set up and activate Parental Control. SETUP MENU VIDEO MENU AGE BLOCK GENERAL CHILDREN UNBLOCKED Note: Use the installer's remote control to specify Parental Control settings. PARENTAL CONTROL include rating information. Make Parental Control restrictions permanent, with - Zenith H20H52DT | Operating Guide - Page 27
Use the keys indicated below to access these menus and displays, on the optional remote. 20 - - - 32 - - - 44 - - - AUX - - - FM CH TO SELECT , ENTER TO QUIT CC FOR PARENT AL CONTROL Ch Preview Menu Press CH PREV. Displays list of the available TV Channels, AUX source, and patient Parental Control - Zenith H20H52DT | Operating Guide - Page 28
Managing the Channel Banks Using the optional Installer's remote control, the TV has four channel banks, where the administrator or installer can store groups of TV channels. PLANNING THE CHANNEL BANKS Generally, TV channels are grouped into "program packages" with terms that are proposed to the - Zenith H20H52DT | Operating Guide - Page 29
3 All CTV 4 Other Channel Number 1 2 3 4 5 6 7 8 9 10 11 12 13 14 15 16 17 18 19 20 21 22 23 24 25 BC A BC A BC A BC A AA A A AA A A AA A A AA A A D currently available will be deleted. ADD and DEL (not BLNK) can be used independently for channel banks 1, 2, 3, and 4. A channel blanked, is - Zenith H20H52DT | Operating Guide - Page 30
Managing the Channel Banks PLAN YOUR CHANNEL BANKS BY FILLING IN THESE CHARTS (or use photocopies) B A Purpose N K 1 2 3 4 Channel Number 1 2 3 4 5 6 7 8 9 10 11 12 13 14 15 16 17 18 19 20 21 22 23 24 25 B Channel Number A Purpose 26 27 28 29 30 31 32 33 34 35 36 37 38 39 40 - Zenith H20H52DT | Operating Guide - Page 31
make TV operation adjustments. Accessing the Installer's Menu Installer's menus can be accessed by using the optional installer's remote control Not shown here) are service-type adjustments and only qualified 13-I. 14-I. 15-I. 16-I. 17-I. 18-I. 19-I. 20-I. 21-I. 22-I. 23-I. 24-I. 25-I. POWER MANAGE - Zenith H20H52DT | Operating Guide - Page 32
NOT USED NOT USED NOT USED EN. VIDEO COL. FOR. VIDEO M. BCK VIDEO M. EN. PTL. COL. Value Range Default Value 0 / 1 0 0 / 1 2 0 / 1 1 0 / 1 0 0 / 1 0 20 - 1 to disable Vi deo menu. Set to 1 to disable V-Chip (P arental Control) menu. Set to 1 to disable Chann el-Time display. Set to 1 to - Zenith H20H52DT | Operating Guide - Page 33
from either the control panel or remote control. 2-I. AC ON (AC Power Switchable) Allows the TV to turn ON just by applying AC power. Pressing the ON button is not necessary. This is desirable when the TV is plugged into a cable box or a power outlet controlled by a wall switch. Use ADJUST to - Zenith H20H52DT | Operating Guide - Page 34
AFC setting here and add the channels using the ADD/DEL option in the Setup provides full range of volume control. It may be best to set the same value on every TV. NOTE: The minimum volume . The menus can always be accessed with MENU on the remote. 12-I. IR BANKS EN. For direct access to a - Zenith H20H52DT | Operating Guide - Page 35
use Timers.) 17-I. ALARM Gives you the option of making USED 20-I. FEATURE LEVEL Default set to ZEN 1 for Zenith IR remote control operation. Set O, P LBL for Zenith Private Label IR remote control operation. Warning: Do not set to "0" or remote will not control TV. Installer should leave item 20 - Zenith H20H52DT | Operating Guide - Page 36
0 to enable the Video menu. 51 DIS. VCHIP M. Set to 1 to disable the Parental Control menu. Parental Control menu will not appear. Set to 0 to enable the Parental Control menu. 52-I. NOT USED 32-I. TIMING PULSE M.P.I. Communication Parameter. Leave at default setting unless changed by Pay-Per-View - Zenith H20H52DT | Operating Guide - Page 37
. 66-I. NOT USED 67-I. NOT USED 68-I. NOT USED 69-I. EN. CH-T COL. Set to 1 to enable custom color for the ChannelTime display. Set to 0 to disable custom color for the Channel-Time display. 77-I. QUICK SHUTOFF Allows TV power off to be controlled by the pillow speaker channel selection button - Zenith H20H52DT | Operating Guide - Page 38
by removing the blocking hours function. Set to 1 to install Parental Control blocking restrictions permanently. Set to 0 for user-specified hours control of blocking schemes. 85-I. NOT USED 86-I. NOT USED 87-I. NOT USED 88-I. EN NOISE MUTE (Enable Noise Mute) Enables soft mute when a signal - Zenith H20H52DT | Operating Guide - Page 39
SPEAKER M.P.I. PILLOW SPEAKER VIDEO IN SPEAKER OUT AUDIO IN TV Back Panel (Expanded View) RF Coaxial Wire (75 ohm) ANTENNA CABLE TV SPEAKER M.P.I. PILLOW SPEAKER VIDEO IN SPEAKER OUT AUDIO IN TV Back Panel (Expanded View) Connect cable to TV MPI Jack and follow on-screen instructions - Zenith H20H52DT | Operating Guide - Page 40
activate the newly copied setup. • See Troubleshooting to solve problems. A. Set Up a Master TV Using a Zenith Multi-Brand remote like the MBR3447, set up a "Master" TV with custom settings and features as described in the master Tv's operating guide. The master TV's Setup is what you will copy to - Zenith H20H52DT | Operating Guide - Page 41
Clone Selection Menu Choices Typical Edit Channel Labels on-screen menus. THE CLONE HAS CONTROL OF THE TV THE CLONE IS VERSION XX THE TV IS VERSION XX THE SW IS REVISION XX CLONE CLOCK= XX:XX TV CLOCK= XX:XX -PRESS ANY KEY TO CONTINUE. -DISCONNECT CLONE WHEN DONE. EDIT CHANNEL LABELS - Zenith H20H52DT | Operating Guide - Page 42
a Zenith TV equipped with M.P.I. Input TV and connect it to the TV that you want to copy the master TV's setup to. With the "TV is Controlled by Clone" message displayed, press 2 or use either Channel key to go to the "Teach to TV" option, press ON/OFF, POWER, or ENTER. Follow on-screen instructions - Zenith H20H52DT | Operating Guide - Page 43
instructions accompanying the LT2000 clone programmer. Use the printed menu illustrations on the quick setup sheet supplied with the Clone as an aid to making your programming choices. (Although the menus are not all displayed, the clone functions all operate normally). Troubleshooting Problem - Zenith H20H52DT | Operating Guide - Page 44
TV/FM Selects TV or FM radio. VOLUME LEFT/RIGHT Adjusts the sound levels. ENTER Press to view the Channel/Time/Audio Display or to remove any on-screen display or menu. TIMER Press and repeat to use available TV channels and gives hospital patient access to the Parental Control menu. remote control - Zenith H20H52DT | Operating Guide - Page 45
remote and what they do in FM Radio mode. POWER Turns TV On or Off. TV/FM Selects TV or FM radio mode. VOLUME (UP/DOWN) Adjusts the sound levels. TIMER Press and repeat to set the time the TV again or wait a few seconds for Station/Time display.) remote control part number SC637 124-213-05 Page 45 - Zenith H20H52DT | Operating Guide - Page 46
Use the number keys on the remote. Don't forget the password, it is the only way you can access the Parental Control menu and change rating selections, or turn Parental Control off. Do you want Parental Control . You cannot disable Parental Control by disconnecting the TV from power. Block hours - Zenith H20H52DT | Operating Guide - Page 47
instructions below to set up and activate Parental Control. CHANNEL PREVIEW• 5 ---9 ---20 - - - 32 - - - 44 - - - 66 - - - - CH TO SELECT , ENTER TO QUIT CC FOR PARENT AL CONTROL PARENTAL CONTROL remote control. 2 Press CC to access the PARENTAL CONTROL menu. 3 Use Scenes. TV-Y TV-Y7 Children - Zenith H20H52DT | Operating Guide - Page 48
Displays Using the optional remote, press the keys indicated below to access these menus and displays. CHANNEL PREVIEW• 5 ---9 ---20 - - - 32 - - - 44 - - - AUX - - - FM CH TO SELECT, ENTER TO QUIT CC FOR PARENTAL CONTROL Ch Preview Menu Press CH PREV. Displays list of the available TV Channels - Zenith H20H52DT | Operating Guide - Page 49
. Careful and regular cleaning can extend the the useful service life of the TV. Be sure to turn the power off and pull or dish washing detergent. Wring the cloth until it's almost dry, and then use it to wipe the screen. 2. Make sure the excess water is off the screen, and then let it air-dry - Zenith H20H52DT | Operating Guide - Page 50
no sound. • Check volume levels. • Make sure the TV sound is not Muted. • Try another channel. The problem may be the broadcast, not the TV. • Is TV SPKR selected on TV back connections panel? • Is PILLOW SPKR selected on TV back connections panel but no pillow speaker connected? • Is the wire for - Zenith H20H52DT | Operating Guide - Page 51
is one channel of sound. On more than one speaker, all the speakers play the same audio. Multiple Protocol Interface: Zenith protocol for external control of TV through RJ11 (M.P.I.) Input jack on TV connections panel. (M.P.I. jack is used for cloning TV's features.) Refers to the jack that sends - Zenith H20H52DT | Operating Guide - Page 52
date of original installation. Before you ask for warranty service, read "Maintenance and Troubleshooting" in the operating guide. You might avoid a service call. For Customer Support/Service Please call: 1-888-865-3026 www.zenith.com © Copyright 2004 Zenith Electronics Corporation 3828VA0518B a
-
 1
1 -
 2
2 -
 3
3 -
 4
4 -
 5
5 -
 6
6 -
 7
7 -
8
-
9
-
10
-
11
-
12
-
13
-
14
-
15
-
16
-
17
-
18
-
19
-
20
-
21
-
22
-
23
-
24
-
25
-
26
-
27
-
28
-
29
-
30
-
31
-
32
-
33
-
34
-
35
-
36
-
37
-
38
-
39
-
40
-
41
-
42
-
43
-
44
-
45
-
46
-
47
-
48
-
49
-
50
-
51
-
52
 |
 |

Internet Home Page : http://www.zenith.com
P/N : 3828VA0518B
(FCH-50)
I n s t a l l a t i o n
a n d
O p e r a t i n g
G u i d e
Warranty
t a b l e
o f
c o n t e n t s
p a g e
5
Model Number
H20H52DT
Please read this manual carefully before operating your set.
Retain it for future reference. Record model number and serial number of the set.
See the label attached on the back cover and quote this information to your dealer
when you require service.
zenith
®
a
H
W
20H52DT