2006 Subaru Impreza Owner's Manual - Page 242
2006 Subaru Impreza Manual
Page 242 highlights
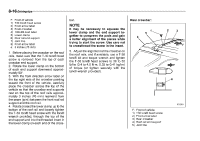
Driving tips 8-15 your vehicle” section in this chapter for information on loading cargo into or onto your vehicle. The maximum load limit of the cargo, crossbars and carrying attachment must not exceed 100 lbs (45 kg). Place the heaviest load at the bottom, nearest the roof, and evenly distribute the cargo. Always properly secure all cargo. For cargo carrying purposes, the roof rail must be used together with a roof crossbar kit and the appropriate carrying attachment. The roof rail must never be used alone to carry cargo. Otherwise, damage to the roof or paint or a dangerous road hazard due to loss of cargo could result. When using the roof crossbar kit, make sure that the total weight of the crossbars, carrying attachment and cargo does not exceed the maximum load limit. Overloading may cause damage to the vehicle and create a safety hazard. carrier, cargo basket, etc. on the crossbars, follow the manufacturer’s instructions and make sure that the attachment is securely fixed to the crossbars. Use only attachments designed specifically for the crossbars. A set of the crossbars is designed to carry loads (cargo and attachment) of not more than 100 lbs (45 kg). Before operating the vehicle, make sure that the cargo is properly secured on the attachment. 3. Carefully raise the crossbar from roof rails. To install the crossbar Front crossbar: Front crossbar has 100 LBS. Load Label on left-hand side. 1 2 3 4 5 a F NOTE Remember that the vehicle’s center of gravity is altered with the weight of the load on the roof, thus affecting the driving characteristics. Drive carefully. Avoid rapid starts, hard cornering and abrupt stops. Crosswind effects will be increased. Removal and installation of the crossbars The crossbars can be removed when you do not use the roof to carry cargo. To remove the crossbar 1. Loosen and remove the T-30 torx® head screw from the top of each crossbar end support. 2. Rotate the lower clamp on the bottom of each end support downward approximately 90. 6 7 F 8 Installing carrying attachments on the crossbars When installing any carrying attachment such as a bike carrier, ski carrier, kayak 800263 – CONTINUED –
-
 1
1 -
2
-
3
-
4
-
5
-
6
-
7
-
8
-
9
-
10
-
11
-
12
-
13
-
14
-
15
-
16
-
17
-
18
-
19
-
20
-
21
-
22
-
23
-
24
-
25
-
26
-
27
-
28
-
29
-
30
-
31
-
32
-
33
-
34
-
35
-
36
-
37
-
38
-
39
-
40
-
41
-
42
-
43
-
44
-
45
-
46
-
47
-
48
-
49
-
50
-
51
-
52
-
53
-
54
-
55
-
56
-
57
-
58
-
59
-
60
-
61
-
62
-
63
-
64
-
65
-
66
-
67
-
68
-
69
-
70
-
71
-
72
-
73
-
74
-
75
-
76
-
77
-
78
-
79
-
80
-
81
-
82
-
83
-
84
-
85
-
86
-
87
-
88
-
89
-
90
-
91
-
92
-
93
-
94
-
95
-
96
-
97
-
98
-
99
-
100
-
101
-
102
-
103
-
104
-
105
-
106
-
107
-
108
-
109
-
110
-
111
-
112
-
113
-
114
-
115
-
116
-
117
-
118
-
119
-
120
-
121
-
122
-
123
-
124
-
125
-
126
-
127
-
128
-
129
-
130
-
131
-
132
-
133
-
134
-
135
-
136
-
137
-
138
-
139
-
140
-
141
-
142
-
143
-
144
-
145
-
146
-
147
-
148
-
149
-
150
-
151
-
152
-
153
-
154
-
155
-
156
-
157
-
158
-
159
-
160
-
161
-
162
-
163
-
164
-
165
-
166
-
167
-
168
-
169
-
170
-
171
-
172
-
173
-
174
-
175
-
176
-
177
-
178
-
179
-
180
-
181
-
182
-
183
-
184
-
185
-
186
-
187
-
188
-
189
-
190
-
191
-
192
-
193
-
194
-
195
-
196
-
197
-
198
-
199
-
200
-
201
-
202
-
203
-
204
-
205
-
206
-
207
-
208
-
209
-
210
-
211
-
212
-
213
-
214
-
215
-
216
-
217
-
218
-
219
-
220
-
221
-
222
-
223
-
224
-
225
-
226
-
227
-
228
-
229
-
230
-
231
-
232
-
233
-
234
-
235
-
236
-
 237
237 -
 238
238 -
 239
239 -
 240
240 -
 241
241 -
 242
242 -
 243
243 -
 244
244 -
 245
245 -
 246
246 -
 247
247 -
248
-
249
-
250
-
251
-
252
-
253
-
254
-
255
-
256
-
257
-
258
-
259
-
260
-
261
-
262
-
263
-
264
-
265
-
266
-
267
-
268
-
269
-
270
-
271
-
272
-
273
-
274
-
275
-
276
-
277
-
278
-
279
-
280
-
281
-
282
-
283
-
284
-
285
-
286
-
287
-
288
-
289
-
290
-
291
-
292
-
293
-
294
-
295
-
296
-
297
-
298
-
299
-
300
-
301
-
302
-
303
-
304
-
305
-
306
-
307
-
308
-
309
-
310
-
311
-
312
-
313
-
314
-
315
-
316
-
317
-
318
-
319
-
320
-
321
-
322
-
323
-
324
-
325
-
326
-
327
-
328
-
329
-
330
-
331
-
332
-
333
-
334
-
335
-
336
-
337
-
338
-
339
-
340
-
341
-
342
-
343
-
344
-
345
-
346
-
347
-
348
-
349
-
350
-
351
-
352
-
353
-
354
-
355
-
356
-
357
-
358
-
359
-
360
-
361
-
362
-
363
-
364
-
365
 |
 |
