3Com 3CRWE454G72 User Guide - Page 19
Powering Up the Access Point, Access Point. - connect
 |
View all 3Com 3CRWE454G72 manuals
Add to My Manuals
Save this manual to your list of manuals |
Page 19 highlights
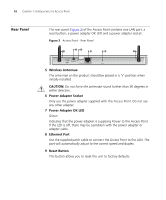
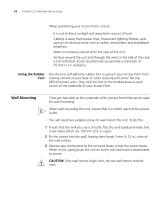
Powering Up the Access Point 19 Powering Up the Access Point To power up the Access Point: 1 Plug the power adapter into the power adapter socket located on the back panel of the Access Point. 2 Plug the power adapter into a standard electrical wall socket. Connecting the Access Point The first step for installing your Access Point is to physically connect it to a switch or hub. See Figure 4. Figure 4 Connecting the Access Point Hub / Switch WLAN LAN Status Alert 3CRWE41196 OfficeConnect 11Mbps Wireless Access Point OfficeConnect Wireless Access Point Wireless users To use your Access Point to connect to the wireless LAN to the wired LAN: 1 Insert one end of the supplied Ethernet (RJ-45 Category 5) cable into the LAN port on the rear panel of the Access Point. 2 Insert the other end of the cable into the RJ-45 port on switch or hub. Check that the LAN status LED lights on the Access Point. You have now completed the hardware installation of your Access Point. Next you need to set up your computers so that they connect to the Access Point.
-
 1
1 -
2
-
3
-
4
-
5
-
6
-
7
-
8
-
9
-
10
-
11
-
12
-
13
-
 14
14 -
 15
15 -
 16
16 -
 17
17 -
 18
18 -
 19
19 -
 20
20 -
 21
21 -
 22
22 -
 23
23 -
 24
24 -
25
-
26
-
27
-
28
-
29
-
30
-
31
-
32
-
33
-
34
-
35
-
36
-
37
-
38
-
39
-
40
-
41
-
42
-
43
-
44
-
45
-
46
-
47
-
48
-
49
-
50
-
51
-
52
-
53
-
54
-
55
-
56
-
57
-
58
-
59
-
60
-
61
-
62
-
63
-
64
-
65
-
66
-
67
-
68
-
69
-
70
-
71
-
72
-
73
-
74
-
75
-
76
-
77
-
78
-
79
-
80
-
81
-
82
-
83
-
84
-
85
-
86
-
87
-
88
-
89
-
90
-
91
-
92
-
93
-
94
-
95
-
96
-
97
-
98
-
99
-
100
-
101
-
102
 |
 |
