Acer AcerPower Sd Power Sd User Guide - Page 78
Insert the new hard disk 1 and secure it with the three screws you, previously removed 2
 |
View all Acer AcerPower Sd manuals
Add to My Manuals
Save this manual to your list of manuals |
Page 78 highlights
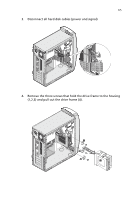
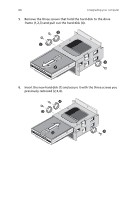
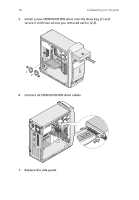
66 4 Upgrading your computer 5. Remove the three screws that hold the hard disk to the drive frame (1,2,3) and pull out the hard disk (4). 6. Insert the new hard disk (1) and secure it with the three screws you previously removed (2,3,4).
-
 1
1 -
2
-
3
-
4
-
5
-
6
-
7
-
8
-
9
-
10
-
11
-
12
-
13
-
14
-
15
-
16
-
17
-
18
-
19
-
20
-
21
-
22
-
23
-
24
-
25
-
26
-
27
-
28
-
29
-
30
-
31
-
32
-
33
-
34
-
35
-
36
-
37
-
38
-
39
-
40
-
41
-
42
-
43
-
44
-
45
-
46
-
47
-
48
-
49
-
50
-
51
-
52
-
53
-
54
-
55
-
56
-
57
-
58
-
59
-
60
-
61
-
62
-
63
-
64
-
65
-
66
-
67
-
68
-
69
-
70
-
71
-
72
-
 73
73 -
 74
74 -
 75
75 -
 76
76 -
 77
77 -
 78
78 -
 79
79 -
 80
80 -
 81
81 -
 82
82 -
 83
83 -
84
-
85
-
86
-
87
-
88
-
89
-
90
-
91
-
92
-
93
-
94
-
95
-
96
-
97
-
98
-
99
-
100
 |
 |

4 Upgrading your computer
66
5.
Remove the three screws that hold the hard disk to the drive
frame (1,2,3) and pull out the hard disk (4).
6.
Insert the new hard disk (1) and secure it with the three screws you
previously removed (2,3,4).