Acer AcerPower Sd Power Sd User Guide - Page 79
floppy drive frame latches 3., c. Secure the drive by using the three screws 4
 |
View all Acer AcerPower Sd manuals
Add to My Manuals
Save this manual to your list of manuals |
Page 79 highlights
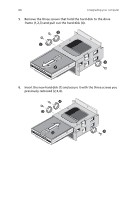
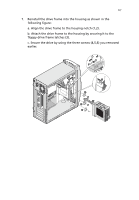
67 7. Reinstall the drive frame into the housing as shown in the following figure: a. Align the drive frame to the housing notch (1,2). b. Attach the drive frame to the housing by securing it to the floppy drive frame latches (3). c. Secure the drive by using the three screws (4,5,6) you removed earlier.
-
 1
1 -
2
-
3
-
4
-
5
-
6
-
7
-
8
-
9
-
10
-
11
-
12
-
13
-
14
-
15
-
16
-
17
-
18
-
19
-
20
-
21
-
22
-
23
-
24
-
25
-
26
-
27
-
28
-
29
-
30
-
31
-
32
-
33
-
34
-
35
-
36
-
37
-
38
-
39
-
40
-
41
-
42
-
43
-
44
-
45
-
46
-
47
-
48
-
49
-
50
-
51
-
52
-
53
-
54
-
55
-
56
-
57
-
58
-
59
-
60
-
61
-
62
-
63
-
64
-
65
-
66
-
67
-
68
-
69
-
70
-
71
-
72
-
73
-
 74
74 -
 75
75 -
 76
76 -
 77
77 -
 78
78 -
 79
79 -
 80
80 -
 81
81 -
 82
82 -
 83
83 -
 84
84 -
85
-
86
-
87
-
88
-
89
-
90
-
91
-
92
-
93
-
94
-
95
-
96
-
97
-
98
-
99
-
100
 |
 |

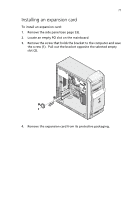
67
7.
Reinstall the drive frame into the housing as shown in the
following figure:
a. Align the drive frame to the housing notch (1,2).
b. Attach the drive frame to the housing by securing it to the
floppy drive frame latches (3).
c. Secure the drive by using the three screws (4,5,6) you removed
earlier.