Adobe 23101764 Tutorial - Page 26
Resizing To A Specific Size
 |
UPC - 718659340025
View all Adobe 23101764 manuals
Add to My Manuals
Save this manual to your list of manuals |
Page 26 highlights
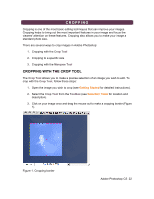
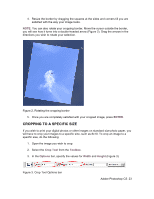
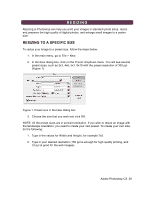
RESIZING Resizing in Photoshop can help you print your images in standard photo sizes, resize and preserve the high quality of digital photos, and enlarge small images to a poster size. RESIZING TO A SPECIFIC SIZE To resize your image to a preset size, follow the steps below: 1. In the main menu, go to File > New. 2. In the New dialog box, click on the Preset dropdown menu. You will see several preset sizes, such as 2x3, 4x6, 5x7, 8x10 with the preset resolution of 300 ppi (Figure 1). Figure 1. Preset size in the New dialog box 3. Choose the size that you wish and click OK. NOTE: All the preset sizes are in portrait orientation. If you wish to resize an image with the landscape orientation, you need to create your own preset. To create your own size, do the following: 1. Type in the values for Width and Height, for example 7x5. 2. Type in your desired resolution (150 ppi is enough for high quality printing, and 72 ppi is good for the web images). Adobe Photoshop CS 26
-
 1
1 -
2
-
3
-
4
-
5
-
6
-
7
-
8
-
9
-
10
-
11
-
12
-
13
-
14
-
15
-
16
-
17
-
18
-
19
-
20
-
 21
21 -
 22
22 -
 23
23 -
 24
24 -
 25
25 -
 26
26 -
 27
27 -
 28
28 -
 29
29 -
 30
30 -
 31
31 -
32
-
33
-
34
-
35
-
36
-
37
-
38
-
39
 |
 |
